Sometimes it may happen is that you may try to delete something from your computer but won’t be able to do it and an error message will pop-up stating- “Can’t delete; folder is in use by Explorer.exe“. You will not be able to remove the directory completely unless you stop the explorer process first. Follow these simple processes first to stop the explorer process and then delete the file from Command Prompt.

Preliminary Fixes
Restart Computer and then try to delete again
Fix-1 Delete the folder using CMD command-
End the Explorer process and then delete the folder from Command Prompt.
1 – Close the program shown in the error message.
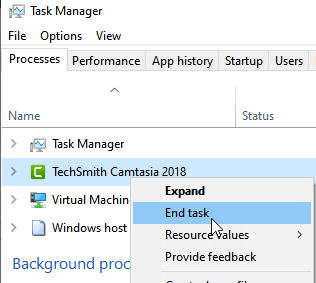
2 – Press CTRL+SHIFT+Esc keys together to open task manager.
3 – Now, Right click and choose end task for that program in Task manager .

4 – First, press Windows key+E to access the File Explorer.
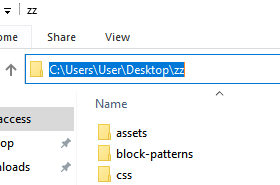
5 – When the File Explorer window appears, navigate to the problematic folder.
6 – Note down the file path from the address bar.

7 – Search “cmd” in the Search box beside the Windows icon.
8 – Then, what you need to do is to right-click on “Command Prompt” in the elevated search result and choose “Run as administrator“.

9. Now, maximize Command Prompt window.
10. Next, copy this command and paste it in Command Prompt window and modify it according to the folder path and then hit Enter to execute it.
del folder path
[NOTE– Replace the folder path with the location of the problematic folder you noted. For us, the command will look like something like this- “rd /s C:\Users\User\Desktop\zz“.]
That should remove the folder from your computer.
Reboot your computer.
Fix-2 Use Process Explorer
Process Explorer is a tool provided by Microsoft which allows a deeper look into the detection of any associated process preventing any particular service on your computer.
1. At first, you need to download Process Explorer.
2. Once you have downloaded the file, you have to extract the “ProcessExplorer” zip file.

3. After that, you have to go to the location where you have just extracted the zip file.
4. Then, double click on the “procexp64“.
(NOTE–
In case if you are using 32-bit Windows 10 or windows 11 , you should run “procexp” on your computer).

5. When the Process Explorer window appears on your computer, click on “Find”
6. After that, simply click on “Find Handle or DLL…“.

7. As the Process Explorer Search panel opens up, enter the name of the problematic file beside ‘Handle or DLL substring:‘.
(For us, it is “7-zip“).
8. Then, click on “Search” to start the searching process.

9. You need to wait for a while.
10. Once the searching process is over, in the Process Explorer window, the related process will be highlighted.
11. After that, right-click on the “explorer.exe” process and click on “Close handle” to terminate the process.

After doing all these, close the Process Explorer window.
Again, try to delete the file/ folder again using cmd. This time it will be deleted without any further issue.
Fix 3 – Disable Preview pane
1 – Press Windows and E key together to open file explorer
2 – Now, Click on View Tab
3 – Make sure Preview pane is not selected. Click on Preview Pane if it is selected to uncheck this option

Fix 4 – Delete the folder in safe mode
1 – Press Windows and R key to Open run
2 -Type MSCONFIG in it and click OK

3 -Now, Click Boot Tab
4 – Select Safe mode
5 – Click Apply and Ok

6 – When you enter safe mode, try to delete the folder again
Fix 5 – Edit File explorer Options
1 – Search File explorer Options and click on it

2 – Click on View tab
3 – Make sure Launch folder windows in a seperate process
4 -Click Apply and OK

Your problem will be solved.