Is the printer on your computer not working after the system received an update? Some Windows 10 users have actually complained about this issue in the forum. Though this problem may have occurred due to the recently installed update on the system, there is a chance that the problem is in the printer itself.
Fix 1 – Power Cycle the printer
Power cycling the printer should work in this case.
Steps to shutdown the printer-
1. At first, switch ON your printer.
2. While the printer is ON, simply take out the ink cartridges from it.
3. Then, you can turn OFF the printer simply by pressing the power switch.
4. Once you are sure that the printer is off, unplug the printer cables from your system.
4. Next, shut down your computer.
5. Ultimately, switch OFF the WiFi router (if your printer supports wireless printing)
Then, just wait for a minute.
Steps to startup the system-
Follow these steps to start up the system.
1. After waiting for a minute, switch ON the printer.
2. Then, put the cartridge back in your printer.
3. Next, it is time to switch ON your system.
4. If you were using the WiFi, turn ON the WiFi router to complete the process.
Fix 2 – Uninstall the recently installed update
You can uninstall the recently installed update from the computer.
Step 1 – Uninstall older Windows Update
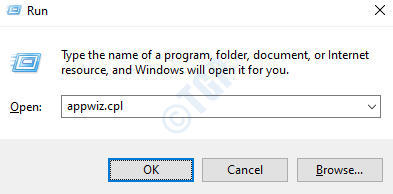
1. At first, press the Windows key+R keys together.
2. Then, write “appwiz.cpl” and click on “OK“.

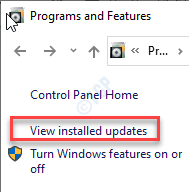
3. After the Program and Features window opens up, click on “View installed updates“.

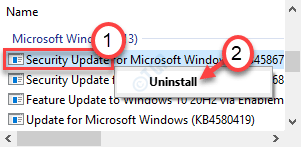
4. Now, simply scroll down to find out the most recent update that may have caused the issue.
5. Right-click on it and click on “Uninstall“.

This will uninstall the update from your computer.
Now, just restart your computer.
Step 2 – Stall the update
You can defer the Windows Update up to 35 days.
1. Open the Settings window by pressing the Windows key+I keys together.
2. Then, click on the “Update & Security“.

3. Then, on the left-hand side, click on the “Windows Update“.
4. Next, click on the “Advanced options“.

5. Now, scroll down to see the ‘Pause Updates‘ settings.
6. Then, select the last date in the list of dates.

This should fix the problem and restart your computer.
Fix 3 – Run the system restore
If uninstalling the latest update patch is not working for you, try restoring the computer using system restore.
1. Press the Windows key+R keys together. Type “rstrui“.
2. Then, click on the “OK“.

3. When the System Restore window appears, click on “Next“.

4. Now, check on the “Show more restore points” box.
You will see more restore points on the screen.

5. Here choose the restore point by date before this Windows Update was installed.
6. Click on “Next“.

7. Simply click on “Finish” to end the process.
As soon as you click on the ‘Finish’ option, the restoring process will commence.

Your computer will reboot and the System Restore will restore the system to the date before the installation of the problematic update.
Fix 4 – Reset the Printer Spooler service
You have to restart the printer spooler service.
1. At first, press the Windows key+R keys together.
2. Then, type “services.msc” and hit Enter.

3. Here you will notice all the services associated with your computer.
4. Now, double-click on the “Print Spooler” service once you have noticed it.

4. Just set up the ‘Startup type:’ to the “Automatic” setting.
5. After that, you need to click on “Stop” to terminate the service.

6. To save the setting click on “Apply” and “OK“.

Now, minimize the Services utility.
7. Press Windows key+E to open the Run window.
8. Then, go to this location 0n the file explorer.
C:\WINDOWS\system32\spool\PRINTERS
9. Trying to access the folder you may see a prompt, click on “Continue“.

10. You have to select all the files and folders inside the PRINTERS folder.
11. To delete the contents of the folder, press the ‘Delete‘ key.

Close the File Explorer window.
Maximize the Services screen.
12. Finally, right-click on the “Print Spooler” service.
13. Then, click on “Start” to resume the service.

Close the Services screen on your computer.
Fix 5 – Troubleshoot the printer
Troubleshoot this problem after the Windows Update with
1. First of all, press the Windows button and the ‘S‘ key and write “Troubleshoot“.
2. Simply, hit the “Enter” key.

3. Then you have to scroll down and click on the “Additional Troubleshooters“.

4. On the right-hand side, scroll down and click on the “Printer“.
5. Next, click on “Run the troubleshooter” to run the troubleshooter.

6. Then, click on the “Advanced” to view the advanced settings of the printer diagnostics.

7. Just, check the box “Apply repairs automatically“.
8. After that, go to the next step, click on “Next“.

9. After this, select your printer from the list of devices.
10. Then, again click on “Next“.

11. After that, click on “Apply this fix“.

Finally, close the troubleshooter screen when the troubleshooting process is complete. Check whether you are seeing the
Fix 6 – Uninstall and reinstall the printer device
1. Pressing Windows key+R should open the Run window.
2. Type “devmgmt.msc” and click on “OK“.

3. In the Device Manager window, expand the “Print queue” section.
4. Then, right-click on the printer and click on “Uninstall device“.

5. Again, click on “Uninstall” to confirm the uninstallation process.

Then, close the Device Manager window.