After installing the May 2019 Update from Microsoft, users have reported that when there are several Sticky notes opened in the system, instead of showing all the sticky notes with one single icon in the taskbar, every note is shown as a separate icon. Let’s say there are 10 sticky notes open, there will be 10 Sticky notes icons in the taskbar, consuming all the space on the taskbar.
This is because of the design changes that Microsoft implemented in the Sticky Notes application. Although there is no direct way to fix this issue. There are several workarounds and options that can be implemented so that working with this new design of Sticky Notes can be managed.
Workaround 1: Combine and Hide Labels for the Task Bar Buttons
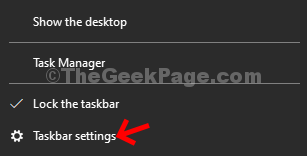
Step 1: Right-click anywhere on an empty area of the taskbar
Step 2: Choose Taskbar Settings from the context menu

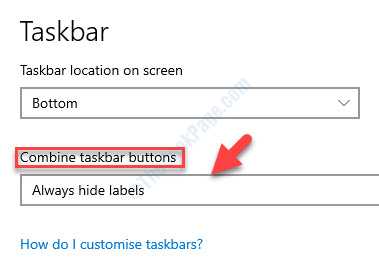
Step 3: Scroll down and locate Combine taskbar buttons
Step 4: From the drop-down select Always, hide labels

With this setting in place, you can see that all the sticky note icons will be combined.
Workaround 2: Enable Show All notes
Mostly, the sticky notes are placed in a particular position on the screen. Like, some notes are placed in the bottom, some on the corner, etc as per the user’s requirement. If the user wants to see all the notes at the same time and in the same position as he had placed them before, then one can use this workaround.
NOTE: All the Notes should be first placed in the required positions for this workaround to work as expected.
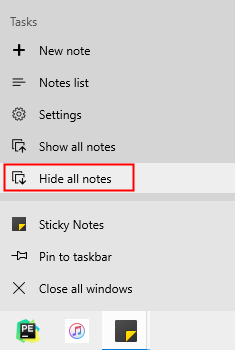
Step 1: Right-click on the Sticky Note icon from the Taskbar
Step 2: Click on Hide all notes

Step 3: Right-click on the Sticky Note Icon again
Step 4: Choose Show all notes

Workaround 3: Create a Desktop View for Sticky Notes
Step 1: Open Task View. Hold the keys Windows logo key+tab at the same time
Step 2: From the top, click on the + New desktop and create a New Desktop View

Step 3: Move the Sticky Notes to the New Desktop Created. To do so, drag the note and drop it to the New Desktop that you created. Repeat the same for all the notes.

After moving all the notes, it should look something like this :

Step 4: When you want to access the Sticky Notes, you can simply change the Desktop View using Ctrl+Windows logo key+Left/Right
Workaround 4: Work with the Notes list feature
There is a new feature called Notes list in Sticky Notes. With this, we can see all the lists in the same window.
Step 1: Right-click on the Sticky Note icon from the Taskbar
Step 2: Click on the Notes list from the menu

The resulting window. would look something like this.

Workaround 5: Uninstall and Reinstall the previous version of Sticky Notes
Step 1: Take ownership of the folder C:\Program Files\WindowsApps
For more details refer to Take Ownership of a File / Folder through Command Prompt in Windows 10
Step 2: Open Run terminal with keys Windows+R
Step 3: Type powershell and hold the keys Ctrl+Shift+Enter to open the command prompt with Admin rights.

Step 4: Uninstall the Sticky Notes Application using the below command and hit Enter
Get-AppxPackage Microsoft.MicrosoftStickyNotes | Remove-AppxPackage
Step 5: Now, Install the previous version of Sticky Notes with the below command and press Enter
Add-AppxPackage -register "C:\Program Files\WindowsApps\Microsoft.MicrosoftStickyNotes_3.1.54.0_x64__8wekyb3d8bbwe\AppxManifest.xml" -DisableDevelopmentMode
Step 6: Disable the Application Updates to Sticky Notes using the below command
Get-AppxProvisionedPackage -Online | Where-Object {$_.PackageName -like "*StickyNotes*"} | Remove-AppxProvisionedPackage -Online
That’s All.
We hope this has been informative. Kindly comment and let us know the workaround that helped you.
Thank you for Reading.