Microsoft Teams is a collaboration tool provided by Microsoft, that provides a platform for communication like chats and video, file sharing, and conferences between users. Many users have noticed that the camera stops working with Microsoft Teams all of a sudden which in turn doesn’t allow them to join any video conference calls.
If you are confronting this issue where Teams is not able to detect the camera, then you have reached the right article. In this article, we have listed some troubleshooting methods that can help you fix this camera not working issue MS Teams on your Windows 11 / 10 PC. Before moving ahead with the fixes in the article, we recommend you try the workarounds to see if they can resolve the issue for you.
Fix 1 – Enable Privacy Settings
Change Settings to Allow Camera Access
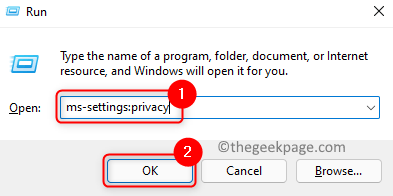
1. Just press the Windows and R keys simultaneously to open the Run dialog.
2. Type ms-settings:privacy and click on OK to open Privacy & Security Settings.
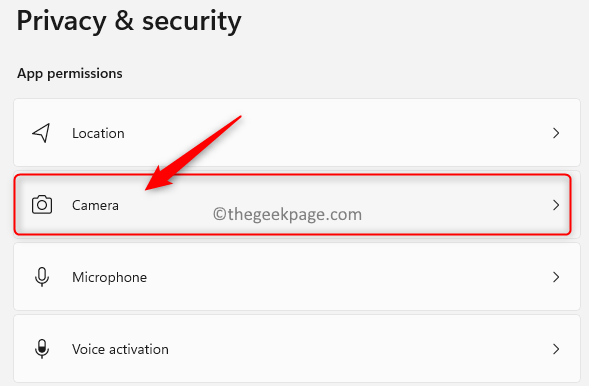
3. Locate the App permissions section.
4. Here, click on Camera to open the settings related to the Camera.
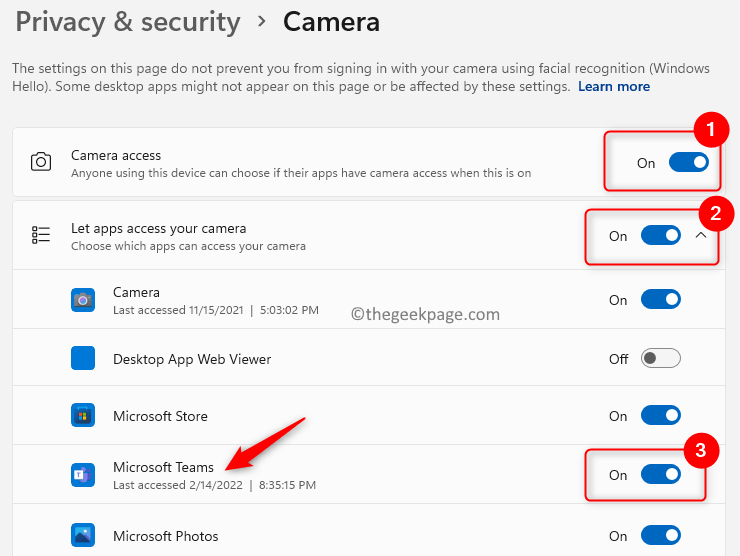
5. Turn on the toggle associated with Camera access.
6. Below the section Let apps access your camera, look for Microsoft Teams.
7. Make sure the toggle associated with Microsoft Teams is turned on.
8. Also, turn on the toggle next to Let desktop apps access your camera.
9. Check if you are able to access the camera using Teams.
Change Settings to Allow Access to Microphone
1. Perform Steps 1 -3 as above.
2. Click on Microphone in the App permissions section.
3. Check if the toggle next to Microphone access is turned on.
4. In the section Let apps access your microphone, turn on the toggle associated with Microsoft Teams.
5. Turn on the toggle next to Let desktop apps access your microphone.
6. Check if the camera issue with Teams is resolved.
Fix 2 – Configure Camera Settings in Microsoft Teams
1. Open Microsoft Teams.
2. Start a meeting with a chosen contact.
3. In the Teams Meeting window, click on the three vertical dots at the upper right and choose Device settings.
4. In the Device Settings pane that opens up, make sure to select the correct device in the Camera section.
5. Make a test call and check if the camera is working with Teams.
Fix 3 – Reinstall Camera Driver
1. Hit the Windows key and type Device Manager in the search box.
2. Select Device Manager in the search results displayed.
3. Expand Cameras in the Device Manager to see the different cameras available. Note that it can be under any section, Just keep expanding and checking camera device to figure out where it is located.
4. Once you have located it , Right-click on the camera device and choose Uninstall device option.
5. In the window that opens, check the box next to Attempt to remove the driver for this device.
6. Then, click on Uninstall to remove the driver from your system.
7. Click on the Action menu at the top of the Device Manager.
8. Select Scan for hardware changes.
9. It will scan and install any missing drivers. The camera will now start working with Teams.
Fix 4 – Basic Troubleshooting
1. Restart your system and check if the issue is resolved.
2. Quit Microsoft Teams completely using the icon in the system tray on the right side of the taskbar. Relaunch again and check if the camera issue is fixed.
3. If you are using an external USB-connected camera, unplug it from the system and plug it back in again. Check if this fixes the camera issue with Teams.
4. Open the default Camera app and check if it works to be sure that the camera is working. If it is not working, it means there are other issues that need to be fixed.
4. In case you are having 3rd-party security software installed on your PC, then try disabling it temporarily to check if it helps clear the issue.
5. Check if there is any other application like Skype, Discord, or Zoom running on your system that is taking control of the camera. Try turning off these applications and check if the camera works with Teams.
Fix 5 – Disable Additional Devices
If your system has multiple cameras, try disabling the USB camera to check if Teams works with the system’s built-in camera. In case you want to use the USB camera, then you can disable the built-in camera and check if the issue is resolved.
1. To open the Run dialog use the Windows and R key combination.
2. Type devmgmt.msc to open the Device Manager.
3. Expand the Cameras branch.
4. Right-click on the device that you want to disable and choose Disable device.
5. Click on Yes to confirm disabling of the device.
6. Open Teams and try making a video call to check if the other camera is working now.
Fix 6 – Update Camera Driver
1. Open Run (Windows + R) and type devmgmt.msc to open Device Manager.
2. Click on the arrow next to Cameras to expand it.
3. Right-click on the camera and choose Update driver.
4. In the Update Drivers window for the camera that opens, click on Search automatically for drivers.
5. Windows will search for any drivers and install them if there are any new updates.
6. Your camera should now work with the Teams app after the update.
Fix 7 – Update Teams
1. Launch the Microsoft Teams app.
2. Click on the three horizontal dots next to your profile icon.
3. Choose Settings in the menu that shows up.
4. Click on About Teams at the bottom left of the Settings screen.
5. As soon as you click, you will see that it will start checking for updates to Teams. If there are any updates, they will be installed.
6. Relaunch the Teams app and check if the camera issue is fixed.
Fix 8 – Reinstall Teams
1. Press Windows + R and type ms-settings:appsfeatures to open Apps & features Settings.
2. Locate Microsoft Teams in the App list.
3. Click on the three vertical dots associated with Microsoft Teams and select Uninstall.
4. In the confirmation, click on Uninstall again.
5. Wait for the application to be uninstalled completely.
6. Restart your system.
7. Download the latest version of Microsoft Teams.
8. Use the installer and follow the on-screen instructions to complete the installation of Teams.
9. Launch Teams and log in using your credentials. Check if the camera is working.
Fix 9 – Run Hardware and Devices Troubleshooter
1. Hit the Windows key and type command prompt in the search box.
2. Right-click on Command Prompt in the result and select Run as administrator.
3. When prompted by User Account Control, click on Yes to grant permissions.
4. Type the command below and hit Enter.
msdt.exe -id DeviceDiagnostic
5. Hardware and Devices troubleshooter opens up. Here, click on Next to start the troubleshooting process.
6. Wait for the troubleshooter to find and fix problems with devices and hardware. If there are any issues, they will be automatically fixed when the troubleshooting completes.
7. Open Teams and check if the camera is working with video calls.
Fix 10 – Check for Windows Update
1. Press Windows + R to open Run.
2. Type ms-settings:windowsupdate and hit Enter to open Windows update in Settings.
3. Here, click on the Check for updates button.
4. Windows will check if there are any new updates available. If any, they will be downloaded and installed on your PC.
5. Restart your PC once Windows is updated to the latest version.
6. Open Teams and check if the camera is working during a video call.
Fix 11 – Use the Browser
If none of the above fixes helped to resolve the issue for you, then use the web version of Teams to attend the meeting.
1. Go to Teams on the web using your browser.
2. Login with your user credentials.
3. Click on the link Use the web app instead.
4. Now, select Chat in the left pane.
5. Choose a contact from the list and start a video call using the Video call button.
6. You will see a notification to allow camera access to the browser. Click on the Allow button.
7. Camera must now be working with Teams call on the web.
If the browser did not ask for permission you will need to configure the settings for the specific browser.
Google Chrome
1. Type chrome://settings/privacy in Chrome’s address bar.
2. Click on Site Settings in the Security and Privacy section on the right side.
3. Go to the Permissions section. Select Camera to change the camera permissions.
4. Here, click on the Microsoft Teams site link.
5. Use the dropdown next to Camera and choose Allow.
6. Make sure the Microphone is also allowed access. A camera that has a built-in microphone will need access permissions.
Microsoft Edge
1. In the Edge browser’s address bar type edge://settings/content to go to the Cookies and site permissions Settings.
2. On the right side, select All sites below the Site permissions section.
3. Choose the Microsoft Teams site in the list of sites.
4. Make sure to select Allow in the dropdown next to Camera and Microphone.
That’s it!
Camera will now be working with Teams video call without creating any issues. We hope this article has been informative enough in resolving the Teams camera issue for you. Let us know the fix that worked for you in the comments below.


