Many users have reported an issue while installing Microsoft Office 365 on their Windows PC. The problem is that the installer gets stuck on “We’re getting things ready” message. Once this message is seen, the user is not able to install Office 365 again. This may happen when the previous Office 365 files were not installed properly or corrupted. At times compatibility issues or the absence of certain privileges during installation may result in this error.
Are you also stuck on the error Getting Things Ready during the Office 365 installation? Then, go ahead and read this article. Here, we have discussed some troubleshooting strategies that can help you resolve this error on your computer.
Fix 1 – Delete Registry Key
1. Press Windows and R keys simultaneously to open Run.
2. Type regedit and click on OK to open the Registry Editor.
3. Click on Yes when prompted by UAC for permissions.
4. Navigate to the location below in the Registry.
HKEY_CURRENT_USER\Software\Microsoft\Windows\CurrentVersion\Policies\Explorer
5. Once in the Explorer key, right-click on the DisallowRun entry on the right-side.
6. Choose the option Delete to remove this entry.
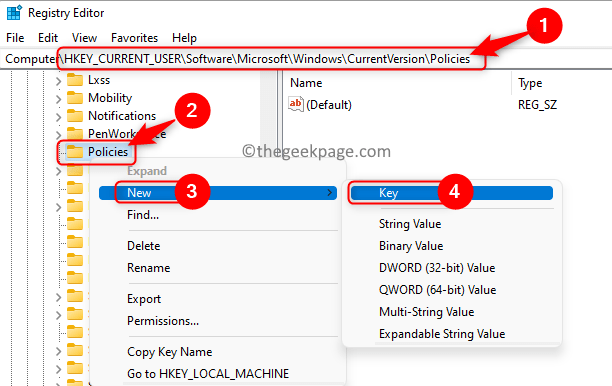
Note:- If the Explorer folder is not found under Policies follow the steps below:
- Right-click on Policies and choose New –> Key. Name this key as Explorer.
- Right-click on the Explorer folder and choose New –> DWORD (32-bit) Value.
- Type the name as DisallowRun for this entry.
- Double-click to modify the value of DisallowRun. Set the Value Data field to 0.
- Restart the system.
- Perform Steps 1 – 4 above.
- Check the value of DisallowRun. If it is 1, then delete the entry as in Steps 5 and 6 mentioned above.
8. Now try installing Office again to check if the error is resolved.
Fix 2 – Repair the Office Installation
1. Open the Run dialog using the Windows and R key combination.
2. Type ms-settings:appsfeatures and hit Enter to open Apps & Features Settings.
3. In the textbox below the App list, type Microsoft 365 to look for your Office installation.
4. Click on the three vertical dots associated with Microsoft 365 installation and choose Modify.
5. When prompted for permissions by User Access Control, tap on the Yes button.
6. In the Repair window, select the Quick Repair option.
7. Then, click on the Repair button.
8. In the Ready to start a Quick Repair window, click on Repair again to start the process.
9. Check if the issue is fixed. If the problem still persists, then try using the Online Repair option at Step 6.
Fix 3 – Uninstall and Reinstall Office
1. Perform Steps 1 – 3 as stated in Fix 2.
2. Click on the three vertical dots next to Microsoft 365 and select Uninstall.
3. In the confirmation prompt, click on Uninstall again.
4. Wait for the uninstallation to complete. After Office 365 is uninstalled, you need to delete the Windows Installer Packages.
5. Press Windows + R and type %ProgramFiles% and hit Enter.
6. Here, delete the folders named Microsoft Office and Microsoft Office 15 respectively. To delete, select the folder and click on the Delete (trash) icon at the top.
7. Again, press Windows + R and type %ProgramFiles(x86)%, and hit Enter.
8. Delete the Microsoft Office Folders here as well.
9. Open Run (Windows + R). Type regedit to open Registry Editor.
10. Copy-paste the location into the Registry’s navigation bar.
HKEY_CURRENT_USER\SOFTWARE\Microsoft\Office
11. Right-click on the Office folder and choose Delete.
12. Go to the location below in the Registry.
HKEY_LOCAL_MACHINE\SOFTWARE\Microsoft\Office
13. Here also, right-click on the Office folder and select Delete.
14. Restart your PC. Now try installing Office again to check if the issue is fixed.
Fix 4 – Use Microsoft Support and Recovery Assistant
1. Click on the link to go to the Microsoft Support and Recovery Assistant download page.
2. Here, click on Download to get the setup file on your system.
3. Install the Microsoft Support and Recovery Assistant using the installer.
4. You need to be connected to the internet to run the tool.
5. Once it is launched, then select Office as the app with which you are facing problems.
6. In the next window, select the problem you are facing. Click on Next.
7. Here, select the option Yes and click on Next to continue.
8. It will ask you to sign in to your Microsoft account. Then, it will check the problem and start the installation of Office 365 on your PC.
Fix 5 – Run the Installer in Compatibility Mode
1. Go to the location of the Office setup file.
2. Right-click on this file and choose Properties.
3. Go to the Compatibility tab.
4. Check the box next to Run this program in compatibility mode for in the Compatibility mode section.
5. In the drop-down below this, select Windows 8 from the list.
6. Then, check the box associated with Run this program as an administrator in the Settings section below.
7. Click on Apply and then on OK.
8. Check if you are able to complete the Office installation without getting stuck.
Thanks for reading.
Office 365 installation must now be complete without getting stuck on the error Getting Things Ready. We hope this article has been helpful in clearing the error for you. Comment and let us know the fix that worked for you.


