BSOD or Blue Screen of Death is a blue error screen which has been troubling Windows users for years. This error screen pops-up when a fatal system error has occurred, along with system crash. If the error didn’t get automatically fixed after a restart and you are stuck in a BSOD loop, then you need to fix this error by yourself.
One such BSOD error which is bothering many users is Page Fault in Nonpaged Area error. If you are also one such user, then there is nothing more to worry. We will help you fix this error using our methods. Simply perform the methods, one by one, until the issue is fixed.
How to Fix Page Fault in Nonpaged Area
This error occurs when Windows 10 and windows 11 OS is unable to locate a system file in memory. System files can tend to go missing due to an unsupported driver, unsuccessful update, faulty RAM or corrupt software. So, hardware and software, any one of the both can cause this error. Follow the methods mentioned below to fix the problem.
Note: This error causes a BSOD loop, meaning you must be unable to log in on your computer. So, to perform the methods and fix this error, you need to be logged in on your computer in Safe Mode.
Fix 1 – Disable Automatic Paging File Size Management
This method has helped a number of Windows 10 users facing the same issue. It might work for you too.
Note: To perform this method, your computer needs to be in Safe Mode.
If you cannot boot, read this article To access Safe Mode, use the method mentioned.
After booting your computer into Safe Mode, follow the steps below.
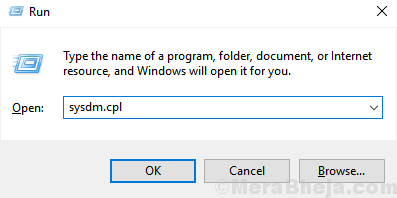
Step 1 – Press Windows Key + R together to Open RUN command Box.
Step 2 – Now, Write sysdm.cpl in it and Press OK.

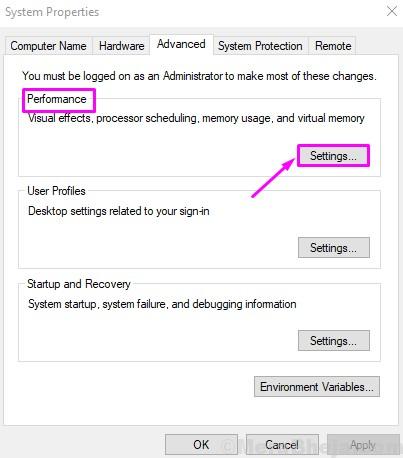
Step 3. – Choose Advanced Tab . Then , Select Settings under Performance.

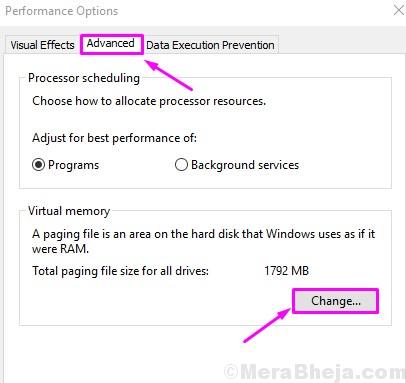
Step 4. Go to Advanced tab and select Change.

Step 5. Uncheck the box beside Automatically manage paging size for all drives .
Step 6: – Select No Paging File. Finally Click on OK.

This should fix the problem. If the issue still persists, perform the next method.
Update drivers for every device
Boot Windows in Safe Mode and follow steps.
1 – Right-click Start menu button.
2 – Select Device Manager.
3 – Right-click on devices and select Update Driver.
4 – Select Search automatically for updated driver software.
5 – Update drivers for every device.
6 – Restart computer.
This method should fix the issue. If you are still facing the issue, follow the methods mentioned below.
1. Run Memory Check and Disk Check.
The error can occur due to faulty RAM. Also, a corrupt NTFS volume can cause this error as well. Memory check will scan and fix any RAM related problems, while Disk check will do the same with NTFS volume.
Note: To perform this method, your computer needs to be in Safe Mode. To access Safe Mode, use the method mentioned before these methods. After booting your computer into Safe Mode, follow the steps below.
Step 1. Go to Cortana and type Command Prompt. Right-click on Command Prompt and select Run as administrator.

Step 2. In Command Prompt window, type the following command and press Enter.
chkdsk /f /r
Step 3. Press Y on the keyboard to schedule the disk check on restart.
Step 4. Go back to Cortana and type mdsched.exe. Press Enter to open Windows Memory Diagnostic.

Step 5. Select Restart now and check for problems (recommended).

The last step will restart your computer and check for problems. It might take more than 15 minutes for the scan and fix process to complete. After it, you will be free of this error. If you are still facing the problem, try the next method.
2. Update Drivers
The most common reason which causes this error is faulty or outdated drivers. In this method, we will update the drivers of all devices.
Note: To perform this method, your computer needs to be in Safe Mode. To access Safe Mode, use the method mentioned before these methods. After booting your computer into Safe Mode, follow the steps below.
Step 1. Right-click on the Start menu button and select Device Manager.

Step 2. Right-click on a device and select Update driver.

Step 3. Select Search automatically for updated driver software.

Step 4. Repeat Step 2 and Step 3 for all the other devices.
Step 5. Restart your computer.
The error must be gone by now. If you are still seeing the BSOD screen, follow the next method.
4. Update Windows and Disable Antivirus (Third-party)
Antiviruses are known to cause interference to system files, which can lead to this error. If you are using a third-party antivirus, try turning it off and then check if this solves the error. If it does, then uninstall the antivirus and install another one. Also, Microsoft releases regular Windows updates which comes with fixes for many bugs and errors. Fix for the error bothering you could be in it. If there are any pending Windows Updates, download and install them to fix the error.
We hope we were able to help you fix this issue using our methods. If you were able to fix this problem using some other method, or if you have any questions regarding this issue, do mention them below in comments.