Windows Update usually makes Windows devices better, and more useful for the billions of users. But sometimes some updates may not work as they are supposed to, so you can easily opt to uninstall some of the recently installed updates. This process is quite easy and Windows does roll back the current updates. After uninstalling an update, you may see this prompt on your screen “An error has occurred, not all of the updates were successfully uninstalled“. If you are getting this, the uninstallation process isn’t complete successfully, so you have to manually resolve the problem.
Fix 1 – Uninstall using DISM
You can use the Deployment Image Servicing and Management (DISM) tool to uninstall a particular update package.
1. Again you have to access the terminal. So, write “command” in the search box.
2. Just, right-click on that “Command Prompt” in the search results and tap on the third option “Run as administrator“.
3. Once you land up in the terminal, type this command and press the Enter key to get the list of update packages that you are system has received.
DISM /Online /Get-Packages | clip
The output will be copied in your clipboard
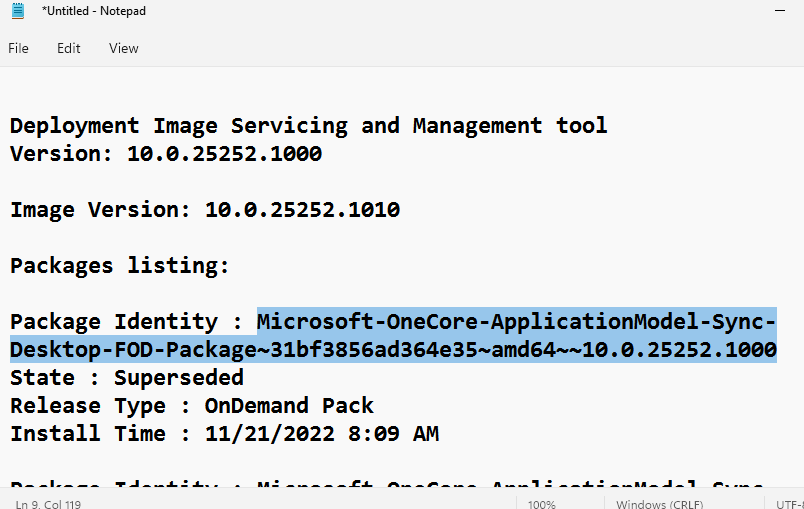
4 – Now, Copy and paste the output in a Notepad

4. Carefully go through the list of updates and note down the “Package Identity:“.
5. When you have noted the package, input this code and edit it.
DISM /Online /Remove-Package /PackageName:put the package identity here
[
Replace the “put the package identity” with the package identity that we have noted.
Example – I am going to uninstall the update package bearing the package identity “Package_for_ServicingStack_581~31bf3856ad364e35~amd64~~22000.581.1.0“.
So, the example command will be in my case –
DISM /Online /Remove-Package /PackageName:Package_for_ServicingStack_581~31bf3856ad364e35~amd64~~22000.581.1.0
]
Just wait for DISM to completely remove the update package from your system. Just like previous fixes, you will be asked to reboot your computer.
This way, you can uninstall any update package you want.
Now, try again to update your windows PC.
Fix 2 – Uninstall the update using CMD
There is a very easy way you can uninstall your desired update.
1. Just click on the Windows icon in the middle of the taskbar.
2. Next start to write “cmd” in the search box at the top. Further, right-click on the “Command Prompt” and “Run as administrator“.
3. The Command Prompt with administrative access appears, copy & paste this line in the terminal and hit Enter to view the list of installed updates.
wmic qfe list brief /format:table
3. Here, you will notice several updates that your system has received. You can identify the update that you want to uninstall from the individual “HotFix ID“.
4. Once you have noticed it, you can uninstall it using this command. Input this line and modify it accordingly.
WUSA /UNINSTALL /KB:HOTFIXID
[
Just replace the “HOTFIXID” in the code with the appropriate number from the list and execute it.
Like, in my case, I am trying to uninstall the most recent update, which is KB5009467.
So, the command will be –
WUSA /UNINSTALL /KB:5009467
]
5. You will see a prompt to uninstall the update from your system. Tap “Yes“.
Windows will now start the uninstallation process.
6. Once the whole process is done, you will be asked to restart the system. Tap “Restart now” to restart the system immediately.
While your system is booting up, Windows should uninstall the update package. Wait till the system successfully restarts.
Fix 3 – Using the Registry Editor
Sometimes the absence of the RPC authentication can create problems with Windows Update.
Step 1
1. You have to access the Registry Editor. Just press the ⊞ Win key once and type “regedit.msc” in the search box on the taskbar.
2. After that, click “Registry Editor” to access it.
Warning – You are going to edit the registry files on your system, which is a very sensitive location. For device safety, we recommend you create a backup of the registry before you proceed any further. Just do this –
a. You will find the “File” option in the menu bar.
b. After that, tap “Export…” to create a new registry backup on your system.

Just name this backup and save it somewhere safe on your system.
3. When the Registry Editor window, go this way –
HKEY_LOCAL_MACHINE\System\CurrentControlSet\Control\Print
4. Once you have reached the location, you have to create a new value.
5. So, just right-click on the space and tap “New>” and “DWORD (32-bit) Value“.
6. Just name this new value as “RpcAuthnLevelPrivacyEnabled“.
7. Now, you have to change the data of this value. So, double-click it.
8. Later, set the ‘Value data:’ to “0“.
9. To save this, tap “OK“.
Restart your PC after doing all these. This will save the changes.
Step 2
After you have restarted the system, you can easily uninstall the update package.
1. To do that, you have to open the Settings. Press the ⊞ Win key+I keys together.
2. Then, click on “Windows Update” on the left-hand pane.
3. On the right-hand pane, you will find several options. Tap “Update history” to find the full list of updates that are installed on your system.
4. Just scroll down through the list of updates to “Uninstall updates“.
This should open the Control Panel.
5. Just, right-tap the Windows Update that you want to uninstall and tap “Uninstall” to completely uninstall the update package.
6. Now, the uninstaller will throw up a prompt for your final confirmation. Tap “Yes“.
Windows will now start the uninstallation process.
7. Wait as Windows uninstalls the update package. Tap “Restart now” to restart the system immediately.
That’s it! This way, you can easily uninstall any update package from your system.
