Some FPS gamers have recently complained about a new bug in Valorant. These affected users have noticed whenever they are trying to play Valorant, Windows is crashing into a Blue Screen of Death issue showing the error code “Vgk.sys“. Don’t worry, this is not a virus/PUP. This is a component of the Vanguard AntiCheat system by Riot, that comes along with the game. This is a simple case of the absence of proper rights for that particular system components.
Fix 1 – Allow Full Control to all the entities
You have to allow all the entities full control of the Vgk.sys component file.
1. You have to access the location of the “Vgk.sys” file.
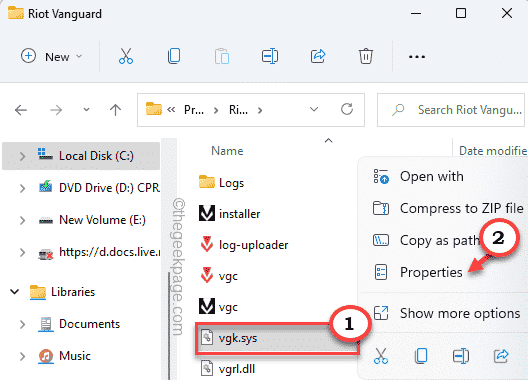
2. So you have to press the Windows key+E keys together. This will open the File Explorer.
3. Once it opens up, go down this path –
C:\Program Files\Riot Vanguard
4. Here, you shall find the “vgc.sys” file here. Just right-tap on the file and click “Properties“.
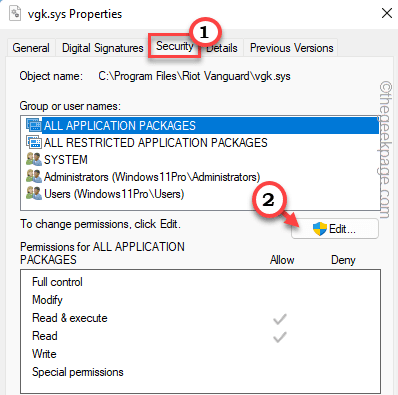
5. Just, go to the “Security” tab.
6. Here you will notice several group and user names.
You have to allow full control of all these groups. So, you need to edit the current settings.
7. Tap “Edit…“.
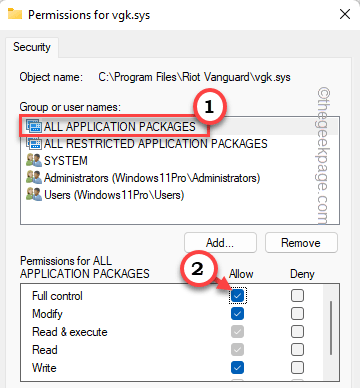
8. In the Permissions for vgk.sys window, select the first group from the list.
9. Then, just tick the “Full control” box.
10. This way, give full control to all the other user groups in that list.
11. Once you have given full control to all the users, tap “Apply” and “OK” to save the changes.
Now, simply launch Valorant and check whether it works. You may also reboot your computer once and check.
NOTE –
Some users have noted that uninstalling Riot Vanguard and then restarting the system and only after that applying the above-mentioned fix has worked out for them. You can try to do that also –
1. Press the Windows key along with the R key.
2. Next, type “appwiz.cpl” and click “OK“.
3. You will the complete list of installed apps on this Control Panel screen.
4. Just locate the “Riot Vanguard” app and right-click on it and click “Uninstall” to uninstall the app from your system.
Once you have uninstalled it, restart your computer and then follow the steps that we have mentioned in Fix 1 to solve the problem once and for all.
Fix 2 – Disable third-party programs
If you are using an unknown third-party program (like Aura Sync), Vanguard anti-cheat may block it and crash the system.
1. You have to access the Task Manager.
2. So, press the Windows key+X keys together and then tap “Task Manager” from the list of available options.
3. When the Task Manager opens up, go to the “Startup” tab.
4. Here look for any third-party software that may interfere with the Vanguard (like – Corsair Unity Engine, Aura Sync, etc).
5. Just right-click on the app and tap “Disable” to disable the app.
This way, disable any unknown app.
After that, restart your computer and after restarting the system, try to play the game again.
NOTE – Users have also been notified that the CorsairVBusDriver.sys can cause this issue as well. Locate the file in your C drive and remove it from there. It may help.
Fix 3 – Launch Valorant as an administrator
Launching Valorant with administrative rights can solve your issue.
1. Look for the Valorant app on your desktop.
2. Then, right-click on the “Valorant” on the desktop and tap “Run as administrator“.
This lets the game launch with administrative permissions.
Just check whether this works for you. If this successfully launches the game, you can make sure Valorant does run only with administrative rights.
1. So again, right-tap the “Valorant” app and tap “Properties“.
2. On the Valorant Properties page, click on the “Compatibility” pane.
4. Among all the options, you have to just check the “Run as administrator” box.
5. Now, you have to save the changes. So, click “Apply” and “OK” to do so.
Test if this helps you solve your issues.
Fix 4 – Make sure vgc is starting up
Sometimes Windows does restrict some components of vgc. Make sure that is starting up.
1. Pressing the Windows key+R key should bring up the Run panel.
2. Later, type “msconfig” and click on “OK“.
3. When you reach the System Configuration page, just head on to the “Services” pane.
4. Just check the “Hide all Microsoft services“.
5. Among all the apps, make sure the “vgc” is checked.
6. After that, tap “Apply” and “OK“.
Now, restart your computer. This should solve your problem.
Fix 5 – Update Valorant
If you haven’t played the game in a while, it is time to update the game.
1. Launch Valorant as an administrator.
2. If you have launched an older version, it will automatically start to update.
All you have to do is wait for the game launcher to install the update completely.
3. Now, the launcher automatically looks for the recent update patch, and downloads and installs it accordingly.
Just wait patiently for the process to be complete. Once it is done, you should be playing the game without any further interruptions.
Fix 6 – Uninstall & reinstall Valorant
If everything else fails, there might be some issues with the Valorant core files. Uninstall and then do a fresh re-install.
1. You have to access the Apps & Features page.
2. To do that, just press the Windows key+X keys together and tap “Apps & Features“.
2. Once the Settings page prevails, look for a search box on the right-hand pane.
3. Type “Valorant” on that search box.
5. Now, you will notice the “Valorant” app on the Settings page. Just click on the three-dot menu and tap on “Uninstall“.
6. Later, click on “Uninstall” to confirm the action again.
Just wait for the Valorant uninstaller to pop up.
7. You have to download the latest version of the Valorant installer.
8. Once the installer is downloaded, double-tap “Install VALORANT“.
9. Tap on “Install” once more.
This shall install the latest version of Valorant on your computer.


