Some Windows 10 users are complaining about a new type of problem which they are facing when they are trying to add a workstation with their existing one. According to these users, whenever they are trying to add a new workstation, the entire process is getting stalled and an error message is popping up, stating “An Active Directory Domain Controller for the domain could not be contacted“. This error usually happens due to faulty DNS settings on your system. To fix this issue on your computer, simply follow these fixes and the problem will be solved in no time.
Fix-1 Build new DNS Configuration-
Adding DNS server addresses may help you out.
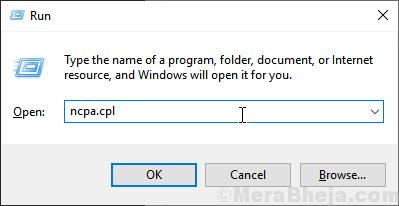
1. You can easily access the Run window by pressing the Windows key+R keys together.
2. Type “ncpa.cpl” in that Run window and hit Enter.

The Services window will emerge.
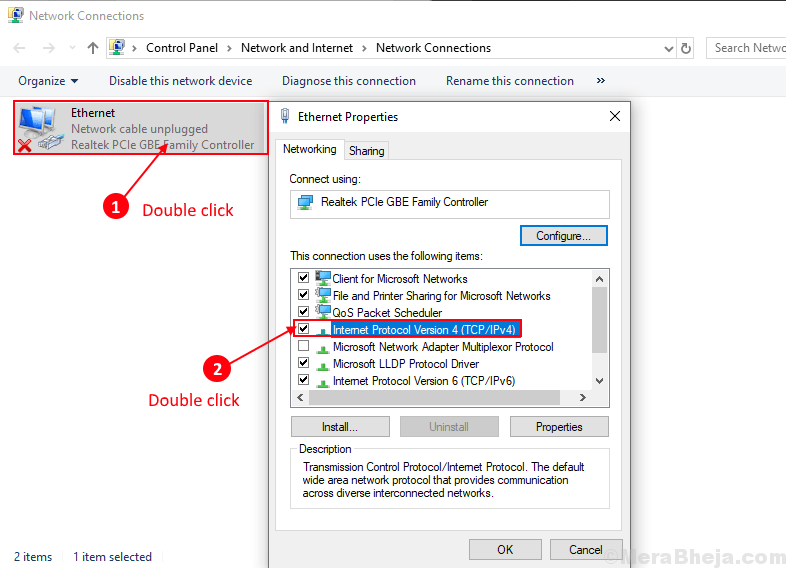
3. Now, in the list of the adapters, double click on the adapter you are using.
4. Now, under the section “This connection uses the following items:“, double click on “Internet Protocol Version 4 (TCP/IPv4)” option.

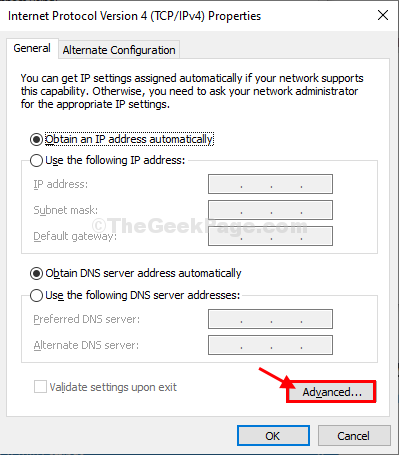
5. In Internet Protocol Version (TCP/IPv4) Properties window, click on “Advanced” settings to modify it.

6. Now, in the Advanced TCP/IP Settings window, go to the “DNS” tab.
7. Then, type the DNS server addresses in the box below ‘DNS server addresses, in order of use:‘. Then, click on “Add…“.
8. Finally, click on “OK” to save the changes on your computer.

Once done, reboot your computer to save the changes on your computer.
After rebooting your computer try to add the workstation again. If the error persists, go for the next fix.
Fix-2 Restart DNS service-
Restarting DNS service may resolve the situation.
1 – Search CMD in Windows Search box.
2 -Right click on search result and click on run as administrator.

Command Prompt window with the administrative right will be opened.
7. To stop the DNS cache, write this command in CMD and then press Enter.
net stop dnscache

3. Now, to restart the DNS cache, just the same as before, copy this command and paste it in CMD and press ‘Enter‘.
net start dnscache

Once done, close the Command Prompt window.
Reboot your computer to let the changes take effect on your computer.
Upon rebooting, try to connect to the workstation again. Your problem should be solved.
Fix-3 Connect to the domain through Settings
Case 1 – For Windows 10
Connecting to the domain through Windows Settings is an alternative path you may use to address the problem.
1. Press Windows key+I to open the Settings window.
2. In the Settings window, click on “Accounts” to open account settings.

3. When the Accounts settings appears on your screen, “Access work or school“.
4. Now, click on “Connect” to begin the process to connect the workstation.

5. In the Microsoft Account window, in the bottom portion of the window, click on “Join this device to a local Active Directory domain“.
6. Join a domain panel will be opened.

7. In Join a domain panel, under “Domain Name“, enter the name of the domain (will have a format like this – “*.local“) you want to join.
8. Now, click on “Next” to proceed to the next step.

9. At the last step, enter the administrative password and complete a connection to the domain.
A reboot may be needed to let the changes take effect on your computer. Your problem should be solved.
Case 2 – For Windows 11
1 – Press Windows key + I to open settings.
2 -Click on Accounts from the left menu.
3 – Now, Click on Access work or School from the right.

4 -Click on connect.

5. In the Microsoft Account window, in the bottom portion of the window, click on “Join this device to a local Active Directory domain“.
6. Join a domain panel will be opened.

7. In Join a domain panel, under “Domain Name“, enter the name of the domain (will have a format like this – “*.local“) you want to join.
8. Now, click on “Next” to proceed to the next step.

9. At the last step, type administrative password and complete the connection to the domain.
Reboot your computer. problem solved.