If you have enlisted in the Windows Insider Program to get an insider preview build of Windows well ahead of any standard users, then you may encounter this error message “This Build of Windows will expire soon” at least once on your computer. In case if you are experiencing this situation at your end, no need to worry. Follow these fixes and the problem will be fixed pretty quickly. But before going on ahead for the main solutions, you should try out these workarounds to test out some simpler fixes.
Workarounds–
1. Restart your computer and after restarting, check if you are still shown the error message.
2. Check if any Windows Update is pending or not. If an update is pending, complete the update process.
If any of these workarounds didn’t work out, go for these fixes
Fix 1 – Activate your Volume License key again
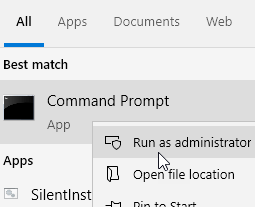
1 – Search cmd in Windows search box and then perform a right click on command prompt icon and click run as admin.

2 – Now, run the command given below and hit enter key
slmgr –rearm
3 – Restart your computer
4 – Now, again open command prompt with admin rights and run the code given below
slmgr /upk
5 – Again restart your computer and check whether your issue got resolved
Fix 2 – Disable License manager and Update services
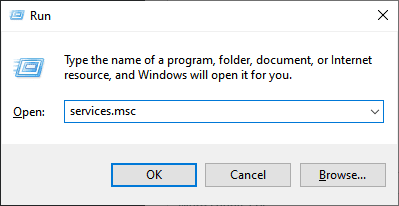
1 – Press Windows and R key at once to open RUN command box
2 – Type services.msc in it and click OK.

3 – Locate Windows License manager service from the list and double click on it.

4 – Now, Set startup type as disabled and click on stop to stop the service
5 – Click on Apply and OK

6 – Again Locate Windows Update service from the list and double click on it
7 – Now, Set startup type as disabled and click on stop to stop the service
8 – Click on Apply and OK

Fix-3 Check Date & Time settings
Any corruption in the time-date settings can cause this problem. Follow these steps to modify Time/Date settings-
1. At first, type “Date & time settings” in the search box.
2. Then, click on the “Date & time settings” in the search results.

3. Under Current date and time settings, toggle “Set time automatically” settings to “Off“.
4. Then, under ‘Set the date and time manually‘, you have to click on “Change“.

5. In the Change date and time window, you have to click on “Date” to change the date to the actual date.
6. Repeat the same feat for “Time” by setting the right time.
7. Click on “Change” to save the change.

Check if the error message is still appearing or not.
Fix-4 Manually try to update your Windows build-
Manually updating the Windows Insider build will update the OS to the latest build.
1. Open Windows Settings by pressing Windows key+I together.
2. Now, scroll down and then click on the last settings, “Update & Security“.

3. In Update & Security settings, on the left-hand side, scroll down and click on the “Windows Insider Program“.
4. On the right side of the window, check if any update option is available or not.

Windows will download and install the latest preview build on your computer.
Your problem will be solved.
Fix-5 Check Activation status of your account-
Your computer may not be activated, which can cause this problem.
1. Press Windows key+I to open the Settings window on your computer.
2. Then, you need to click on the “Updates & Security” settings to access it.

2. In the Updates & Security window, scroll down on the left side to find “Activation“.
3. You can easily check the activation status besides “Activation” on the right side of the Settings window.

In case, if you notice “Windows is activated” on the right-hand side of the Settings window, then this is not causing the problem.
If you see “Windows is not activated” or “Windows activation has expired on…” message, then you will need to activate your Windows 10.
After activating your Windows 10, the problem should be solved.
Fix-6 Run Automatic Repairs-
Running Automatic Repair may solve the issue for you.
1. Press Windows Icon+I together.
2. In the Settings window, click on “Update and Security“.

3. Now, on the left pane, you have to click on “Recovery“.
3. Scroll down and under ‘Advanced Startup‘, then click on “Restart Now“.

4. Your computer will be booted into Windows RE mode.
5. When the ‘Choose an option‘ Window appears, simply you have to click on “Troubleshoot“.

5. When the Troubleshooting window appears, click on “Advanced options“.

6. Then, you have to click on “Startup Repair” to start up the repair process.
Now, Startup Repair will look for the issue which may cause this problem.
This process will take some time.
Once the process is complete boot back to Windows 10 and further check if you are experiencing the same issue or not.
The problem should be fixed.