You load into your world after the 3.2 update in 7 Days to Die, but the frame counter says 90. Then you turn your camera and it drops to 20! It sometimes hold there and jumps back. And somewhere in the console, EXC NullReference is scrolling past in red again and again. Reinstalling won’t fix this problem either, by the way. Here are some solutions that can fix it for you.
The Short Version
The frame drops are a separate mess. Dynamic Mesh, the system that draws distant buildings and player bases, chews through memory and never quite lets go of it. So every camera turn in a city makes the engine scramble. Add 3.2’s new polish on the reflections and volumetric lighting on top and your VRAM fills up mid-horde. Rubber-banding follows.
Then there are the small things. Broken VSync. Windows Defender scanning chunk files as they load. Junk drones that fall through the map and spam the log. Why does a drone tank your frame rate? Because the server logs an exception every tick until you unbind it. Lovely.
But none of this needs a reinstall. Work down the list.
Fix 1 – Wipe the Mods Folder (Both of Them)
Start here if you’re getting NullReference. Old mods are the number one cause. And there are two Mods folders, not one. Most guides forget the second.
1 – Open Steam, right-click 7 Days to Die in your library, click Manage, then Browse local files.
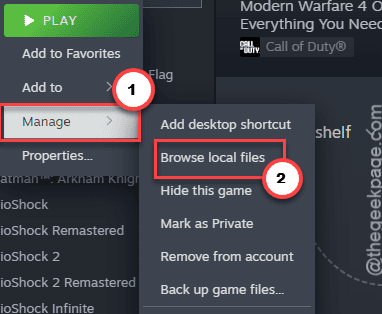
2 – Find the Mods folder in that window and delete it.
3 – Press Windows + R, type %appdata%\7DaysToDie, and press Enter.
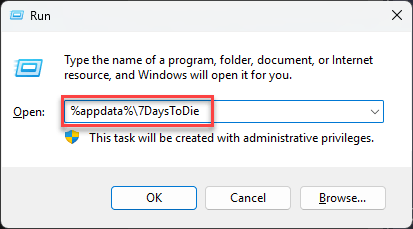
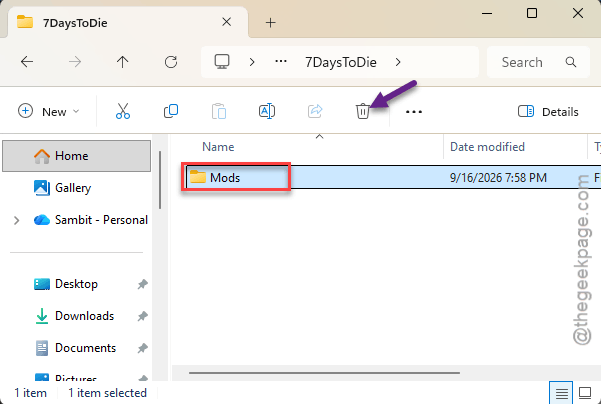
4 – Delete the Mods folder here too.
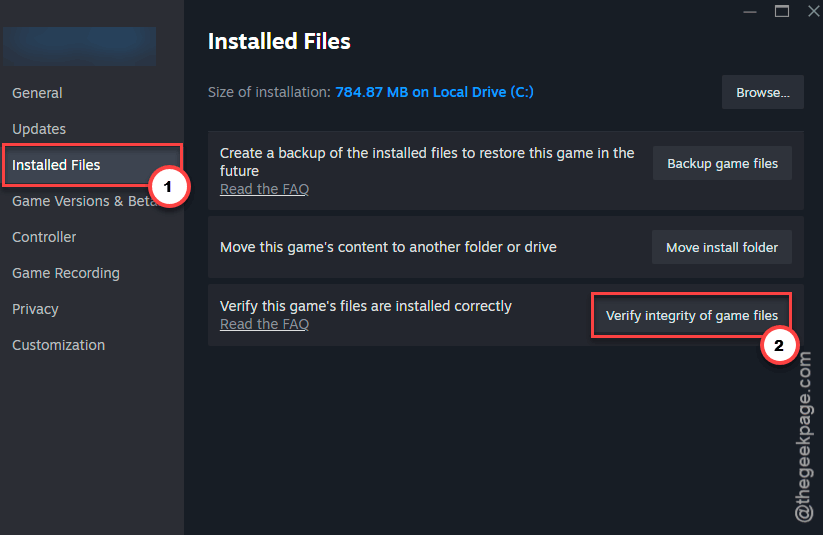
5 – Back in Steam, right-click the game, click Properties, then Installed Files.
6 – Click Verify integrity of game files and wait for the bar to finish.
7 – Launch the game and start a new world.
No errors? Good. Now add mods back one at a time, and only ones that say 3.2 on the download page. Anything older will drag the loop right back.
Fix 2 – Clear Your Glitched Drone From the Console
Junk drones fall through the world and lose their tracking data, and the server will not stop logging errors until you cut them loose. Sound familiar? Two commands fix it.
1 – Load into your game.
2 – Press F1 to open the command console.
3 – Type jd clear and press Enter.
4 – Still getting errors? Type jd unbind and press Enter. That detaches the broken drone’s ID from your profile.
5 – Press F1 to close the console.
6 – Quit to the main menu and reload your world.
Your drone is gone after this. Craft a new one. Annoying. But a fresh drone beats a five-frame horde night.
Fix 3 – Turn Off Dynamic Mesh
The single biggest frame-rate fix in 3.2. And the game ships with it on.
1 – From the main menu, click Options, then Video.
2 – Click the Dynamic Mesh Options tab on the right side.
3 – Set Dynamic Mesh Enabled to No.
4 – Click Apply.
5 – Load into a city and turn the camera around. Watch the frame counter.
Want to keep distant bases visible? Leave it on. But set Max Region Cache to 1 and Max Distance to 500. Half the cost, most of the look.
Fix 4 – Cut Reflections, Shadows, and SSAO
This stable updates lighting looks great in screenshots. On a mid-range card it’s a VRAM hog. And a full VRAM pool is where the rubber-banding comes from.
1 – Click Options, then Video, then the Quality tab.
2 – Set Reflection Quality to Low or Off. Real-time reflections are the heaviest single setting in this build.
3 – Set Shadow Distance to Low or Medium.
4 – Turn off SSAO (the ambient shadow effect in corners) and Sun Shafts.
5 – Click Apply.
6 – Quit the game fully and relaunch. That clears the VRAM pool (applying alone does not).
Horde night is the test. If it stays smooth through the third wave, you’re set.
Fix 5 – Turn Off the Game’s VSync and Use the Driver’s Instead
According to some users, the Unity VSync in 3.2 is broken. It scrambles the rendering queue and makes frame pacing feel drunk even when the number looks fine. So turn it off in the game and let your graphics driver handle it (it does a far better job).
1 – Click Options, then Video.
2 – Set VSync to Off and click Apply.
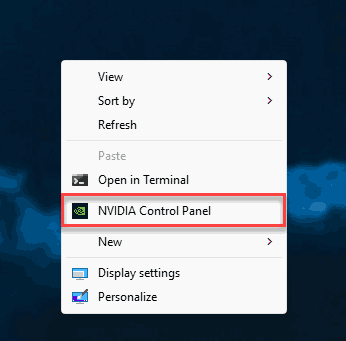
3 – Right-click the desktop and open NVIDIA Control Panel or AMD Software.
4 – Find the VSync (or Vertical Sync) setting for 7 Days to Die and set it to On.
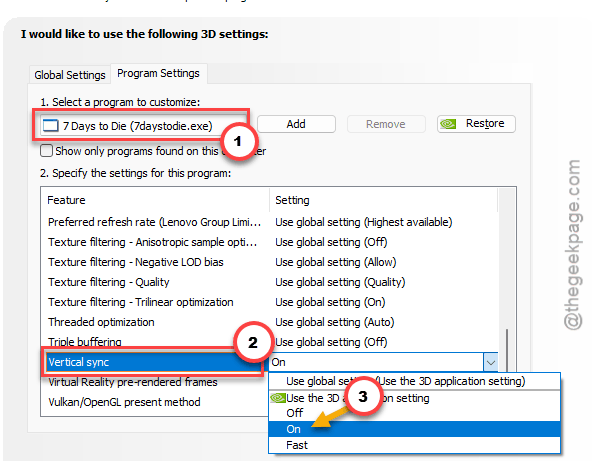
Tearing gone, stutter gone, and the game never knows the difference.
Fix 6 – Add Graphics Jobs to boot.config
Unity can spread rendering work across all your CPU cores. But 7 Days to Die doesn’t turn that on by itself, for some reason. Two lines in a text file fix it, and they smooth out the 1% lows more than any menu setting.
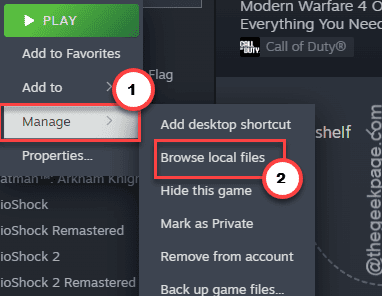
1 – In Steam, right-click 7 Days to Die, click Manage, then Browse local files (same as Fix 1).
2 – Open the 7DaysToDie_Data folder.
3 – Right-click boot.config and open it with Notepad.
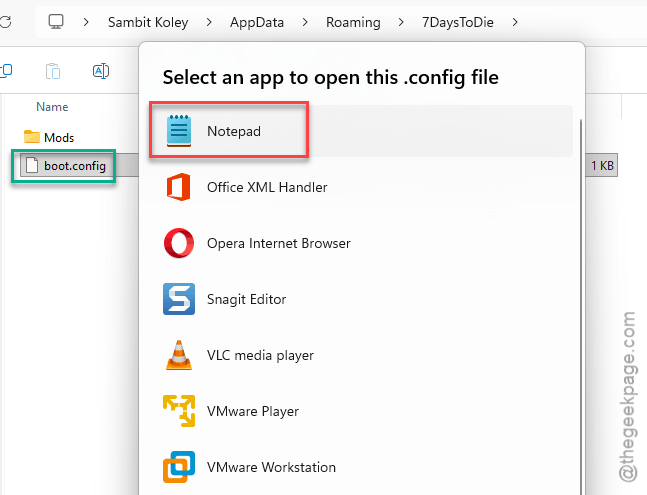
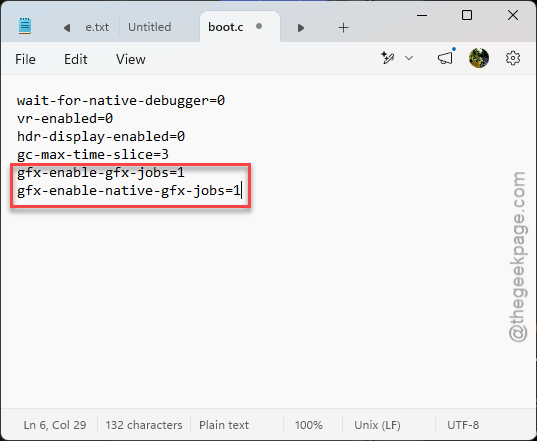
4 – Click at the very bottom of the text and add these two lines, each on its own line:
gfx-enable-gfx-jobs=1

gfx-enable-native-gfx-jobs=1
5 – Press Ctrl + S to save, then close Notepad.
6 – Launch the game.
Verifying files later may overwrite this file. So keep those two lines in a note somewhere. You’ll be back.
Fix 7 – Cap the Frame Rate at Your 1% Low
Counterintuitive one. A frame rate that swings from 90 to 40 feels worse than a steady 60, because your eyes notice the swing, not the number. Cap it at the low end and the stutter feeling disappears.
1 – Download and install RivaTuner Statistics Server (it comes bundled with MSI Afterburner if you already have that).
2 – Open RTSS and click Add in the bottom left.
3 – Browse to 7DaysToDie.exe in the game’s install folder and add it.
4 – With the game selected, set Framerate limit to 60. Or to whatever your 1% low sits at, if you know it.
5 – Leave RTSS running in the background and launch the game.
The frame-time graph goes flat. And flat is what smooth feels like.
Fix 8 – Exclude the Game Folder From Windows Defender
Every chunk the game loads is a file write. And Defender scans every file write, in real time, while you’re fighting. That’s a few milliseconds of freeze, hundreds of times a minute.
1 – Click the search icon on the taskbar, type Windows Security, and open it.
2 – Click Virus & threat protection.
3 – Under Virus & threat protection settings, click Manage settings.
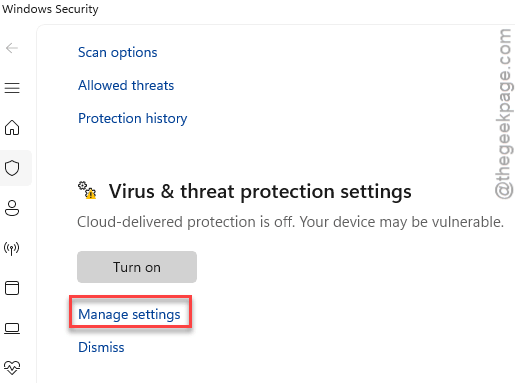
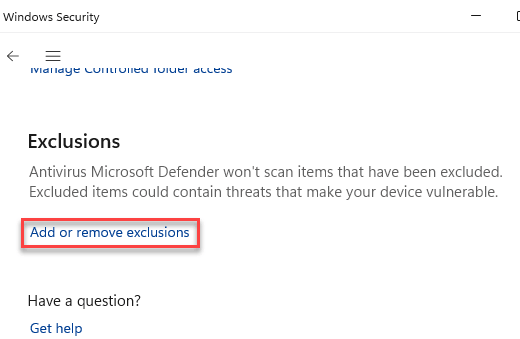
4 – Scroll down to Exclusions and click Add or remove exclusions.
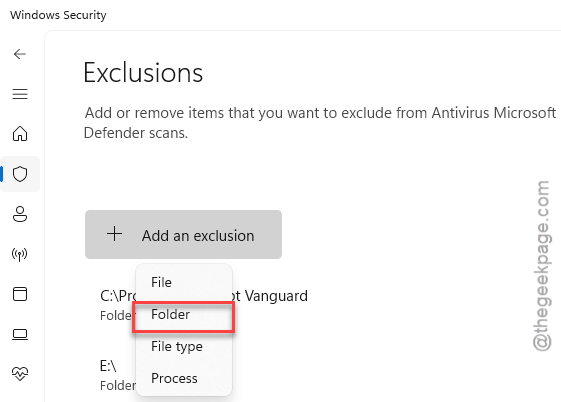
5 – Click Add an exclusion, then Folder.
6 – Pick your 7 Days to Die install folder and click Select Folder.
Defender stops touching the game’s files. Everything else on the PC stays protected.
Avoiding This Next Time
- Before any big update, move your Mods folders somewhere else. Then add mods back one by one once you know they’re 3.2-ready. Slow. But it beats a NullReference loop.
- Keep Dynamic Mesh off unless you’re on a high-end machine. It’s the setting that gives back the most.
- Re-add the boot.config lines after every file verify. Steam wipes them. Every time.
- Craft a new drone instead of nursing a glitched one. They’re cheap. Your frame rate is not.
Quick Answers
How can I improve my FPS in 7 Days to Die?
Turn off Dynamic Mesh under Options > Video > Dynamic Mesh Options first. That alone fixes most 3.2 frame drops. Then drop Reflection Quality to Low, turn off SSAO and Sun Shafts, and add the two graphics jobs lines to boot.config so Unity spreads work across every CPU core.
How do I fix FPS drops in 7 Days to Die?
Frame drops when turning the camera in cities are Dynamic Mesh. Disable it, or set Max Region Cache to 1 and Max Distance to 500. Rubber-banding on horde night is VRAM, so lower reflections and shadows and fully restart the game. Exclude the install folder from Windows Defender too.
How do I fix stuttering in 7 Days to Die?
Turn off the in-game VSync and force it on in your NVIDIA or AMD driver instead, since the Unity version breaks frame pacing in 3.2. Then cap the frame rate in RivaTuner Statistics Server at your 1% low, usually around 60. A flat frame time feels smoother than a high but bouncy one.
Why does 7 Days to Die say EXC NullReference?
Almost always leftover mods from an Alpha build. The 3.2 update rebuilt the game’s code, so old XML and DLL files hit missing references and loop. Delete the Mods folder in both the install directory and %appdata%\7DaysToDie, then verify files in Steam. A glitched junk drone causes it too, so type jd clear in the F1 console.