When it comes to PowerPoint, nothing can be termed too fancy. People need to be entertained and drawn into your presentation and you have every single right to keep their eyes glued to your wonderfully crafted slides. Every single day, you might be wondering about ways to make your presentations more lively and more fun! Well, how about you fill your texts in your PowerPoint with any images/photos of your choice? Sounds like something that only the pro-presentations can have? Well, get ready to be a pro-presenter then!
In this article, we break that simple trick to you which definitely is going to take your presentations to that next level that you have always wanted them to be at! Read on, to master this super cool PowerPoint hack!
Also Read: How to Insert an Image or Photo into a Shape in PowerPoint Presentations
Solution
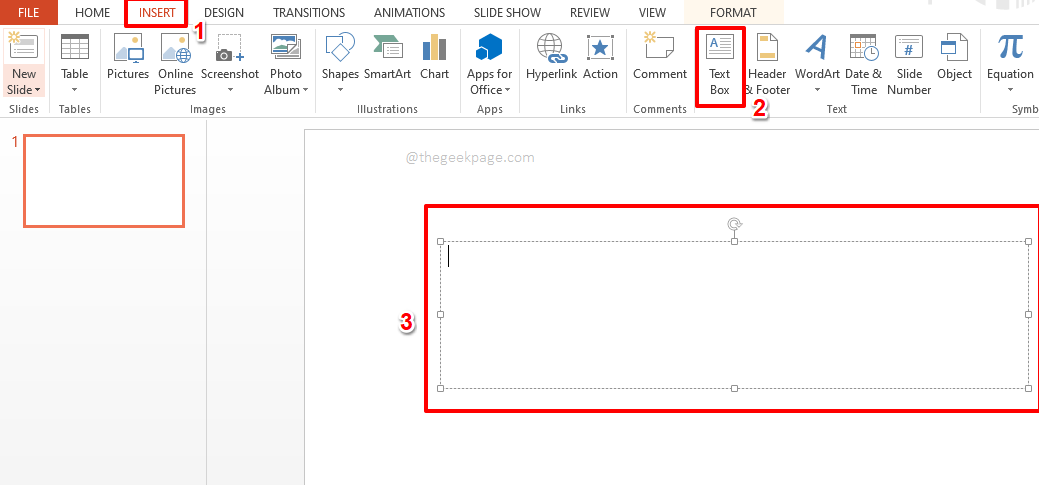
Step 1: Click on the INSERT tab from the top ribbon first. Under the Text group, click on the button named Text Box.
As next, click anywhere on the slide and drag, to draw a text box of your preferred height and width.
Step 2: As next, type in the text inside the text box. Select the text to apply styling to it.
Note: As you want to fill the text with an image, the text has to be in large font to make the change visible.
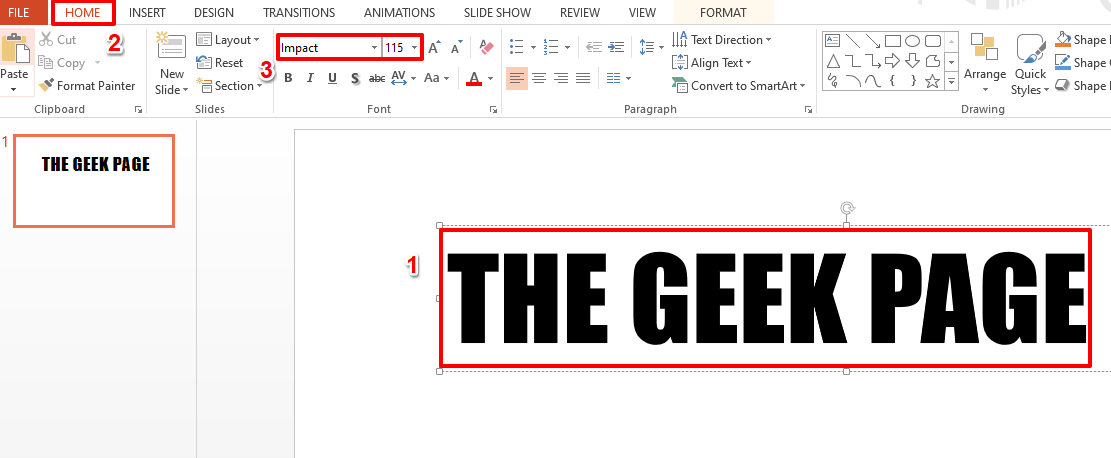
Once you have selected the text, click on the HOME tab and choose the styling options of your choice under the group FONT.
I have chosen the font type Impact and font size 115 to make my text large and distinct. You can choose any font styling of your choice.
Step 3: As next, right click on the text box and then click on the Format Shape option.
Step 4: Now on the right side of the slide, a new section named Format Shape opens up.
Click on the tab TEXT OPTIONS on the Format Shape section.
As next, under the section TEXT FILL, choose the radio button corresponding to the option Picture or texture fill.
Now, under the Insert picture from option, click on the button that says File, to choose an image from your PC.
Note: You also have the option to choose the picture from your clipboard using the button Clipboard or from the Internet using the button Online. Since I already have the image to be used present on my PC, I decided to go with the File option.
Step 5: You will now have the Insert Picture window open before you.
Navigate to the location where the image to be used is present.
Click on the image to select it and then hit the Insert button.
Step 6: That’s it. Your text should now be perfectly filled in with the image that you chose. Sit back and enjoy!
Please tell us in the comments section how easy it was for you to insert an image into your PowerPoint text, following the steps in our article.
Keep coming back for more amazing articles!


