The error prompt “LoadLibrary failed with error 126: The module could not be found” message can appear at the startup of almost any Windows app. There are some definite reasons behind this problem. Usually, the lack of administrative privileges leads to this error and as a result, the program shuts down. So, follow these easy tricks to fix the problem on your own.
Fix 1 – Run the program as an administrator
Log in to the system using an administrative account and run the application as an administrator.
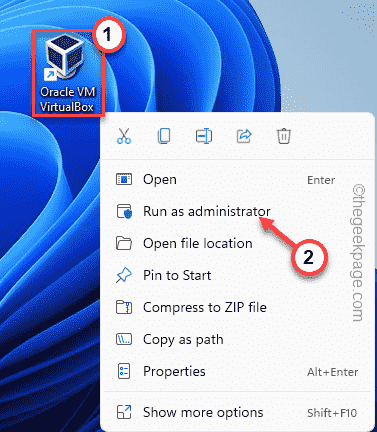
1. Locate the app icon on your desktop.
2. Then, right-click that app on the desktop and tap “Run as administrator“.
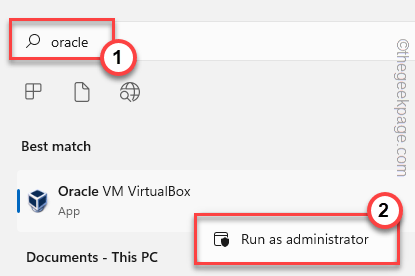
[If you can’t find the app icon on your desktop, you can also use the search box to search for the app.
1. Press the Win key and search the app name.
2. When you see the name of the app on the search results, right-click that and tap “Run as administrator“.
]
3. Now, just click “Yes” on the User Account Control page to run the app with administrative consent.
You won’t see the “LoadLibrary failed with error 126: The module could not be found” again.
If you see the error message isn’t coming up, you can set the application to always run with administrative rights.
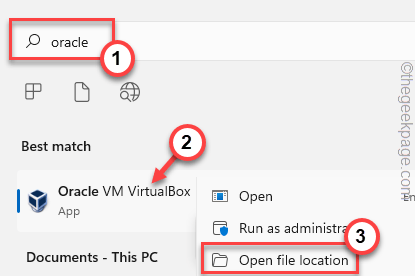
1. Tap the Windows key on your keyboard, and search for the app.
2. When you see that app on the search results, right-click it and tap “Open file location“.
3. This should bring up the actual location of the app on the drive.
4. Now, look for the application .exe file. Next, right-click that and tap “Properties“.
5. When the Properties page appears, go to the “Compatibility” tab.
6. Here, make sure to check the “Run this program as an administrator“.
7. Finally, make sure to click on “Apply” to apply the change and “OK” to save it.
Now, close the File Explorer page. Then, run the application once again with administrative rights.
It should be fixed permanently.
Fix 2 – Copy a DLL file
You can copy a particular dll file from System32 folders.
1. Press the Windows key from the keyboard and type “cmd“.
2. Now, right-click on the “Command Prompt” and tap “Run as administrator“.
3. Now, copy-paste these codes into the terminal and hit Enter.
Cd /d C:\Windows\System32
Copy atioglxx.dll .dll
Once you have executed both the codes, close the CMD terminal.
Then, launch the application and test whether this has worked out.
Fix 3 – Edit the group policy
[For Remote setups]
1. Press the Win key+R keys together.
2. Then, type “gpedit.msc” and click “OK“.
3. When the Local Group Policy Editor page opens up, follow this path –
Computer Configuration>> Administrative Templates>> Windows Components>> Remote Desktop Services>> Remote Desktop Session Host>> Remote Session Environment
4. When you reach that mentioned location, find out the “Use WDDM Graphics Display Driver for Remote Desktop Connections” policy.
5. Then, double-tap the policy to change the settings.
6. Set the policy setting to “Disabled“.
7. After that, click “Apply” and “OK“.
Now, close the Local Group Policy Editor page and restart the system.
Now, run the application and check if you are still facing Error Code 126.
NOTE –
If you still facing the same error message, follow these steps –
1. Open the Group Policy Editor.
2. Then, navigate to the same place once again –
Computer Configuration >> Administrative Templates >> Windows Components >> Remote Desktop Services >> Remote Desktop Session Host >> Remote Session Environment
3. Now, on the right-hand side, double tap the “Use Hardware Graphics Adapters for All Remote Desktop Services
” policy to access it.
4. Then, set the policy settings to the “Enabled” option.
5. After that, click “OK“.
6. This way, enable these policies on the same page –
Prioritize H.265/AVC444 Graphics Mode for Remote Desktop Connections
Configure H.264/AVC Hardware Encoding for Remote Desktop Connections
After that, exit the Local Group Policy Editor.
Restart the system. Once you have restarted, you won’t see the error message again.
Fix 4 – Rdp client is using the integrated card
If you are trying to launch the app on a remote system, there is a chance that it is using the integrated graphics card, instead of the dedicated driver.
1. You can disable the integrated card using the Device Manager.
2. Press the Win key+R keys together.
3. Then, type “devmgmt.msc” and hit Enter.
4. Once the Device Manager loads up, navigate to the “Display adapters“.
5. Then, right-click the integrated graphics card driver and tap “Disable device“.
6. Now, click “Yes” to disable the device driver.
This way, any program can’t use the integrated driver at all. Now, run the program to test this solution.
Fix 5 – Update Old Graphics card
Using an old graphics card driver may lead to this error message for some apps like Adobe Photoshop, etc.
1. Open the search box and search “device manager“.
2. Then, tap “Device Manager” to access it.
3. Once the Device Manager opens up, expand the “Display adapters“.
4. Now, right-click the display driver and tap “Update driver“.
5. Now, tap the “Search automatically for drivers” option.
This will now search automatically for the graphics driver compatible with your graphics adapter.
Once the process is complete, close the Device Manager.
NOTE –
For dedicated graphics card users, there is something else you can try to directly update your graphics card.
1. Open the GeForce Experience app.
2. Now, if you go to the “DRIVERS” section, wait for a few seconds to look for the latest available driver.
3. Once it does, tap “Download” to download the latest version of the driver.
This way, it will download the latest version of the driver.
4. Once it is done, click on the “CUSTOM INSTALLATION” option.
5. On to the next step, make sure to check the “Perform a clean installation” check box.
6. Then, click “INSTALL” on the same screen to proceed with the final installation process.
The installation process may take a few minutes as it will clean up the graphics card settings, and profiles. Then, it will install the latest version of the graphics card.
You should restart the computer once you are done. After you have restarted, run the app and test if this works.
Fix 6 – Run some file-checking scans
Running SFC, and DISM scan checks should help you resolve the issue.
1. At first, click on the 🔍 icon beside the Windows icon and type “command“.
2. Then, right-click on “Comand Prompt” and tap on “Run as administrator“.
2. Then, type this SFC scanning command and hit Enter to run the SFC scan.
sfc /scannow
3. Once the SFC scan completes, copy this code from here, paste it into the terminal, and hit the Enter key.
dism online cleanup-image restorehealth
After that, close the Command Prompt screen. After that, restart the system.
Fix 7 – Uninstall the display adapter
You can uninstall the display adapter and reinstall it.
1. Pressing the Win key+X brings up the context menu.
2. Then, tap “Device Manager” to access it.
3. In the Device Manager, just tap “Display adapters” to expand it.
4. To uninstall the driver, right-tap the display driver and tap “Uninstall device“.
5. Tap “Uninstall” when you are prompted with the warning message.
Once you have uninstalled the card driver, close the Device Manager and restart the system.
This will reset the graphics driver to the default setting once the device reboots.
Your problem will be solved.


