Have you been wondering how you can create a super cool avatar of yourself by filling in a photo of yours inside a shape just by using PowerPoint? Or are you bored of inserting images in the conventional way and would like to experiment with your photos/images taking different shapes to make your PowePoint presentations more lively?
Whatever be your requirement, if you are crawling on the Internet looking for ways using you can fill the shapes in your PowerPoint presentations with images, you cannot be at a better place. Read on, to learn how you can easily master this super cool PowerPoint trick.
Solution
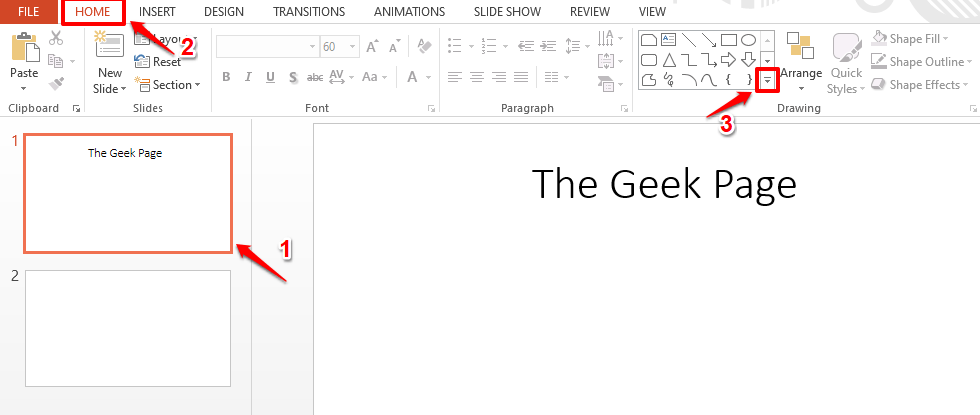
Step 1: Open the PowerPoint presentation and click on the slide on which you want to insert the shape at.
Now click on the HOME tab from the top ribbon and click on the expander icon for the shapes, under the Drawing group, to view all the shapes available.
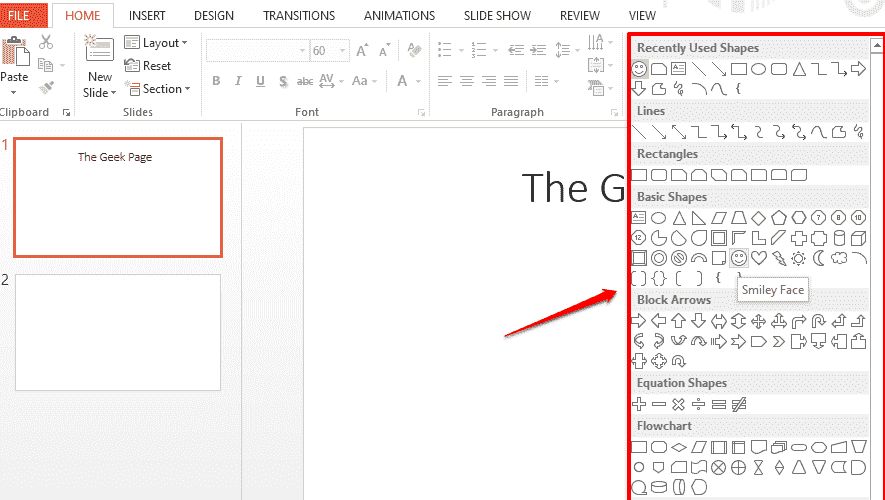
Step 2: You will now be able to see all the shapes that are available. You can scroll down using the scrollbar to view more shapes.
Simply click on any shape as per your choice. I have clicked on the Smiley Face shape.
Step 3: Now on the slide, simply click and drag to insert the shape. Use the small hollow square shapes present at the borders of the shape to resize it.
Also, you can click and drag the shape to move it around.
Step 4: Let’s now fill the shape with an image or photo as per your preference.
For that, click on the shape first. You will now be able to view the contextual tab named DRAWING TOOLS at the very top part of the window. Under the DRAWING TOOLS contextual tab, click on the tab named FORMAT.
Under FORMAT options, click on the dropdown button named Shape Fill under the group Shape Styles.
Step 5: From the list of options that get expanded out, click on the one that says Picture.
Step 6: You will now be taken to the Insert Pictures window.
Click on the Bing Image Search option if you want to get the picture from the Internet.
Or if you want to get the picture from OneDrive, then click on the option OneDrive – Personal.
Or if you have the image present on your computer already, then click on the option Browse against the From a file option to insert the picture right from your computer. I have selected this option.
Step 7: When the Insert Picture window opens up, navigate to the location where the picture to be inserted is present.
As next, click on the image and then hit the Insert button at the bottom.
Step 8: That’s it. You can now see that your image is successfully inserted into the shape.
Step 9: Following example shows the image inserted inside the Heart shape.
Step 10: The following screenshot shows how 2 different images are inserted into the Pie shape and the Bevel shape in a single slide.
Stay tuned for more amazing tricks, tips, how-tos, and hacks!


