FaceIt.sys, rzudd.sys, and the Acme. sys these three drivers are completely different and serve distinct purposes on a Windows 10 machine. But some users are complaining about facing Blue Screen of Death issues with the aforementioned system drivers. If you are one of these users, don’t worry.
Fix 1 – Run the Driver Verifier
To detect particularly which system driver is causing this issue you have to run the Driver Verifier and sort it out.
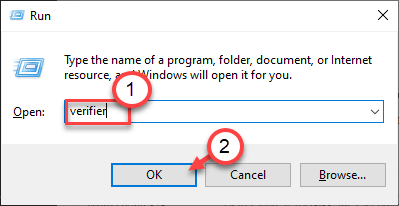
1. Press the Windows key+R keys together.
2. After that, type “verifier” in the terminal and hit Enter.

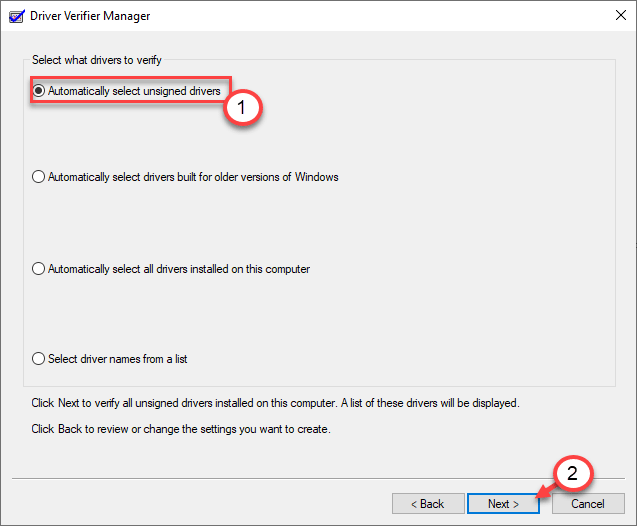
3. Once the Driver Verifier opens up, click on the “Automatically select unsigned drivers“.
4. Then, click on “Next” to check if there are any unassigned drivers.

You will see a list of unassigned drivers on your screen. You can either rollback or update the drivers from there. If you want you can also disable or uninstall the faulty ones from there.
Now, you can restart in Safe mode. In Safe mode, just uninstall/rollback/update the existing driver from your computer.
To disable the driver verifier, follow these steps –
a. Open the Command Prompt as an administrator.
b. Paste this code in the terminal and hit Enter.
verifier /reset

This way you can disable the driver verifier. This should have solved the problem.
Fix 2 – Delete/uninstall driver
You can easily delete or uninstall the faulty driver from your computer.
Follow these steps to do so –
1. Switch off your computer.
2. Then, start your computer.
When you see that the computer is starting up, press-hold the power button for 5 secs to completely switch off your device.
3. Keep repeating this process of start-force shutdown-start 3 times and at 4th time let your computer start normally.
You will see the Automatic Repair window.
4. Then, click on “Advanced options“.

5. In the Choose an option screen, click on the “Troubleshoot“.

6. Next, you have to click on the “Advanced options“.

7. We need to access the Command Prompt screen.
Then, click on “Command Prompt“.

8. After that, select your account.
9. Just type in the account password in the designated box to log in.
10. Then, click on “Continue“.

11. Once the Command Prompt window appears, type this code and hit Enter to delete the driver from your computer.
cd C:/Windows/System32/drivers
del ProblematicDriver.sys
[NOTE – Alter the “ProblematicDriver” with the name of the problematic driver on your computer.
Example – Suppose, you are facing the BSOD issue with the faceit.sys driver. Then, the command will be –
del faceit.sys
]

Close the Command Prompt window.
Restart your computer. Install the latest driver of the application on your computer and check it out.
Fix 3 – Install the latest driver
You have to uninstall and install the latest driver.
Step 1 – Uninstall the driver
At first, you have to uninstall the driver.
1. Right-click on the Windows icon and click on the “Run“.
2. Then, type “appwiz.cpl” in the Run terminal and then click on “OK“.

3. Now, right-click on the application that is associated with the conflicting driver and click on “Uninstall“.
(Suppose, you are seeing the ‘rzudd.sys’ in the BSOD screen, then you have to uninstall the Razer Synapse and Razer Cortex application.)

Once you have uninstalled all the drivers related to that particular application, close the Control Panel window.
Restart your computer.
Step 2 – Use disk cleanup
Now, you have to clean up the existing temporary files from the system.
1. Press Windows+R keys together.
2. After that, paste this command and hit Enter.
cleanmgr /low disk

The Disk Cleanup window will be opened.
3. When the Disk Cleanup: Drive Selection window appears, click on the “Drives:” and choose your Windows 10 drive (normally, it is the “C:” drive).
4. Now, click on “OK“.

Allow a while to calculate the number of trash files on the drive.
5. Now, in the “Files to delete:” section, tick all the boxes one-by-one.
6. After that, click on “OK” to start the cleanup process.

Disk Cleanup will clear out all the junk files from the C: drive.
Step 3 – Uninstall the related driver
Now, you have to uninstall all the drivers related to the problematic application.
1. At first, press the Windows key+R keys.
2. Then, type “devmgmt.msc” and hit Enter.

3. When in the Device Manager window, click on “View” and click on “Show hidden devices“.

4. Now, locate the driver associated with the problematic application.
5. Right-click on the particular driver and click on “Uninstall device“.

6. Then, check the box beside the option “Remove the driver software for this device“.
7. Finally, click on “Uninstall” to uninstall it from the device.

This way uninstall all the similar devices associated with the program.
8. Then, go to the “Action” and click on “Scan for hardware changes“.

You may see the uninstalled device once again in the list. Uninstall it in the same way.
This way, make sure there is no device driver associated with the problematic driver on the Device Manager screen.
[It is possible that Windows has a default driver for that device. Windows will still install this driver. You can leave it alone.]
Restart your computer to let these changes take effect.
Step 4 – Install the latest driver
Now you have to install the latest driver on your computer.
1. Go to the designated website and download the latest driver.
2. Once you have downloaded the setup, run it and complete the installation process.
Restart your computer and check it out.
This should solve your problem.
Fix 4 – Run Memory test
You have to run the memory test to check if there is any defect in the RAM.
1.What you have to do at first is right-click on the Windows icon and then click on “Run“.
2. Then, write “mdsched.exe” and hit Enter.

3. After that, once the Windows Memory Diagnostics opens up, you can click on the “Restart now and check for problems (recommended)“.
This will restart the device at once and start the memory-checking process.
Otherwise,
If you want you can schedule this search. Click on the “Check for problems the next time I start my computer” option.

Your system will reboot.
Wait till the computer checks for faults in the memory unit.
Fix 6 – Run system restore
If nothing so far has worked out for you, try to restore the machine to a previous time when everything was fine.
1. Force-shutdown your computer to open up the Windows RE.
2. When the Automatic Repair settings window appears, click on “Advanced options“.

3. Once the Choose an option‘ window opens up, you have to click on “Troubleshoot“.
Troubleshoot > Advanced options
4. In the Advanced options window, click on “System Restore“.

System Restore will restore your system to a particular restore point.
5. In the System Restore screen, click on “Next“.

6. Choose the restore point from the list of available restore points and then click on “Next“.

7. Click on “Finish” to finish the process.
Now, let your computer start and restore it to a version when this error wasn’t working.