If you are an avid gamer and you are trying to play a high-end game on your regular PC that does not have matching specifications, can lead to a slow gaming experience. While you may experience low frame rates for the game, it can even crash at times when the game gets intensive. In such cases you can set the game’s priority to high using the Task Manager. You can also set the priority to high for any other process if needed through the Task Manager. This helps Windows to allocate a major chunk of its capacity for the game or the process.
However, the Task Manager may sometime return an error message that says Access Denied, thus, preventing you to change the priority of the game or the process. Sometimes, it simply doesn’t let you change the priority and this issue can occur with either some processes or all. Usually, the concern arises when the error occurs for all processes on your system and not just for one. If the error occurs for one process on different systems, then it’s an issue with the process.
Fortunately, there are a few ways that can help you fix the issue. Let’s see how:
Method 1: Click on details tab in Task Manager
Before you proceed with the below steps, make sure you are logged in as the administrator or in the administrator account. Now, proceed with the below steps.
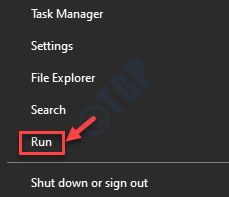
Step 1: Right-click on Start and select Run to open the Run command window.

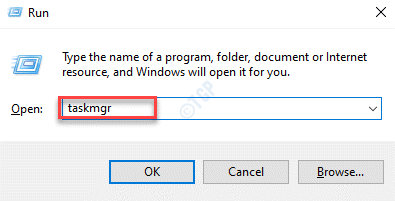
Step 2: In the Run command search field, type taskmgr and hit Enter to open the Task Manager window.

Step 3: In the Task Manager window, under the Processes tab, click on Show processes from all users button or select the Details tab.
*Note – Some users may not see the Show processes from all users options. In such cases, they can select the Details tab and follow the process.
Right-click on the process for which you want to change the priority, select Set priority and then select High.

That’s all. You should be able to set the priority of the process in Task Manager on your Windows 10 PC in this manner.
Method 2: Set Priority in Task Manager in Safe Mode
While booting your PC into safe mode will run the Windows minus some features and services, it will run the PC in a clean boot state that helps users to fix a lot of system issues. Here’s how to boot into safe mode:
Step 1: Press the Win + R keys together on your keyboard to open the Run command window.
Step 2: In the search field, type msconfig and press OK to open the System Configuration window.

Step 3: In the System Configuration window, select the Boot tab.
Now, go to the Boot options section and check the box next to Safe mode.
Under the Safe mode option, select the options as per your choice.
For instance, we selected Minimal. You can select any other options as per your requirement.

Your Windows 10 will now boot into safe mode. Once you are into safe mode, check if you can now change the priority settings for the game or the process.
Step 4: Right-click on Taskbar and select Task Manager from the menu.

Step 5: In the Task Manager window, go to the Details tab.
Now, right-click on the process for which you want to set the priority, select Set priority and then select High.

Method 3: Double-Check if Administrators Have Full Control
Step 1: Right-click on the Taskbar and select Task Manager.

Step 2: In the Task Manager window that opens, under the Processes tab, select the process for which you want to change the priority, right-click on it and select Properties.

Step 3: In the Properties window, select the Security tab.
Now, click on the Edit button.

Step 4: In the next dialogue box, in the Group or user names field, select Administrators.

Step 5: Now, under the Permissions for Administrators section, check the Allow box next to Full control.
Press Apply and the OK for the changes to be applied.

Press OK in the Properties box to save the changes and exit.
Now, go back to Task Manager window and try changing the priority for the desired process and it should work.
Method 4: Turn Off User Account Control
Step 1: Press the Win + R keys together on your keyboard to launch Run command.
Step 2: In the search box, type useraccountcontrolsettings and press OK.

Step 3: This will open the User Account Control Settings window.
Now, go to the left side and move the slider to to the bottom and set it to Never notify.
Press OK to confirm the changes and exit.

Now, go to Task Manager and check if you can change the priority settings of the desired process.