A few users when trying to access some websites, get the error “err_ssl_bad_record_mac_alert”. This might be because of network issues, incompatible MTU size, or website restrictions, if you are using old versions of Chrome, etc. In this article, we have a few different methods to solve this error. Let us see how to apply them and get rid of the problem.
Method 1: Update Chrome To The Latest Version
Step 1: Open the Chrome browser and click on the three dots at the top right corner
Step 2: From the list click on Help
Step 3: From the fly-out option click on About google chrome
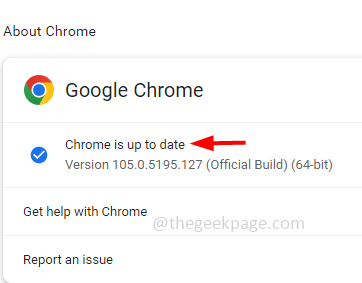
Step 4: It will scan and check if there are any updates, if yes it will automatically update else click on Update chrome and wait for the latest version to be installed. Once the chrome is updated it will show as up to date.
Step 5: Restart the computer and then check if the issue is solved.
Method 2: Add The Problematic Website In To The Trusted Site
Step 1: Open the run prompt using Windows + R keys together
Step 2: Type inetcpl.cpl in the run prompt and hit enter. It will open the Internet properties window
Step 3: Go to the Security tab
Step 4: Click on Trusted sites under select a zone to view or change security settings
Step 5: Then click on Sites button
Step 6: Copy the website URL which is giving the problem and paste it in the Add this website to the zone
Note: URL shown in the below image is just an example
Step 7: Click on Add button and then close the window
Step 8: Then in the Internet properties window click on OK
Step 9: Restart the computer and check if the issue is solved.
Method 3: Disable The Antivirus
Step 1: If you have the antivirus installed then try to disable it
Step 2: To disable it, click on the show hidden icons arrow mark at the bottom right corner
Step 3: Right click on the antivirus icon and click on disable. Now check if the issue is solved.
Method 4: Change The Startup Type Of Windows Time Service
Step 1: Open the run prompt using Windows + R keys together
Step 2: Type services.msc in the run prompt and hit enter
Step 3: Scroll down and find for Windows Time
Step 4: If the service is running first stop the service by clicking on the Stop button
Step 5: Double click on it and from the startup type dropdown select Automatic
Step 6: Click on the Start button
Step 7: To save the changes click on Apply and OK
Step 8: Restart the system and check if the issue is solved.
Method 5: Disable The Killer Network Services
Step 1: Open the run prompt using Windows + R keys together
Step 2: Type services.msc in the run prompt and hit enter
Step 3: Scroll down and find for Killer Network Service
Step 4: Double click on it and from the startup type dropdown select Disabled
Step 5: To save the changes click on Apply and OK
Step 6: Restart the system and check if the issue is solved.
Method 6: Turn Off Stream Detect In Killer Control Center
Step 1: If you are using Alienware computer or Dell computer then open the killer network control panel
Step 2: In the opened control panel, click on Settings
Step 3: Then on the right side, disable the Advanced stream detect by clicking on the toggle bar below it
Step 4: Restart the computer and check if the issue is resolved.
Method 7: Change The Routers MTU Size
Step 1: Open the browser and enter your router login address. The default address would be 192.168.0.1 or 192.168.1.1 and most routers use this. Or you can contact your router manufacturer for this information
Step 2: Check for the WAN section where you can change MTU size. In most routers it will be under advanced settings of the WAN section
Step 3: In the MTU size field change the value to 1400
Step 4: To save the changes click on Save button.
That’s it! I hope this article is helpful. Let us know which of the above method did you apply to solve the issue. Thank you!!


