If your default browser is Google Chrome, you would know that apart from its great features, it’s also prone to random errors. The errors are accompanied with messages that create more confusion. One such Google Chrome error is ERR_CONNECTION_CLOSED which means that the connection to the website you were trying to open, is closed. In short, you are unable to access the desired website, This can be confusing, because it offers no explanation on how to fix the issue. However fortunately, the ERR_CONNECTION_CLOSED Error in Google Chrome can be fixed. Let’s see how.
Method 1: Flush DNS and Reset Network Settings (Using Command Prompt)
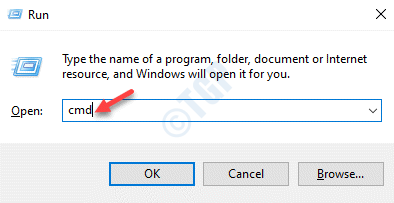
Step 1: Right-click on Start and select Run. This will open the Run command window.

Step 2: In the search field, type cmd and press the Ctrl + Shift + Enter hotkey on your keyboard to launch Command Prompt with administrator rights.

Step 3: In the Command Prompt (admin) window, run the below commands one by one and hit Enter after each command:
ipconfig/release
ipconfig/all
ipconfig/flushdns
ipconfig/renew
netsh int ip set dns
netsh winsock reset
Once completed, exit Command Prompt and restart your PC. You can now open Chrome and browse through your favorite websites normally.
Method 2: Reset Windows Winsock Protocol
Step 1: Press the Win + R keys together on your keyboard to open the Run command window.
Step 2: In the Run command search box, write cmd and then press the Ctrl + Shift + Enter keys together to open the Command Prompt in elevated mode.

Step 3: In the Command Prompt (admin) window, execute the below command:
netsh winsock reset catalog

Now, restart your PC and launch Chrome. You should be able to browse through websites now without the error.
Method 3: Turn Off Proxy Server and VPN Connections
Step 1: Right-click on Start menu and select Run.

Step 2: In the Run command window that opens, type inetcpl.cpl in the search box and hit Enter to open the Internet Properties window.

Step 3: In the Internet Properties window, select the Connections tab and under the Dial-up and virtual private network settings section, select the VPN and click on the Remove button on its right.

Step 4: Now, click on the LAN settings button at the bottom of the screen.

Step 5: In the LAN Settings window, uncheck the box next to Use a proxy server for LAN and select the Automatically detect settings option above.

This will remove the VPN and disable the configured proxy. Once done, launch Chrome and you should now be able to browse through the web without facing the ERR_CONNECTION_CLOSED error.
Method 4: Change DNS Server Manually
Step 1: Press the Win + X keys together on your keyboard and select Run to launch the Run command box.

Step 2: In the search field, type ncpa.cpl and press OK to open the Network Connections window.

Step 3: In the Network Connections window, right-click on the active WiFi network and select Properties.
Note that if you are using ethernet connection, right click on Ethernet adapter.

Step 4: In the WiFi Properties window, go to the This connection uses the following items section. Here, select Internet Protocol Version 4 (TCP/IPv4) and click on Properties.

Step 5: Next, select Uses the following DNS server addresses and input the below DNS server addresses respectively:
Preferred DNS server: 8.8.8.8

Alternate DNS Server: 8.8.4.4
Press OK to exit the window.

Now, that you have changed the Google DNS addresses, open Chrome and check if the error is gone.
Method 5: Reset Chrome Settings to Default
Step 1: Open Google Chrome and navigate to the three dots on the upper right side of the browser.
Click on it and select Settings.

Step 2: In the Settings window, scroll down and select Advanced.

Step 3: Now, scroll down further and under the Reset and clean up section, click on Restore settings to their original defaults.

Step 4: In the Reset settings prompt, press the Reset settings button below to confirm the action.

Now, re-launch Chrome and check if you can browse through the websites without coming across the error.
Alternatively, you can clear the Chrome’s cache and cookies, update Chrome to the latest version, or remove the Chrome extensions to check if it’s working. If nothing works, the last option would be to uninstall Chrome and reinstall it. This should help you get rid of the error.