Several windows users complained that when they tried accessing some websites on the google chrome browser on their system, they could not access the webpage. It also displayed a message on the browser that said “The site can’t be reached” with an error code ERR_ADDRESS_UNREACHABLE.
There could be a number of potential reasons behind this problem and they might be due to website server issues, proxy server settings, an unstable internet connection, and so on.
If you are also going through a similar kind of problem, then do not panic. We have got a bunch of solutions after deeply analyzing the issue in this post.
Before you proceed, please try these workarounds given below:
- Try to check if the user tried accessing the website from some other device and there is no problem, then it means there is some problem with the device/windows system so please try and diagnose the problem to fix it.
- Next, try if the problem is with the browser itself by trying to access the website from some other browser installed on your system.
- If not, check if the issue is caused because of some browser extensions/add-ons by trying to access the website in incognito mode.
Fix 1 – Check if your internet connection is stable
There is a high chance that the main problem might be with the internet connection on your system. It is one of the possibilities that the user did not notice the internet connection went down. So firstly, if you are using WiFi, then restart the wi-fi router once and reset it by pressing a pin behind your router and reconnecting it to your system.
If you are using an Ethernet cable connection, then first disconnect it from the system and wait for about 1-2 minutes and then try to connect it back. IF this does not work, then probably you should call the internet service provider and get a stable internet connection for your system.
Fix 2 – Clear Chrome’s DNS Host Cache
Here are the steps which help the user how to clear the DNS host cache on the chrome browser.
Step 1: Open the Google Chrome browser app on your system.
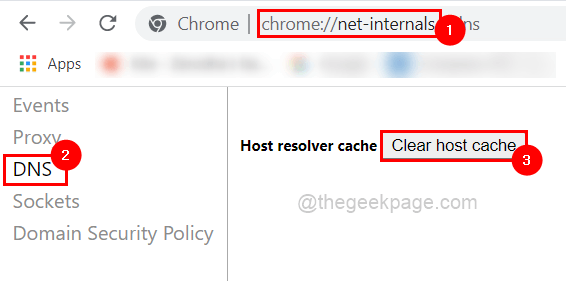
Step 2: Open a new tab and on the address bar of the new tab, type chrome://net-internals/ and press the Enter key.
Step 3: Then, click the DNS option on the left side of the menu as shown below.
Step 4: Next, click the Clear host cache button which clears the DNS cache of the chrome browser.

Step 5: Once done you can close the tab.
Fix 3 – Enable or Disable Proxy Server Settings
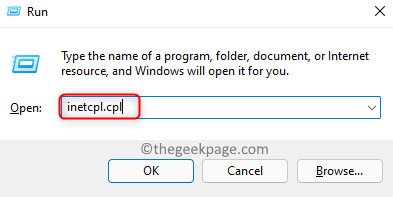
Step 1: Press the Windows and R keys together which opens the run command box.
Step 2: Next type inetcpl.cpl in it and hit Enter key.

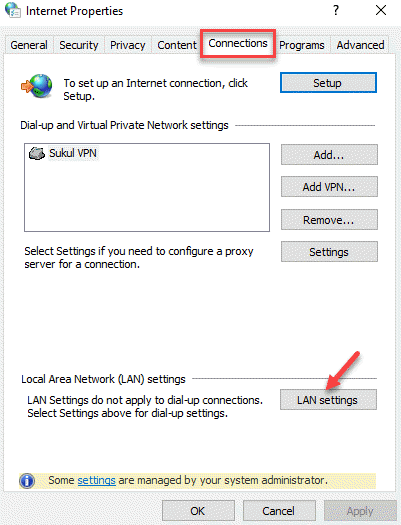
Step 3: This opens the Internet Options window on the system.
Step 4: Now you should go to the Connections tab and click LAN settings at the bottom as shown below.

Step 5: Now you can enable the Use a proxy server for your LAN checkbox under Proxy server.
Step 6: Then, enter the value 127.0.0.1 in the Address textbox and 80 in the Port and click OK and later you can check if the problem got solved.

Step 6: If this did not work out, you may have to disable the Use a proxy server for your LAN checkbox by unchecking it as shown below.

Step 7: After it is done, close the internet options and check if the problem is fixed or not.
Fix 4 – Clear Browsing History Data of Google Chrome
Step 1: Open the Google Chrome browser on your system.
Step 2: To open the Settings page, press and hold the ALT + F keys and then, hit the S key on your keyboard.
Step 3:On the Settings page, go to the Privacy and security option on the left side menu as shown below.

Step 4: After selecting the Privacy and security option, click Clear browsing data on the right side as shown in the below image.
Step 5: In the Clear browsing data window under the Basic tab, select All time as Time range and click all the three checkboxes to select it.
Step 6: Then, click Clear data to clear all the browsing history, cookies, other site data, Cached images and files as shown below

Step 7: Close the settings page and check if the issue still persists once it is cleared.