When it comes to creating bootable USB drives, Rufus is the best in the business. Just plug in your USB stick, browse the ISO file, and hit the “START” option to start the ISO extraction process and that’s it! But sometimes while Rufus is extracting the ISO file, it may stumble upon an error message “Error: ISO image extraction failure.” You have to close the error message and retry the whole process again.
Fix 1 – Check the USB device and ISO file
Before retrying the process, check the ISO file and the USB device once again.
1. Make sure the USB device is connected to your system correctly. You can use the ports on the rear side of the cabinet to plug in the drive.
2. The ISO file may get corrupted. You can’t directly do an integrity check over the ISO file, try to mount the file from your file explorer and test whether you can view the files within it or not.
This way, check if this works out.
Fix 2 – Create a new ISO
If the existing ISO file is corrupted due to any reason, you can extract the files using an extractor and then recreate a new ISO to use it in Rufus.
Step 1 – Extract the ISO file
You can easily extract the ISO file using the WINRAR.
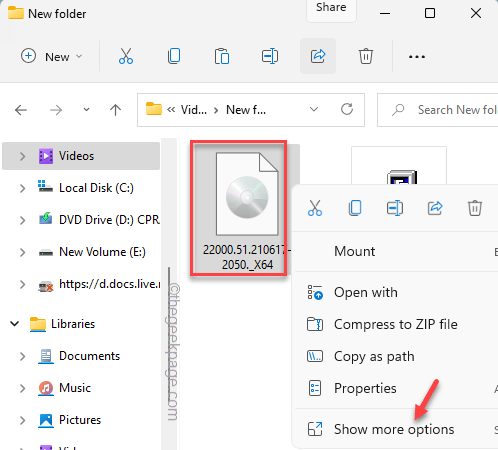
1. Open the File Explorer and navigate to the ISO file.
2. Just right-tap the ISO file and tap “Show more options“.
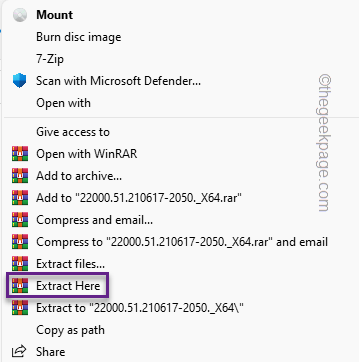
3. Then, tap the “Extract here” to extract all the files within this folder.
Additionally, you can also extract the contents of the ISO file in a folder of your choice. In that case, you have to choose “Extract files…“.
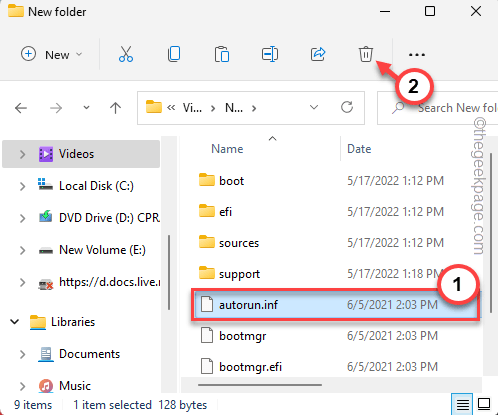
4. Once you have extracted the files, look for a file named “Autorun” in the extracted files list.
5. Select the file and remove it from your system.
Once you have done all these, close the File Explorer.
Step 2 – Download AND INSTALL ISO creator
Now you can easily create a new ISO with the extracted files using Free ISO Creator.
1. At first, download the Freeisocreator setup file.
Once you have downloaded the zip file, close the browser.
2. Now, just extract the “freeisocreator_setup” file on your system.
3. Now, run the setup file on your system to install the app.
4. In the installer page, tap “Next” to proceed.
5. Tap on “Next” several times and finally, click on “Install“.
6. The installation process should be over in a few seconds. Once it is done, tap “Finish“.
Step 3 – Use ISO creator
You can create Free ISO Creator tool to create the ISO quickly.
1. Press the Windows key and tap “Free ISO Creator” to access it.
Otherwise, you can also double-tap the app icon on the desktop.
2. Now, tap “Browse” so that you can navigate to the folder containing the extracted ISO files.
3. Navigate to the ISO files and select the folder housing the ISO contents.
4. Next, tap “OK“.
5. Once you have selected the folder, tap “Save As“.
6. Now, select the location where you want to store the ISO file.
7. Give an appropriate name to the ISO file and tap “Save“.
8. Once you have done all these, click “Create” to start creating the ISO file.
This process may take a while. So, you have to be patient.
9. Once you have created the ISO file, you tap “Close“.
Step 4 – Use this ISO
Now, you can use Rufus to create the bootable drive.
1. Launch Rufus.
2. Select the USB device from the Device drop-down menu, if it isn’t automatically selected.
3. Then, tap “SELECT“.
4. Just select the ISO file that you have created just now and tap “Open“.
5. Once you have selected the ISO file, you can additionally switch the various parameters in the “Format options” section.
6. After that, tap “START“.
That’s it! This way, you can create the bootable USB drive without any further issues.


