Mostly, the users who are using the Epson Printer for a long time, see the error code 0x97 on their printer screen. The error shows up instantly and the printer would stop printing. There won’t be any warning message as such before encountering this error. One won’t be able to use the printer again until this error is resolved. This error is commonly seen in Epson WorkForce series WF-3640, WF-4630, or WF-7610 models.
In this article, we have sorted out some fixes that can help to solve Error Code 0x97 in an Epson Printer
Fix 1: Remove everything from the Printer
Step 1: If there are any printing tasks, cancel them
Step 2: Check the Paper tray and remove the paper jam if any.
Step 3: Disconnect all the cables that are connected.
Step 4: Remove the Ink Cartridges from the printer head
Step 5: Press and hold the Power button for a minute
Step 6: Plugin all the removed cables
Step 7: Reinstall the Ink Cartridges back to the slot
Step 8: Turn on the Printer and perform a print test.
Check if this fixes the issue. If not, try the next fix.
Fix 2: Ensure that the Print Head is Clean
Step 1: Remove all the Ink Cartridges from the Printer and place them on a clean surface in an inverted position
Step 2: Once, all the ink cartridges are removed, remove the paper head
Step 3: Clean the bottom of the printhead using a clean lint-free cloth dipped in warm water.
Step 4: Clean the nozzle area of the print head well until you stop seeing ink on the cleaning cloth
Step 5: Carefully dip the Print head in warm water for around 10 minutes. Make sure the water is warm and not boiling hot.
Step 6: Remove the Print head from the water and clean the surface with a clean dry lint-free cloth to remove the water content and moisture from the surface
Step 7: Now, place the Print head on a clean surface and air dry it for around 15 -20 minutes
Step 8: Place the Print head back in its place
Step 9: Place the Ink Cartridges back to respective slots
Step 10: Turn On the Printer and see if it starts working.
Fix 3: Reset the Printer
NOTE: To perform this fix, you might need some other person to help you.
Step 1: Disconnect all the connected cables from the Printer
Step 2: Let the printer rest for some time. Around 5 mins
Step 3: Hold the power button for a minute
Step 4: Continue holding the power button and simultaneously, connect all the cables that you disconnected.
Step 5: Continue holding the power button for a minute and then release it
Step 6: Once the printer has powered on, check if the issue resolves.
In case this fix doesn’t help, try the fixes listed below.
Fix 4: Update the Driver for your Printer
Step 1: Open the Run Dialog holding the keys Windows+R at the same time.
Step 2: Type devmgmt.msc and hit Enter

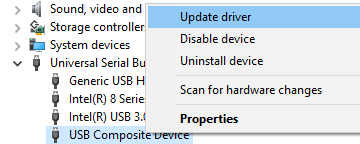
Step 3: Device Manager window opens. Scroll down and double-click on Universal serial bus controllers.
Step 4: Right-click on USB Composite Device and select Update Driver

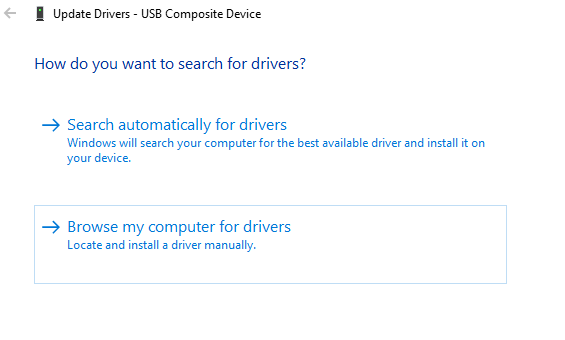
Step 5: Click on Browse my computer for drivers

Step 6: Choose Let me pick from a list of available drivers on my computer

Step 7: Click on USB Composite Device and click on the Next button

Step 8: Now, the drivers will be installed. Wait for some time for the installation to finish. You will see the dialog as shown below after installation

Step 9: Restart the system
Step 10: Open Device Manager. From the top menu choose Scan for Hardware changes

Now check if the issue has resolved. If not, try the next fix listed.
Fix 5: Manually install the Printer Drivers
In some cases, it is noticed that installing the drivers directly from the manufacturer’s page has helped. To do so,
Step 1: Go to the manufacturer’s page. That is the Epson Printers Page
Step 2: Download the required Driver
Step 3: Run the .exe file that is downloaded to the system by double-clicking on it.
Check if this fixes the issue, If not try the next fix.
Fix 6: Run the Printer Troubleshooter
Step 1: Open the Run Dialog in your System, it can be done by holding the Shortcut keys Windows+r
Step 2: In the appearing window, type the command ms-settings:troubleshoot and click on OK

Step 3: In the Settings–> Update & Security –> Troubleshoot window that appears, Click on Additional troubleshooters

Step 4: In the Additional Troubleshooters window that opens, click on Printers

Step 5: Now, click on Run the troubleshooter button

Step 6: Now, the system will start looking for problems. You will be notified once the problem is found, follow the on-screen instructions to fix the problem.
In case you are not able to fix the issue with all the above fixes, check if the printer has the warranty and reach out to the Epson customer care. If not, please contact the Hardware Specialist and check for any hardware repairs.
That’s All
We hope this article has been informative. Kindly comment and let us know which of the above fixes helped you.
Thank you for Reading.