Sleep mode is the best that windows has offered to its users. This will save the battery power and also shuts down the hard disk which will maintain its health and overall performance. But many of the windows users have reported that while their system is in sleep mode, it automatically wakes up, which is what the users do not like. It can be really frustrating if something like this happens and they are not able to do anything because this is not an error or warning. Here all you need to change a small settings called wake timers, which you can either enable or disable it as per your requirement. If you are looking forward to it, then please go through this post which will help you on how to do.
How to Enable or Disable Wake Timers in Windows 11
Step 1: Press Windows key on the keyboard and type edit power plan.
Step 2: Then, Select Edit power plan from the search results as shown below.

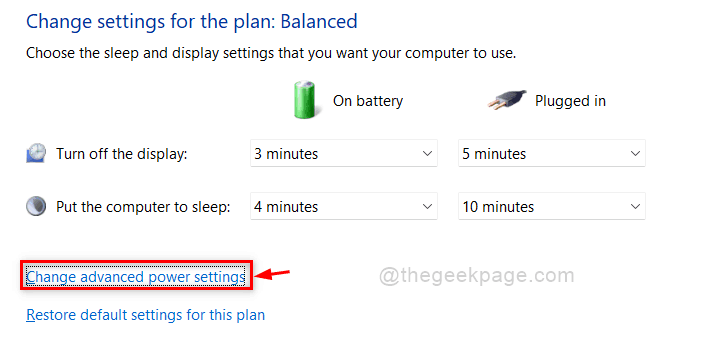
Step 3: Then, Click Change advanced power settings link button as shown below.

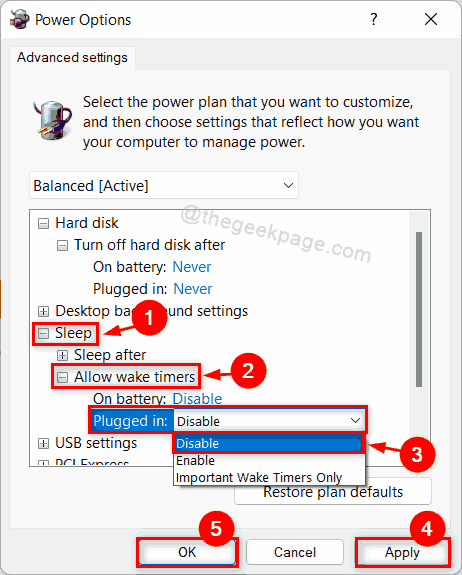
Step 4: In the Power options window, Click Sleep option to expand and then, click Allow wake timers option.
Step 5: Once done, click Plugged in dropdown list and select Disable from the list to disable wake timers on your system.
Step 6: Do the same for On battery option as well and Click Apply and OK button to make changes.

Step 7: Select enable from the dropdown list of Plugged in option if you want to enable wake timers.
Step 8: Also perform the same for On battery option as well if you want to enable wake timers as shown in the below screenshot.
Step 9: Then, Click Apply and OK to make changes.

Step 10: Close the control panel window.
That’s it guys!
Hope this post was informative and helpful to you.
Please let us know in the comments section below.
Thank you for reading.