Wi-Fi networks can be configured in such a way that their SSID (Wi-Fi name) doesn’t appear on the available networks section of any of the devices. These are the hidden Wi-Fi networks. There are many reasons why a network could be hidden, one of the top reasons being enhanced security. However, there definitely is a way using which you can connect to any hidden network, provided you know its network name, security type and password.
This article explains in simple steps how you can connect to a hidden Wi-Fi network from your Windows 11.
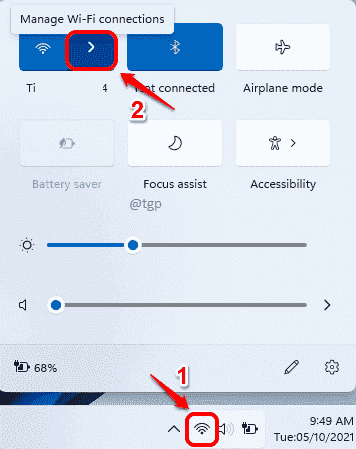
Step 1: Click on the Wi-Fi icon on the bottom right corner of the taskbar.
As next, next to the Wi-Fi icon, click on the right arrow for managing the Wi-Fi connections as shown in the screenshot below.
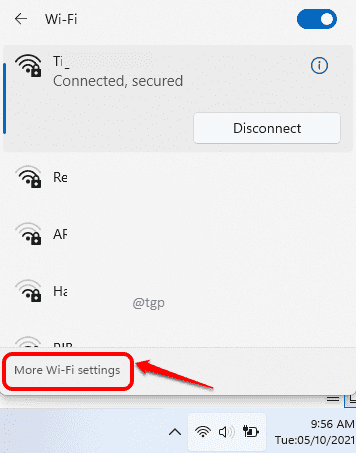
Step 2: You will now see all your available networks. Your hidden network will not be present in this list.
Click on More Wi-Fi settings at the bottom.
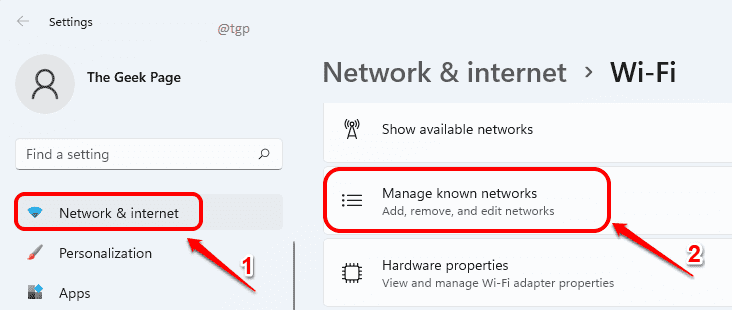
Step 3: In the left window pane, click on Network & internet and in the right window pane, click on Manage known networks.
Step 4: As next click on Add network button.
Step 5: Now Add a new network window will be open. Follow the steps below to successfully connect to your hidden network.
- Enter the SSID of the hidden Wi-Fi network in the Network name field.
- Choose the Security type from the drop down list.
- Enter the password to your hidden network in the Security key field.
- Check the checkboxes corresponding to both the Connect automatically and Connect even if this network is not broadcasting options.
- Once everything is done, click on the Save button.
You should now be successfully connected to the hidden Wi-Fi network. Please tell us in the comments if you still face any issues.


