You must have used the autocorrect feature in the smartphones, that automatically helps correct the words you type incorrectly on the touchpad. In the similar fashion, Windows 11 offers an autocorrect feature that helps you type flawlessly by automatically correcting any spelling mistakes as you type on your touch keyboard. For instance, when you type on Google search, fill a form, etc. The suggestions appear above the touch keyboard.
While some users find this feature really helpful as it helps them type without any mistakes, others may find it annoying. That’s because when unable to identify the word, the autocorrect function may suggest a different word altogether for the word you want to type. This can lead to an error and pull up a different search result or end up filling up a different word in the form. It can also be sometimes that the word you typing is correct but still it gets changed to another word automatically.
So, this article will focus on offering a solution for whether you want to enable or disable the autocorrect feature on Windows 11. Let’s see how..
How to Turn On or Turn Off the Autocorrect Suggestions on the Touch Keyboard in Windows 11
By the Touch Keyboard, we mean the on-screen keyboard for those having the touchscreen laptop. So, while with the autocorrect feature off you won’t see any suggestions above the touch keyboard, with the feature on, you can and that can be either helpful for some or frustrating for others. Let’s see how to enable the autocorrect feature on the touch keyboard on your Windows 11 PC:
Step 1: Press the Win + I keys together on your keyboard to launch the Settings app.
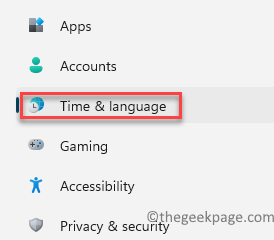
Step 2: In the Settings window, on the left side of the pane, click on the Time & language option.
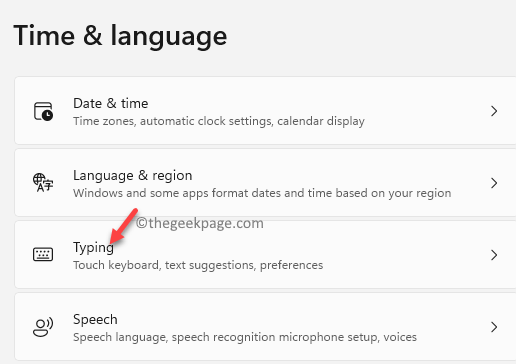
Step 3: Now, go to the right side of the pane and click on Typing.
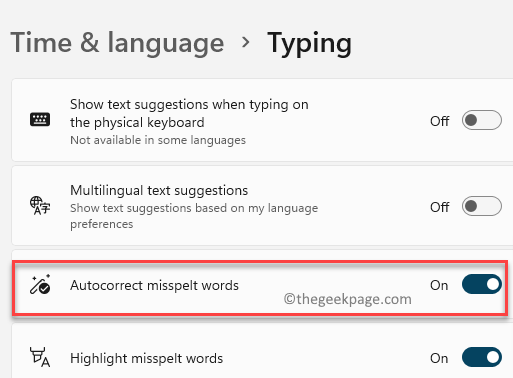
Step 4: Next, in the Typing settings screen, go to the right side and under the Typing section, go to the Autocorrect misspelled words option.
Move the slider next to it to the right to turn it on.
This will enable the Autocorrect feature on your Windows 11 PC.
You can try typing a few words and any misspelt word should be corrected automatically.
*Note – To disable the autocorrect feature, simply follow the Steps 1 to 3 as it is and then move the slider next to the Autocorrect misspelled words option to the left to turn it off.
Now, the autocorrect option is disabled. Exit the Settings window and try typing a sentence in the Google search using the touch keyboard and the autocorrect function should not bother you anymore.


