NetBIOS or Network Basic Input/Output System is the program in Windows 11, 10 that lets an application running on different computers transfer data over a LAN. This NetBIOS is very useful when you enable the NetBIOS in TCP/IP settings in Windows 11 or 10. In this article, we are going to show how to enable the NetBIOS over TCP/IP on your computer.
How to enable/disable the NetBIOS over TCP/IP in Windows 11, 10
It is very easy to enable the NetBIOS over TCP/IP in Windows 11, 10. There are mainly two ways to do so.
Way 1 – Using the Control Panel
Way 2 – Using the Registry Editor
You can follow any of these two ways.
Way 1 – Using the Control Panel settings
You can use the Control Panel settings to enable the NetBIOS over TCP settings.
1. At first, press the Windows key+R keys together.
2.Just write “ncpa.cpl” and then click on “OK“.

This will open up the Network Connections screen.
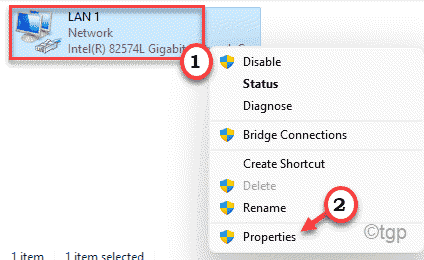
3. Now, you need to right-click on your network adapter and then click on “Properties” to access it.

4. Then, you have to double click on the “Internet Protocol Version 4(TCP/IPv4)” to access it.

5. After that, click on the “Advanced” settings to adjust it.

6. Next, just go to the “WINS” section.
7. After that, click on the radio button beside the “Enable NetBIOS over TCP/IP” option.
8. Then, click on “OK” to save the settings.

This way, you can easily enable the NetBIOS settings.
Now, if you want to disable it, go this way –
1. At first, press the Windows key+R keys together.
2. Again, type “ncpa.cpl” and hit Enter.

3. Now, right-click on your network adapter and tap on “Properties” to access it.
4. Just like before, double tap on the “Internet Protocol Version 4(TCP/IPv4)” settings.

5. Just, click on “Advanced...” in the ‘General’ section.
6. Now, go to the “WINS” panel.
7. Then, click on the radio button beside the “Disable NetBIOS over TCP/IP” to disable it.

8. Finally, click on “Apply” and “OK” to save the changes.

This way you can easily adjust the NetBIOS settings.
Way 2 – Using the Registry Editor
You can also use the registry editor to create a new ‘NetBIOSOptions’ key to adjust the NetBIOS settings.
1. At first, click on the search icon and type “regedit“.
2. After that, click on the “Registry Editor” to open up the Registry Editor.

NOTE –
In the next step, you will be adding a new key to your computer registry. This is risky as the registry keeps crucial info on the system. So, we suggest you create a backup of the registry keys if you haven’t created one yet.
a. Once you have opened the Registry Editor, you will need to click on the “File” and then click on “Export“.
b. Then, just save the backup in a secure place.

3. When the Registry Edit0r opens up, go to this key header file–
Computer\HKEY_LOCAL_MACHINE\SYSTEM\CurrentControlSet\Services\NetBT\Parameters\Interfaces
4. On the left-hand pane, select the first “Tcpip” iteration.
5. Now, on the right-hand side, double click on the “NetbiosOptions” key to modify it.

6. If you want to enable the NetBIOS over TCP/IP, set the “Value data:” to “1“.
7. Then, click on “OK” to save it.

[
a. If you want to disable the NetBIOS over TCP/IP settings, just set the ‘Value data:’ to “2“.
b. Then, hit Enter to save the change.

]
8. Now, this way, follow these same steps to alter all the “NetbiosOptions” values for all the “tcpip” iterations.
If you can’t find the “NetbiosOptions” value in any “tcpip” iteration, skip it.

Once you have done this, close the Registry Editor screen. Then, restart your computer. This way, you can easily enable/disable the NetBIOS settings.