Today, most of the contracts, documents are sent online. Hence, electronic signatures are much needed. Having the soft copy of your signature and being able to add that signature to any document becomes really important.
This article lets us explore different ways of generating the signature and also look at editing the signature and saving it for further use.
Method 1: Drawing your signature using the mouse
Step 1: Open the document in Microsoft Word
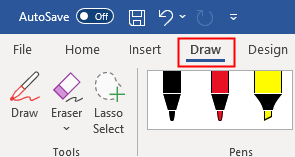
Step 2: From the top menu, click on the Draw tab. If you are able to see the Draw tab, go to Step 8. If not follow the below steps.
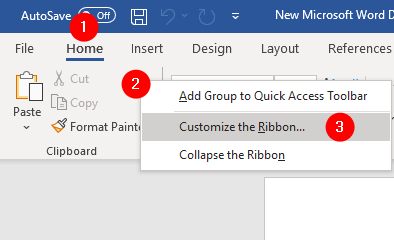
Step 3: Click on any of the top menu options like Home, Insert, design except File
Step 4: Right-click anywhere on the ribbon
Step 5: From the context menu, choose to Customise the Ribbon

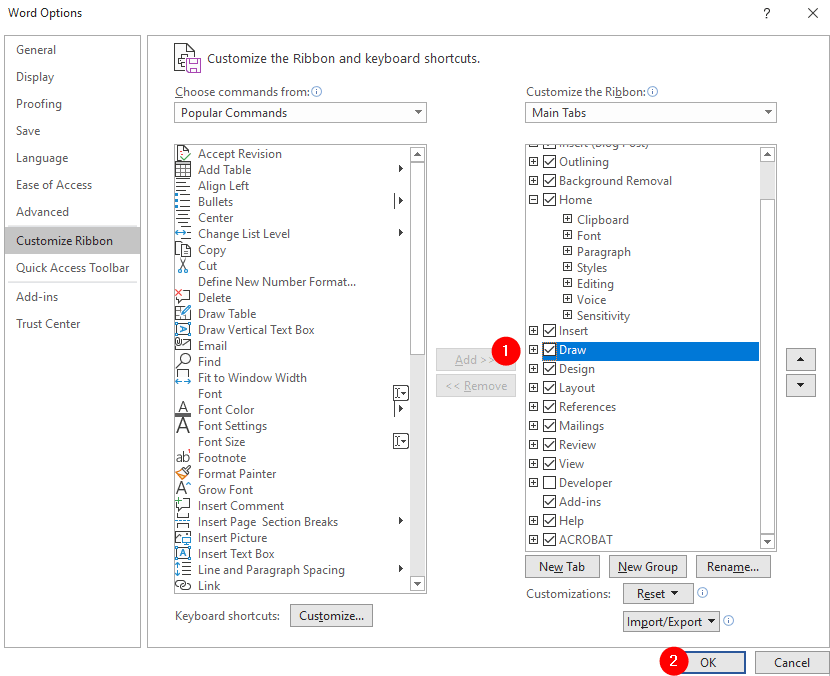
Step 6: In the Word options window that opens, from the right-hand side section, tick on the Draw option
Step 7: Click on the OK button

Step 8: Now, Click on the Draw menu at the top.

Step 9: Click on Draw again in the sub-menu as shown below and then Choose the pen to draw from
Step 10: Click on the downward arrow and choose the thickness of the pen
Step 11: Optionally, in the same menu, you can also choose the color of your choice

Step 12: Draw your signature carefully. After drawing your signature, let’s say it looks like follows

Step 13: Evidently, the signature looks too big. To change the size of the signature with the same aspect ratio, click on the signature. Then press the Shift button and then use the corner pointer (refer to the below image) to increase or decrease the size.

Step 14: Click on the signature and move it to the required position. After doing that, the signature should look like follows

Step 15: You can save the signature and the description below it for future use. To do so, follow the below steps
Step 16: Select the contents that you want to be used in the future as shown below
Step 17: From the top menu, click on the Insert tab
Step 18: From the right-hand corner, click on Quick parts
Step 19: From the drop-down, click on Save Selection to Quick Part Gallery

Step 20: In the Create New Building Block window that opens, give a suitable name and press the Ok button

Step 21: Whenever you plan to use it, just click on Insert–> Quick Parts, select the required signature from the list.

Method 2: Taking a picture of the Signature
Step 1: Using a pen sign on a crease-free paper and then take a clear picture of the same using a camera/phone camera
Step 2: Transfer that image to the computer, either by physical transfer or mail, one-drive, or any sharing means.
Step 3: Open the Microsoft Word document, where you plan to use it
Step 4: Click on Insert from the top menu. Then click on Pictures
Step 5: From the drop-down, click on This Device

Step 6: Browse to the location of the file and click on the image file
Step 7: Now, you will be able to see the image on the word document
Step 8: The image will be very big in size and might fit on the whole page. So, crop only the required part from it
Step 9: To crop the image, right-click on the image and then choose crop as shown below

Step 10: Trim the unnecessary parts and keep only the signature
Step 11: If required rotate the image using rotating arrow option shown below

Step 12: Double picture on the picture, to see a Picture Format menu at the top
Step 13: From the menu, click on Color and then choose Black and white 50% or Black and White 75% or Set Transparent Color
Note that each image is different. Choose the color effect that suits you the best.

NOTE:
- If you notice that the sign is not clear with the above options, click on Artistic Effects and then choose Photocopy. Now repeat step 13 and press Ctrl+S
Step 15: You can see that the image being processed as shown below

Step 16: Evidently, the size of the signature needs to be reduced. To change the size of the signature with the same aspect ratio, click on the signature. Then press the Shift button and then use the corner pointer (refer to the below image) to increase or decrease the size.

Step 17: As seen in the above image, the signature would have a white background. This would fit in all the documents that have a white background.
Step 18: Let’s say the document has some other color as the background, then the sign would look as follows

Step 19: In cases like this, double-click on the image. You can see the Picture Format menu
Step 20: Click on Remove background

Step 21: You can see a pink area surrounding the signature. Everything in pink will be removed. Everything in pitch black color will be kept.

Step 22: As seen in the image above, the whole signature is not in pitch black color.
Step 23: Select Mark Areas to Keep option from the Background Removal menu at the top and then click on the signature area.

Step 24: Please zoom the page and then start clicking on the signature area. On clicking on the area you should see that some portion of the sign around that area turning pitch black as shown below

Step 25: Repeat the same process till the entire signature is in pitch-black color as shown below

Step 23: As seen in the image above, some of the portions are white in color. We have to eliminate that. To do so, click on Mark Areas to Remove from the top menu and then click on the white area. Again, it is better to zoom the page and then start clicking on the signature area.
Step 24: Once, all the necessary changes are done, click on the Keep Changes button

Step 25: The Signature will look as follows

Step 17: If you want to save this image (just the signature image), you can do so. Just right click on that image and choose Save as Picture from the context menu

Step 18: If you want to save the Sign and description for later use, then follow steps 17-21 from Method 1.
Method 3: Signing from the touchpad in the Phone
Step 1: Open Microsoft Word on your Phone
Step 2: Open blank document
Step 3: Click on the Home, a pop-up menu shows up, choose Draw

Step 4: Using the touchpad, draw your signature.
Step 5: Save the document
Step 6: Share the document to your laptop using email or one drive or any means of your choice.
Step 7: Repeat steps 12 to 21 from Method 1.
That’s All.
We hope this article has been informative. Thank you for reading.
Please comment and let us know which of the above methods helped you. Also, kindly comment and let us know if you are facing any issues, we will be glad to help.