If you are facing a dxgi.dll error at any stage like when you are trying to run a particular application or when you start Windows or install some application etc then it might be because of corrupted files, outdated updates, or missing dxgi.dll files. dxgi.dll is a DirectX graphics infrastructure file that comes under the .dll category and this error can be solved. In this article, we have different methods that you can try to get rid of the problem. So let us start!
Method 1 – Check For The Windows Updates And Install Them
Step 1 – Open the Windows settings using Windows + I keys together
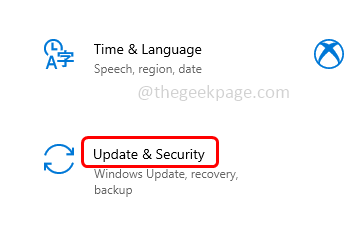
Step 2 – Click on Update & security
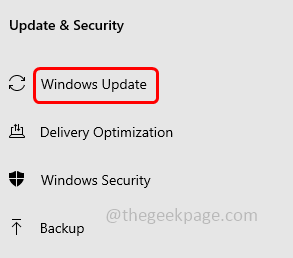
Step 3 – From the left, click on Windows update
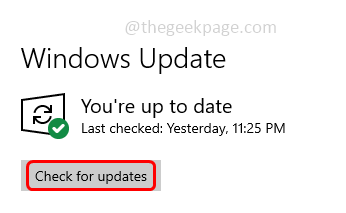
Step 4 – Click on the check for updates button at the right. If there are any updates available, install them else if you do not have any updates it will show you’re up to date
Step 5 – Restart your computer and then check if the issue is solved.
Method 2 – Install DirectX On Your Machine
Step 1 – Open any browser that you use and in the search bar type DirectX download then hit enter
Step 2 – Click on the first link from the search results
Step 3 – In the opened Microsoft link, download the DirectX End-User Runtime Web Installer by clicking on the download button
Step 4 – Once the .exe file is downloaded, double-click on the downloaded .exe file
Step 5 – Accept the license agreement by clicking on the radio button beside I accept the agreement option
Step 6 – Click on next and follow the onscreen instructions to install the DirectX on the machine
Step 7 – Restart the system and then check if the issue is solved.
Method 3 – Run The SFC And DISM Commands
Step 1 – Open the command prompt as an administrator. To do this, type cmd in the windows search then hold Ctrl + Shift keys together then hit enter
Step 2 – A user account control window will appear. Click on yes
Step 3 – Copy and paste the following command in the command prompt and hit enter. It will take a few minutes to complete the execution process wait for it
sfc /scannow
Step 4 – Once done copy and paste the following command in the command prompt and hit enter
DISM /Online /Cleanup-Image /RestoreHealth
Step 5 – When the above command is executed and completed successfully then restart the system and check if the problem is resolved.
Method 4 – Restore The dxgi.dll File
Incase if the dxgi.dll file is been deleted accidentally then it will be in your recycle bin until and unless you have deleted all items from recycle bin. You can easily restore the files and folders from the recycle bin
Step 1 – Double click on the recycle bin icon from your desktop
Step 2 – And find for the dxgi.dll file. Note down the original location of the file (the location of the file before it was deleted)
Step 3 – Right click on the file and click on restore. This will place the file back in its original path
Step 4 – Restart the computer and check if the issue is solved.
Method 5 – Register The dxgi.dll File
Step 1 – Open the command prompt as an administrator. To do this, type cmd in the windows search then hold Ctrl + Shift keys together then hit enter
Step 2 – A user account control window will appear. Click on yes
Step 3 – Copy the following command and paste it in the command prompt then hit enter. regsvr32 is a command line utility that is used for registering dll and ocx controls in the windows operating system
regsvr32 dxgi.dll
Step 4 – Once the execution is complete, it will print the message saying dxgi.dll file is successfully registered
Step 5 – Restart the computer and check if the issue is resolved.
Method 6 – Re-install Visual C++ Redistributable Packages With Latest Version
Step 1 – Open the run prompt using Windows + R keys together
Step 2 – Type appwiz.cpl in the run prompt and hit enter. This will open programs and features window in the control panel
Step 3 – Find Microsoft Visual C++ Redistributable and right click on them and then click on uninstall
Step 4 – Once completely uninstalled, restart the computer
Step 5 – Now to re-install go to the Microsoft link and click on download button to download it
Step 6 – Double click on the downloaded .exe and follow the online instructions to install it
Step 7 – Once installed restart the computer and check if the issue is solved.
Method 7 – Re-Install The Problematic Application
If you are facing the dxgi.dll when using a particular application then try to reinstall that particular application or program so that the dxgi.dll file will be restored freshly when installed again.
Step 1 – Open the run prompt using Windows + R keys
Step 2 – Type appwiz.cpl in the run prompt and hit enter. This will open the programs and features window
Step 3 – Right click on the problematic application and then click on uninstall
Step 4 – Once it is uninstalled, go to its manufacturer website and download the application
Step 5 – Double click on the downloaded .exe file and install it again
Step 6 – Now all the files will be freshly installed and the error will be solved.
That’s it! I hope the above provided information is useful and easy to follow. Let us know which method you applied to solve the error. Thank you and happy reading!!


