If you are seeing ‘IRQL NOT LESS OR EQUAL NDIS.Sys‘ error message in windows 10 or windows 11 PC during blue screen of death problem on your computer, don’t worry. This problem occurs due to corrupted Network Driver Interface Specification (NDIS) on your system. Follow these easy steps to repair your Windows to get rid of the problem pretty easily. But before going ahead for the main solutions you should go through these workarounds to check some prerequisites.
Initial Workarounds–
1. Check if any unnecessary peripherals (like- USB sticks, external hard drive, unused external speakers ) are connected to usb port. If they are connected, eject them immediately.
2. Check if any Windows Update is pending.
Go for these fixes-
Fix-1 Change the hard disk policies-
Enabling write caching on your hard disk drive may solve your problem.
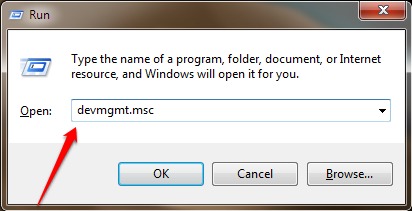
1. Press Windows key+R to launch Run window.
2. In Run window, type “devmgmt.msc” and then hit Enter.

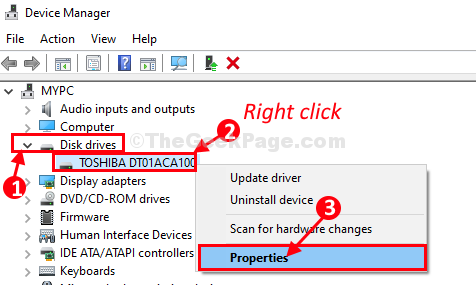
Device Manager window will be opened.
3. In Device Manager window, expand “Disk drives“.
4. Right click on the HDD/SSD drive and then click on “Properties“.

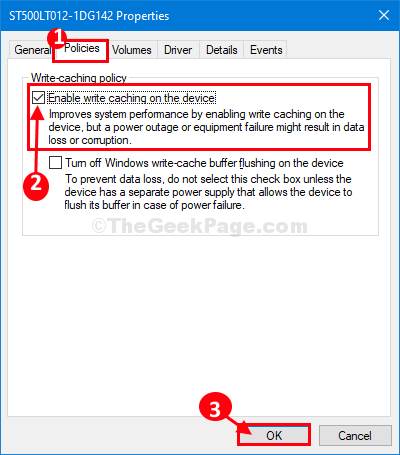
5. In Properties window, go to “Policies” tab.
6. Now, check the option “Enable write caching on the device“.
7. Finally, click on “OK” to save the changes.

Close Device Manager window.
Reboot your computer.
Fix-2 Perform Memory Diagnostics in Safe Mode-
Corruption in system memory may lead to this problem. Check if there is any corruption-
1-Press Windows key + R key together to open run.
2 – Now, copy and paste the path given below to go to recovery settings.
ms-settings:recovery

3 -Click OK.
4 -Now, click on Restart Now in Advanced startup section.

5. In Choose an option window, click on “Troubleshoot“.

6. In Troubleshoot window, click on “Advanced options“.

7. In the Advanced options window, click on the “Startup Settings“.

8. Now, click on “Restart” to restart your computer in safe mode.

9. Now, you will be shown options of Startup Settings.
10. Press “4” to ‘Enable Safe Mode‘.

Your computer will be booted into Safe mode.
11. Press Windows key+R to launch Run.
12. In Run window, type “mdsched.exe” and then hit Enter.

Windows Memory Diagnostic tool will be opened.
13. In Windows Memory Diagnostic window, click on “Restart now and check for problems (recommended)“.

Your computer will be restarted and when your computer is booting up, Windows Memory Diagnostic tool will check for any errors in the memory and will fix it.
This process will may take a while.
When the error checking process will be completed, your computer will be rebooted.
Check if the problem is still happening or not.
Fix-3 Perform Check Disk operation-
1. Click in Search box beside Windows icon and then type “cmd“.
2. Then, right click on “Command Prompt” in the elevated search result and choose “Run as administrator“.
3. Click on “Yes” if you are prompted for permission by User Account Control.

Command Prompt with administrative rights will be opened.
4. In Command Prompt window, copy-paste and modify the command and then hit Enter after to execute it.
chkdsk /f /r <drive letter>
Example– Replace ‘<drive letter>‘ with the drive letter of the partition where Windows is installed on your computer. For us the command will look like this-
chkdsk /f /r C:

5. Press “Y” to check the drive during reboot.
Restart your computer. Check Disk process will analyze the memory for any error on your computer.
This process may take a while to be complete.
Close Command Prompt window.
Fix-4 Run System Restore-
The problem may occur due to a corrupted third party software installed recently, running system restore may solve this issue.
1-Press Windows key + R key together to open run.
2 – Now, copy and paste the path given below to go to recovery settings.
ms-settings:recovery

3 -Click OK.
4 -Now, click on Restart Now in Advanced startup section.

5. Your computer will be booted into Windows RE mode. In ‘Choose an option‘ window, click on “Troubleshoot“.

3. In Troubleshooting window, click on “Advanced options“.

4. In Advanced options window, click on “System Restore” to start the system restore process on your computer.

System restore process will put your computer back to the state when it was working fine.
5. In System Restore window, click on “Next“.

6. Choose the restore point from the list of the restore points and then click on “Next“.

7. Click on “Finish” to finish the process.
This will initialize the restoration process of your system to the system restore point you have selected.

Wait patiently as this process will take some time.
Once it is restored your computer will be working as same as before.