While playing a video on your computer you may stumble upon an error message out of nowhere, stating “Display Driver stopped responding and has recovered“. This problem comes with additional issues like color flickers, black screens on several video-streaming websites. If you are facing this issue, don’t worry. This problem usually occurs due to a corrupted graphics driver on your computer.
Fix 1 – Update graphics driver
Old graphics driver may sometimes cause this issue on your computer.
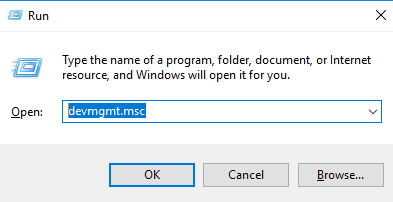
1. At first, right-click on the Windows icon. Then click on “Run“.
2. Write “devmgmt.msc” and then click on “OK“.

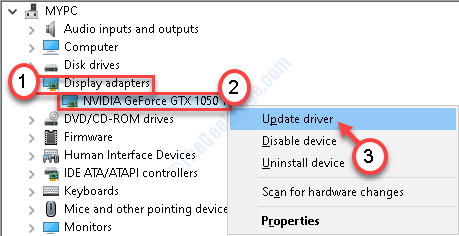
3. Once the Device Manager appears on your screen, you need to expand the “Display adapters“.
4. After that, right-click on your graphics driver and then click on “Update driver“.

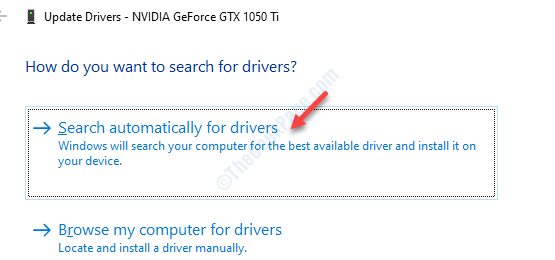
5. To let Windows search for the driver, click on “Search automatically for drivers“.

Windows will now search for the latest driver and install it on your computer.
Fix 2 – Adjust Visual settings
Adjusting the visual settings on your computer should solve your display trouble.
1. Press Windows key+R.
2. Then you need to type “sysdm.cpl“. Click on “OK“.

3. In the System Properties window, go to the “Advanced“.
4. You need to click on “Settings…” in ‘Performance’.

5. In the ‘Visual Effects’ tab, click on the radio button beside the option “Adjust for best performance“.

6. Next, click on “Apply” and “OK” to save the change on your computer.

After that, you need to restart your computer.
After restarting you won’t face the issue anymore.
Fix 3 – Modify Registry-
There is a chance that the graphics driver is not responding to Window’s request in the stipulated time. Increasing the time limit should fix the problem.
1. Type “regedit” in the search box.
2. Then hit Enter to access the Registry Editor on your computer.

3. When you have opened the Registry Editor on your computer, expand the left side to go to this place~
Computer\HKEY_LOCAL_MACHINE\SYSTEM\CurrentControlSet\Control\GraphicsDrivers
Follow these steps according to the version of Windows (32-bit or 64-bit) you are using.
Steps for 32-bit Windows users-
a. After that, you need to right-click on the right-hand side and then click on “New>“. Next, click on the “DWORD (32-bit) Value“.

b.You need to name this new key as “TdrDelay“.
c. Then, double click on the “TdrDelay” key to change the value.

7. After that set the ‘Value data:’ section to “8“.
8. Finally, click on “OK“.

Steps for 64-bit Windows users
a. Right-click on the space and then click on “New>” and then click on “Q-Word (64-bit) Value“.

b. Give the name to this key as “TdrDelay“.
c. Now, to change the value of this delay, double click on this key.

d. In the Edit QWORD (32-bit) Value window, put “8“.
e. Then, click on “OK“.

Close the Registry Editor window and reboot your device to let this change take effect.
After restarting the problem won’t bother you again.
Fix 3- Uninstall and reinstall the graphics card
1. You need to press Windows key+X from your keyboard.
2. Just click on the “Device Manager” to access the utility.

3. From the list of drivers, expand the section called “Display adapters“.
4. After that, right-click on the NVIDIA graphics driver. Then, click on the “Uninstall device“.

5. If you see a prompt for confirmation, just click on “Uninstall“.

Close the Device Manager and reboot your computer.
This should fix your problem.