If you are having a ‘Display driver stopped responding and has recovered‘ error message upon opening your Windows 10 computer, there is a display issue on your computer. This problem actually occurs because of the outdated driver on your computer. In this article, we have explained some easy fixes to tackle this issue very easily. Follow these and the problem will be solved very quickly.
Fix 1 – Modify your registry
The most prominent fix for this problem is to modify the registry on your computer.
1. Type “regedit” in the search box.
2. After that, click on the “Registry Editor” to access it.

3. When you have opened the Registry Editor on your computer, expand the left side to go to this place~
Computer\HKEY_LOCAL_MACHINE\SYSTEM\CurrentControlSet\Control\GraphicsDrivers
4. After that, you need to right-click on the right-hand side and then click on “New>“. Next, click on the “DWORD (32-bit) Value“.

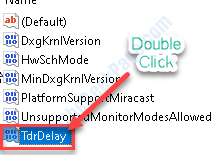
5. Name the new key as “TdrDelay“.
6. Then, double click on the “TdrDelay” key to modify it.

7. After that set the ‘Value data:’ section to “6“.
8. Finally, click on “OK“.

Close the Registry Editor window. After that, reboot your computer to witness the change yourself.
Fix 2 – Update the graphics and monitor driver
Updating graphics and monitor driver may solve this issue on your computer.
1. Press Windows key+R.
2. Write “devmgmt.msc” and then click on “OK“.

3. Once the Device Manager appears you have to click on the “Display adapters“.
4. After that, right-click on your graphics driver and then click on “Update driver“.

5. Then, click on “Search automatically for drivers“.

Windows will now search for the latest driver and install it on your computer.
6. Then, expand the section “Monitors“.
7. After that, right-click on your monitor and then click on “Update driver“.

8. Same way, choose the “Search automatically for drivers“.

Once the driver is updated, close the Device Manager window.
Restart your device to complete this process. Check if this works.
Fix 3 – Set the Visual Effects to automatic
Setting to the visual effect to automatic will work out for you.
1. Right-click on the Windows icon. Then, click on “Run“.
2. After that, type “sysdm.cpl“. Click on “OK“.

3. When the System Properties window appears, go to the “Advanced“.
4. You need to click on “Settings…” in ‘Performance’.

5. In the ‘Visual Effects’ tab, click on the radio button beside the option “Let Windows choose what’s best for my computer“.

6. Next, click on “Apply” and “OK” to save the change on your computer.

Then, restart your computer and check if the display issue is still occurring or not.
Fix 4 – Launch System Restore
You can easily restore your system back to a point when the problem wasn’t there.
1. At first, right-click on the Windows icon to open up a Run window.
2. When the Run appears, type “rstrui” and then hit Enter.

System Restore will open.
3. When the System Restore opens up, choose the latest restore point.
4. After that, click on “Next“.

5. At last, click on “Finish“.

Your computer will boot and recovered back to the point.
See if this has helped your problem.
Fix 5 – Reset your computer
If even the system restore doesn’t work, you have to reset your computer.
1. Type “Advanced startup” from the search box.
2. After that you need to click on “Change advanced startup options“.

3. When the Windows Recovery mode opens up, go this way-
Troubleshoot > Reset this PC

4. Now, you have to choose the “Refresh your PC“.

Wait for Windows to refresh your PC on your computer.