Telemetry is a feature that is auto-enabled in Windows 10. This collects some important information about software installed in the system and its performance data. With this feature, the usage details of particular software, hardware usage details, etc can be tracked. The company says that this information is used to enhance the functionality and user experience in the system.
As per Microsoft,
Windows telemetry is vital technical data from Windows devices about the device and how Windows and related software are performing. It’s used in the following ways:
- Keep Windows up to date.
- Keep Windows secure, reliable, and performant.
- Improve Windows – through the aggregate analysis of the use of Windows.
- Personalize Windows engagement surfaces.
However, if you want to disable this feature, this article shows how it can be achieved using a Task Scheduler
Steps to Disable Telemetry and Data Collection Using Task Scheduler
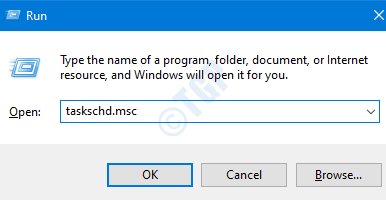
Step 1: Press Windows+r keys at the same time to open Run Window, type taskschd.msc , and press Enter.

Step 2: Make sure you are the administrator, if not press CTRL+SHIFT+ENTER at the same time to open Task Scheduler in Admin Mode.
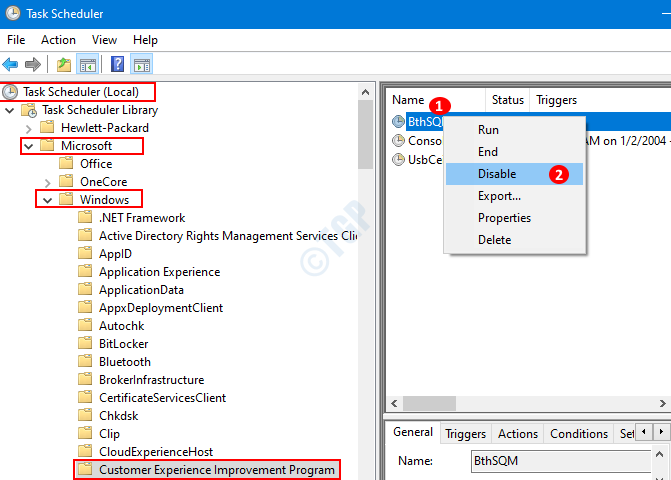
Step 3: In the task scheduler window, navigate to Task Scheduler Library > Microsoft > Windows > Customer Experience Improvement Program location. In the Middle panel, we can see some tasks.
- Right Click on the task (example, BthSQM)
- Click on Disable
Repeat the same process for all the tasks in the middle panel.(As an example , in the below screenshot , we have to disable all the three tasks)

You can now see that Telemetry and Data Collection has been disabled from your System.
You can also check, How to Disable Telemetry using Registry Tweaks, Under Disable Telemetry heading on the landing page.
Hope this has been informative. Thank you for reading.