By default, Windows takes some diagnostic data from your computer to fix the issues that your computer faces. This data is highly useful in figuring out what exactly caused the issue in the first place. But some users might definitely feel that this is a privacy breach. So, the obvious question is, is there a way to limit the sending of diagnostic data to Microsoft from your Windows? There definitely is!
In this article, we explain through 2 different methods, how you can easily limit diagnostic data collection in your Windows 11. Enjoy!
Method 1: Using Registry Editor
This method involves making changes to registry settings. Hence it is recommended to take a backup before you proceed as mistakes in registry settings can cause system issues.
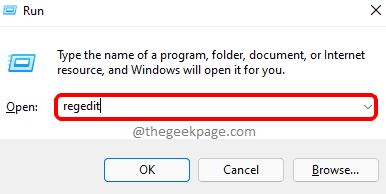
Step 1: Press the Win + R keys together to launch the Run window. Type in regedit and hit the Enter key. This would open the Registry Editor window.
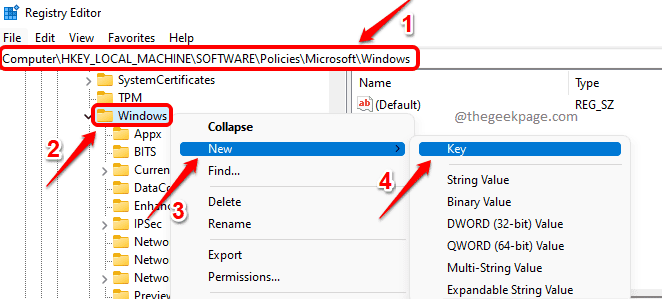
Step 2: In the Registry Editor navigation bar, copy & paste the following location and hit the Enter key.
HKEY_LOCAL_MACHINE\SOFTWARE\Policies\Microsoft\Windows
As next, right click on the Windows folder, click on New and then click on Key.
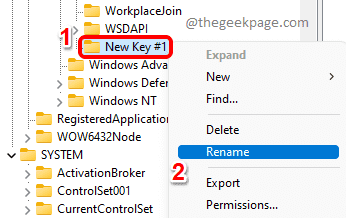
Step 3: Right click on the newly created key and then click on the Rename option. Give the name of the newly created key as DataCollection.
Note: If you get a message saying that the specified key name already exists, then just press the OK button and continue with Step 4.
Step 4: As next, right click on DataCollection folder, click on New and then click on DWORD (32-bit) Value.
Step 5: In the right window pane, right click on the newly created DWORD value and then click on the Rename option.
Step 6: Give the name of the newly created DWORD as LimitDiagnosticLogCollection.
Double click on LimitDiagnosticLogCollection and set the value in the Value data field as 1.
Hit the OK button once you are all done.
That’s it. Restart the machine for the changes to take over.
Note: If you want to revert limiting the diagnostic data, then you can either give 0(Zero) in step 6 instead of 1, or you can delete the LimitDiagnosticLogCollection DWORD value altogether.
Method 2: Using Local Group Policy Editor
Step 1: Open the Run dialogue box first by simultaneously pressing the Win and R keys. Type in gpedit.msc and hit the Enter key.
Step 2: Once the Local Group Policy Editor window opens up, navigate to the following location by double clicking on each folder on the way.
Computer Configuration --> Administrative Templates --> Windows Components --> Data Collection and Preview Builds
Once you are at the Data Collection and Preview Builds folder, on the right window pane, double click on the setting named Limit Diagnostic Log Collection to edit its configuration.
Step 3: In the window that follows, choose the radio button corresponding to the Enabled option.
Hit Apply button and then the OK button.
Note: If you want to revert the changes, simply choose the Not Configured radio button in the previous step instead of Enabled.
Please tell us in the comments section whether you found the article useful or not.


