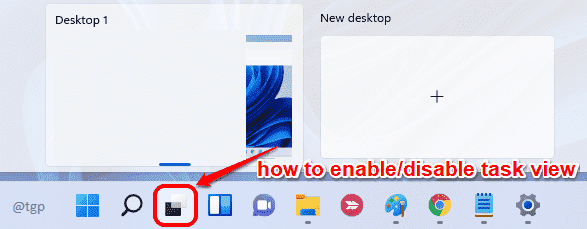
The Task view button is quite a handy feature when it comes to multitasking. You can create multiple desktops and switch between these custom desktops very easily using this feature. Each of these desktops could have different sets of applications or files open in them so that it is very easy to organize your work. Once the works on one desktop are finished, you can quickly close that desktop and concentrate on the remaining ones.
However, not everyone likes things to be too complicated. One desktop is more than enough for the majority of Windows users. Hence knowing how to enable or disable this feature in your Windows OS is very important. Read on, to learn how you can disable or enable the Task view button in your Windows 11.
How to Disable/Enable Task View Button Through Taskbar Settings
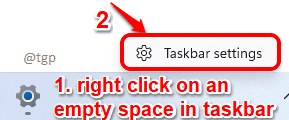
Step 1: Right click on an empty space in the taskbar and then click on Taskbar settings from the right click context menu.
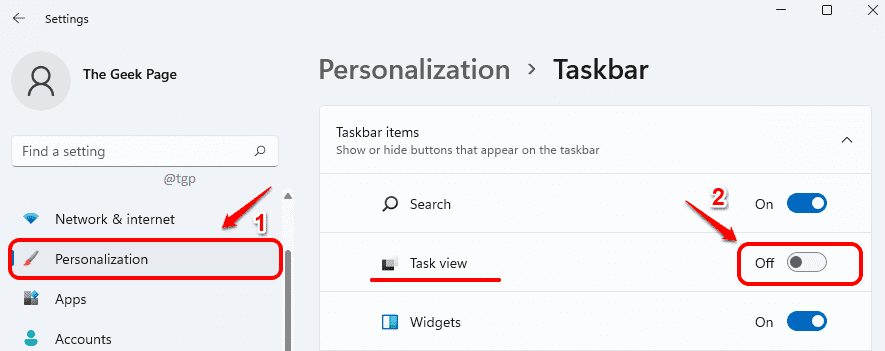
Step 2: In the left window pane, click on Personalization.
Now on the right side, under the section Taskbar items, turn OFF the toggle button corresponding to the option Task view, to remove the task view button from the taskbar.
If you check the taskbar now, you can see that the Task view button is successfully removed.
Step 3: If you want to enable the Task view button, toggle the Task view button to ON state in the same Personalization window.
How to Disable/Enable Task View Button Through Registry Editor
Though the task view button can be enabled or disabled straight away using the previous method, you can do the same through the Registry editor as well.
Note: Any mistake in editing the registry editors can cause serious issues to your machine. Hence it is recommended to keep a backup of your registry editor before you proceed with the following steps.
Step 1: Press WIN+R keys together to launch the Run window. Type in regedit and then hit the Enter key.
Step 2: As next, follow the steps below:
1. Copy paste the following path in the navigation bar and hit Enter key.
HKEY_CURRENT_USER\Software\Microsoft\Windows\CurrentVersion\Explorer\Advanced
2. In the left window pane, make sure you are currently in the folder named Advanced.
3. In the right window pane, right click on the key named ShowTaskViewButton.
4. From the right click context menu, click on Modify.
Step 3: When the Edit window comes up, type in 0 (zero) in the Value data field and hit OK button to disable the task view button.
If you check in the taskbar, you can see that the task view button would now be gone.
Step 4: If you want to bring the task view button or enable it, then instead of 0, type in 1 in the Value data field and hit Enter key.
That’s it. Please tell us in the comments whether the methods worked for you or not.


