When the proxy settings of your Windows 10 or Windows 11 PC gets changed, you won’t even know. It can be unintentional, it can be due to a wrong software installation, or due to a harmful program that can alter the proxy settings without your knowledge.
Thanks to the wrong proxy settings, you may suddenly notice that the web page is not loading or loading very slow. In short, you start facing connection problems while browsing the web. So, how do you fix this is change in proxy settings issue? Let’s see how.
Method 1: Using Registry Editor
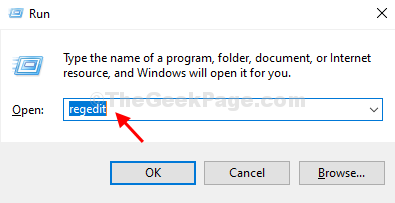
Step 1: Press the Windows key + R to open the Run command. Now, type regedit in the search box and hit Enter.

Step 2: In the Registry Editor window, navigate to the below path:
HKEY_LOCAL_MACHINE\Software\Policies\Microsoft\Windows\CurrentVersion\Internet Settings
Now, find the ProxySettingsPerUser registry on the right side of the pane. But, if the registry is missing, follow Step 3 to create it.
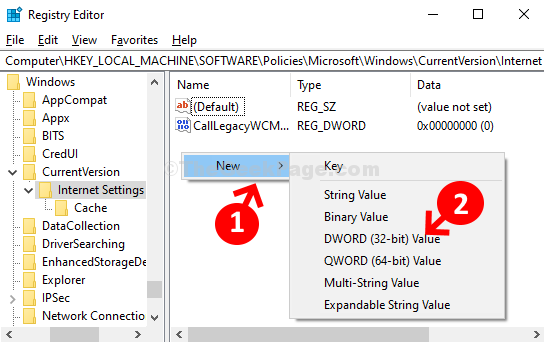
Step 3: On the right side of the pane, right-click on an empty area, click on New, and the select DWORD (32-bit) Value from the context menu.

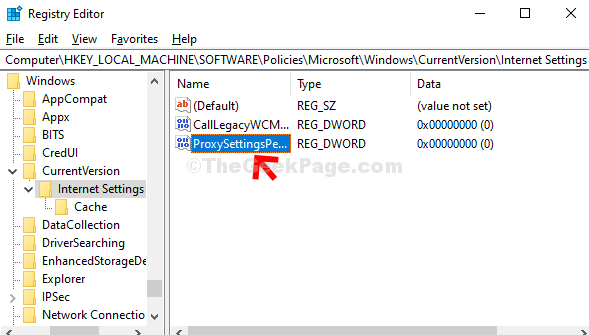
Step 4: Name the new value as ProxySettingsPerUser and double-click to open it.

Step 5: In the Edit DWORD (32-bit) Value window, change the Value Data to 1 and hit OK.

Now simply restart your computer for the changes to be effective.
Method 2: Using Internet Properties
Step 1: Press The Windows key + R together on your keyboard to open the Run command. Now, type inetcpl.cpl in the search box and hit Enter.

Step 2: In the Internet Properties window, click on the Connections tab and then click on the LAN settings button.

Step 3: In the LAN settings window, under Proxy server section, uncheck the box next to Use a proxy server for your LAN, and press OK to save the changes and exit.

That’s it. The Proxy Settings of your computer are now turned off.