There are times when you may want to convert your Windows 11 PC to a Wi-Fi Hotspot. While connecting all your devices to a single Wi-Fi is what is desired, but there an be situations when that may not be possible. For instance, if you are put up in a hotel and their Wi-Fi connection is only for a single device, that’s when you would want to turn your PC into WiFi hotspot and share the connection with your phone or tablet.
Also, the PC hotspot may be useful in situations when you are in a flight and the airlines charges you per device for the Wi-Fi and you would rather choose to pay for your laptop. Also, you may not have the option to turn on the mobile hotspot due to restrictions in flights. These are some situation when you would want to share your laptop’s Wi-Fi with other devices.
And, if your laptop features the built-in mobile network adapter that doubles up as a Wi-Fi. These laptops can also be useful in the above situations as well as in remote locations where you can turn your laptop’s built-in Wi-Fi adapter into hotspot and connect with other devices using the internet connection. However, with the launch of Windows 11 many users have been struggling with the new features and the changes in settings.
The good news is, we will show you how to convert your Windows 11 PC into a Wi-Fi hotspot. Let’s see how:
Method 1: Through the Settings App
This is the basic method to convert your Windows 11 PC into a WiFi hotspot in less than a minute. Let’s see how to make changes in the Settings to enable the mobile hotspot to share your PC’s internet connection with other devices easily:
Step 1: Press the Win + I keys together on your keyboard to open the Settings app.
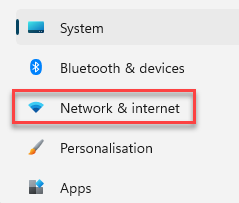
Step 2: In the Settings window, click on Network & internet on the left side of the pane.

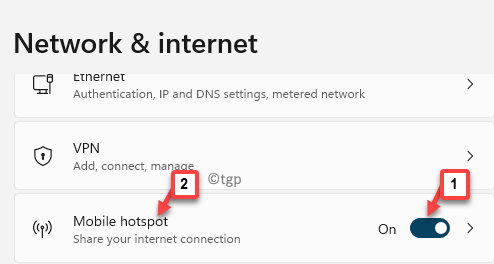
Step 3: Now, go to the right side of the window, scroll down and turn on Mobile hotspot.
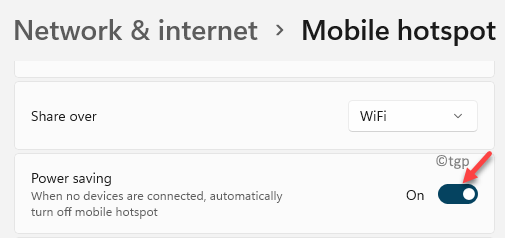
*Note – You can click on Mobile hotspot option and turn on the Power saving option. to your PC.
This will ensure that when no devices are connected to your PC, the mobile hotspot gets disabled by-default.
Step 4: If you are using the Mobile Hotspot for the first time, make sure to name your Hotspot and add a password.
This will make your connection secure from unauthorized access.
For this, scroll down to the bottom and under the Properties section, click on Edit.
Step 5: In the Edit network info, go to the Network name field and add your desired name, that’s easy to remember.
Then, in the Network password field, add a password of minimum of 8 characters.
Press Save to save the changes.
Exit the Settings app and now you have successfully enabled the mobile hotspot on your Windows 11 PC.
Method 2: Through Command Prompt
While you can turn your Windows 11 PC to a WiFi hotspot using the Settings app (Method 2), sometimes it may not work and that’s when you can enable the mobile hotspot on your PC manually, using the Command Prompt. Let’s see how:
Step 1: Press the Win + R keys simultaneously on your keyboard to open the Run command box.
Step 2: In the Run command search bar, type cmd and press the Ctrl + Shift + Enter keys together on your keyboard to launch the elevated Command Prompt window.
Step 3: In the Command Prompt (admin) window, run the below command and Enter:
netsh wlan show drivers
This will help you find out whether your laptop supports the virtual hotspot or not.

Step 4: Close the Command Prompt and re-open it again following the Step 1 and Step 2 with administrative rights.
Now, execute the below command in the elevated Command Prompt:
netsh wlan set hostednetwork mode=allow ssid= key=

The SSID syntax here, means – the name you want to broadcast. It could be anything as per your wish.
The Key syntax here, is the password. You can input your chosen password.
Step 4: Now, copy and paste the below command and press Enter to kick off the hosted network you created above, with SSID as TechEmpty:
netsh wlan start hostednetwork

It will return a message that says “the hosted network mode has been set to allow”. This means that the command executed successfully.
Step 5: Now, before you proceed to share your PC internet with other devices, here’s you can view the virtual hotspot properties by executing the third command as below and hit Enter:
netsh wlan show hostednetwork
This command will pull up all the information with created hosted network.

Step 6: Now, In order to share the PC Wi-Fi with other devices, proceed with the below steps:
Press the Win + R shortcut keys to open Run command.
Step 7: In the search field, type ncpa.cpl and press OK to open the Network Connection window.

Step 8: In the Network Connections window, right-click on the active internet connection and select Properties.

Step 9: Now, in the Properties dialogue box, go to the Sharing tab and check the box next to Allow other network users to connect through this computer’s network connection.
Select the Home networking connection from the drop-down.
In my case, it’s the WiFi. You can select as per your home network.

Step 10: Uncheck the box next to Allow other network users to control or disable the shared internet connection.
Press OK to save the changes and exit.
Step 10: Now, run the below command in the Command prompt (admin) window to stop the shared network and hit Enter:
netsh wlan stop hostednetwork
You have successfully converted the Windows 11 PC to Wi-Fi hotspot.


