How To Disable Or Enable USB Ports In Windows:- Ever wondered why you can’t connect your USB to your school’s computer? Or ever felt tired of telling your friends how much you don’t want them to connect their USBs to your laptop? If your answer is yes to any of the above two questions, this article is for you. Read on, to learn about the various methods using which you can enable or disable your USB ports.
By Changing Registry Editor Entries
Note : The following steps work only if the USB storage driver has already been installed.
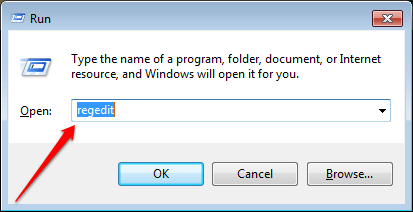
STEP 1 – First of all, you need to launch the Registry Editor program. For that, press WIN+R keys together to open the Run dialog box. When the Run dialog box opens up, type in regedit and hit enter key.
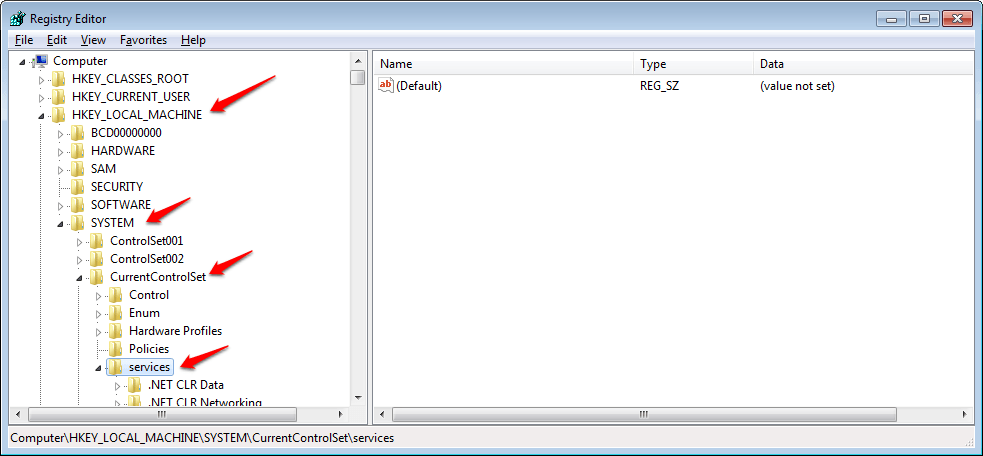
STEP 2 – A new window for Registry Editor opens up. As next, you need to navigate to the following path:
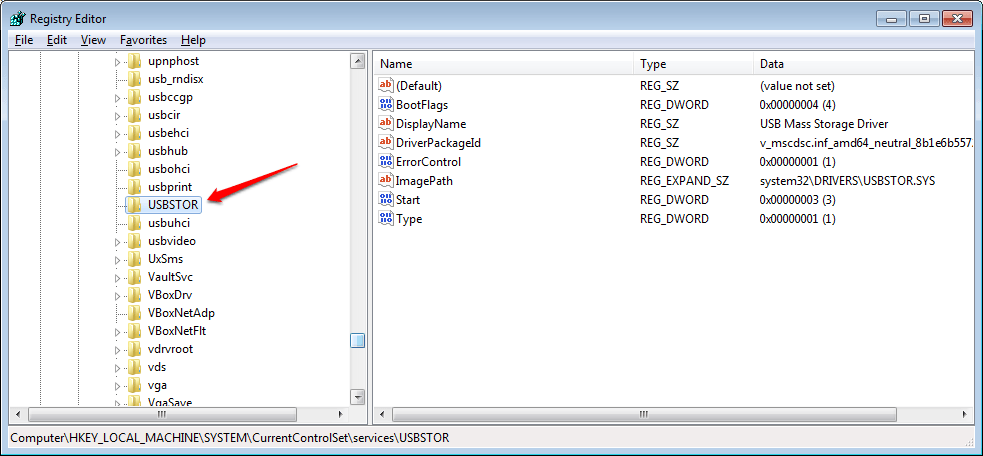
HKEY_LOCAL_MACHINE\SYSTEM\CurrentControlSet\Services\USBSTOR
STEP 4 – Now in the right window pane corresponding to the USBSTOR key, you will be able to see an entry named Start. This is the entry that we need to make changes to.
STEP 5 – Double click on the Start entry. This opens a new window to edit this DWORD value. Here under the filed Value data, the value will be 3. You have to change it to 4 as shown in the screenshot given below to disable the USB ports. If you want to enable the ports, simply revert the value back to 3.
Through Device Manager
STEP 1
- You need to launch the Device Manager. For that, press WIN+R keys together to open the Run dialog box. When it opens up, type in devmgmt.msc and hit enter key.
STEP 2
- The Device Manager window opens up. Locate an entry by the name Universal Serial Bus controllers. Click on the side arrow associated with it to view its contents.
STEP 3
- Now you can try disabling each of the entries inside Universal Serial Bus controllers to disable the USB ports. If your issue is that the ports are not working, try enabling the drivers here.
By Changing BIOS Setup
If in case the above two methods do not work for you, you could always try changing your BIOS setup. For that, follow the steps given below.
STEP 1
First of all, enter BIOS. You can refer our article on the topic How To Open UEFI BIOS Settings In Windows 10 if you have any confusions on how to get to the BIOS.
STEP 2
Once you are in the BIOS, look for the tab Advanced. Here make sure that Legacy USB Support and USB functions are disabled.

STEP 3
Once you are done, you can exit from the BIOS. Typically, F10 is used to save and exit from the BIOS.
STEP 4
Once the system reboots, check to make sure that you have successfully disabled the USB ports.
Hope one of the above 3 methods worked for you. If you are stuck with any of the steps, feel free to leave comments. We would be happy to help.


