Do you know the significance of Windows Diagnostic Data on your system? This feature on your system sends the error information to Microsoft team, which assists them in resolving difficulties. Microsoft subsequently issues an update that may assist many additional people who are experiencing the same problem on their system. In Windows 11, the option to convert from basic to full (send all diagnostic data) is no longer accessible; instead, only the option to send optional diagnostic data is provided. In this post, we’ll go through a few options for changing diagnostic data to full in Windows 11.
How to Enable Additional Troubleshooting Recommendations in Windows 11 Using Settings app
Step 1: Press windows + I keys together on your keyboard to open Settings app directly.
Step 2: Go to Privacy & security on the left side of the Settings app.
Step 3: Then, Click Diagnostic & feedback on the right side of the window after scrolling down.

Step 4: Then, Click on Send optional diagnostic data toggle button to turn it On as shown below.

Step 5: Close the Settings window.
How to Change Diagnostics Data to Full in Windows 11 Using Services
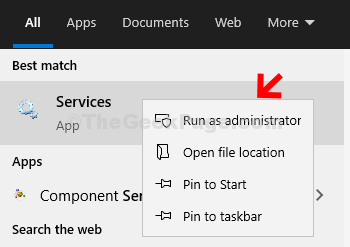
Step 1: Press Windows key on your keyboard and type services.
Step 2: Right Click on the Services app from the search results.
Step 3: Select Run as administrator from the context menu.

Step 4: Search for Connected User Experiences and Telemetry services from the list.
Step 5: Right click on Connected User Experiences and Telemetry service and select Properties from the menu as shown below.

Step 6: Select Automatic from the Startup type dropdown list and Click Start button as shown below.
Step 7: Click Apply and OK to make changes.

Step 8: Now you can see that the Connected user experiences and telemetry service has started and then, close the Services window.
How to Enable or Disable Recommended Troubleshooting Using Registry Editor
Step 1: Press Windows + R keys together on your keyboard to open Run dialog box.
Step 2: Type regedit in the run box and hit the Enter key.

Step 3: Copy and Paste the following path in the address bar.
\HKEY_LOCAL_MACHINE\SOFTWARE\Microsoft\Windows
Step 4: Look for WindowsMitigation registry key under Windows key.
Step 5: If the WindowsMitigation key is missing, then create a new key under Windows registry key by right clicking on it
Step 6: Then, Select New > Key from the context menu as shown below.

Step 7: Create a DWORD value by right clicking on WindowsMitigation registry key and selecting New > DWORD Value as shown below.

Step 8: Rename it to UserPreference.
Step 9: Double click on UserPreference dword value on the right side and enter the value 3 and click OK to make changes.

Step 10: Close the Registry Editor and Restart your system once and check if it is working.
That’s all guys.
I hope this post was informative and helpful.
Thank you very much for reading.