Some times you may notice that you are deleting files from your system and removing them again from the Recycle Bin, but the deleted files keep coming back in the Recycle bin. This means that the Recycle Bin folder has gone corrupt. You wouldn’t know, unless you try to delete files from the Recycle bin. This can be frustrating, but on the brighter side, this issue can be fixed. We have some possible solutions that may help you get rid of the problem. Let’s see how.
Method 1: Using Command Prompt
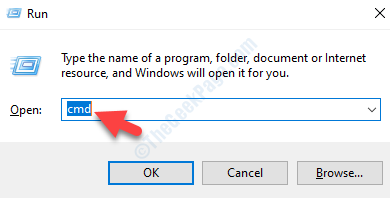
Step 1: Press Win + X keys together on your keyboard and select Run to open the Run command.

Step 2: Type cmd in the Run command and press Ctrl + Shift + Enter hotkey together on your keyboard to open Command Prompt with admin rights.

Step 3: Now, type the below command in the Command Prompt (admin) and hit Enter:
rd /s /q C:$Recycle.bin

Now, exit Command Prompt and restart your PC. Try deleting the Recycle Bin files now and they should be deleted permanently.
Method 2: Through File Explorer
Step 1: Press the Win + E shortcut keys together on your keyboard to open the File Explorer.
Step 2: In the File Explorer window, go to the View tab at the top. Click on Show/hide to expand and check the box next to Hidden items.

Step 3: Now, click on This PC shortcut on the left and then on the right side of the pane, click on the drive where you have installed Windows.
For instance, in our case, Windows is installed in C drive, so, we selected the C drive.

Step 4: Now, when inside the C drive, look for $Recycle.bin.
Select it and hit Delete.

Step 5: Now, you will see a prompt asking you for permanent deletion.
Press Yes to continue.
Step 6: You will then see a prompt asking for confirmation.
Hit the Continue button.
Step 7: Click on Continue on the UAC prompt that appears.
Step 8: Click Yes to confirm permanent deletion.
Step 9: You will now see the Delete File prompt.
Check the box next to Do this for all current items and click Yes to save your time.
The Recycle Bin on your system is now permanently deleted. Reboot your system and go to the File Explorer window > View > Show/hide > Hidden items.
Method 3: By Checking Permissions
Step 1: Right-click on the file or folder you want to delete and select Properties.

Step 2: In the Properties window, go to the Security tab and click on Advanced at the bottom.

Step 3: Next, go to the Owner section at the top and click on the Change link.

Step 4: In the Select User or Group dialogue box, go to the Enter the object name to select field and type Everyone in the empty .
Press OK to save changes.

Step 5: Go back to the Properties window, and under the Security tab, click on the Edit button.

Step 6: In the next window, go to the Permissions for SYSTEM field and under Allow check all the boxes.
Press Apply and then OK to save the changes and exit.

Step 7: Press Apply and then OK again in the Properties window to save changes and leave.
You should now be able to delete all files and folders from the Recycle Bin.
Method 4: By Uninstalling Cloud Syncing Software
Step 1: Right-click on the Start menu and select Run to open Run command.

Step 2: Write appwiz.cpl in the Run command search box and press OK to open the Programs and Features window in Control Panel.

Step 3: In the Programs and Features window, under the Uninstall or change a program section, find the cloud storage app from the list.
Right-click on the app and select Uninstall.

Select Yes to confirm and proceed with the uninstallation.
Once, the uninstalltion is complete, reboot your PC and you can now delete the files from your Recycle Bin. The deleted files or folders shouldn’t reappear again.