The free Linux version of DaVinci Resolve can’t decode AAC audio. That is the reason you are running into this ]problem. Your MP4 imports fine, the video plays, and the audio track just sits there. Silence. AAC is the audio format almost every phone, camera, and screen recorder uses. It’s compressed, it’s everywhere, and Resolve on Linux (the free build, mainly) never got the license to read it. Windows and Mac users mostly sail past this. But, Linux users hit it on the very first import. And no, there’s no setting that turns it on for you. But, luckily, there are a few quirky workaround that takes about a minute, and you only lose the audio compression, not the video. Here’s what to do.
Fix 1 – Rewrap the File With Shutter Encoder
This is the fastest way out. Shutter Encoder is a free tool that swaps the audio track for uncompressed WAV while leaving the video alone. So there’s no quality loss, and it finishes in seconds.
1 – Download and install Shutter Encoder. It’s free, and there’s a Linux build on the site.
2 – Open Shutter Encoder and drag your silent video into the window.
3 – Open the Choose function dropdown and pick Rewrap.
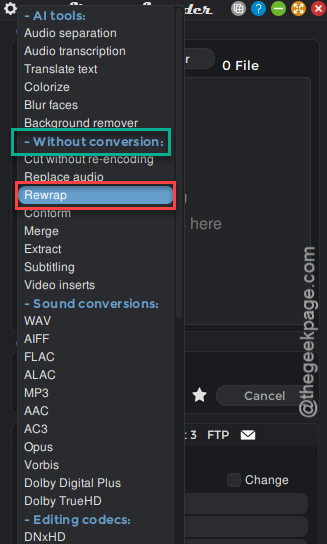
4 – Set the output container to .mov.
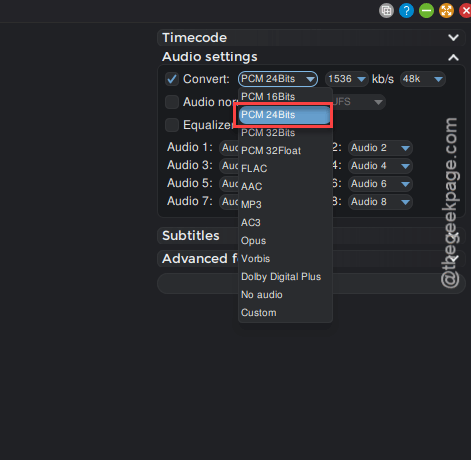
5 – Look at the Audio settings panel on the right side. Change the audio format from AAC to WAV. Pick 16-bit or 24-bit PCM. Either one works.
6 – Click Start function.
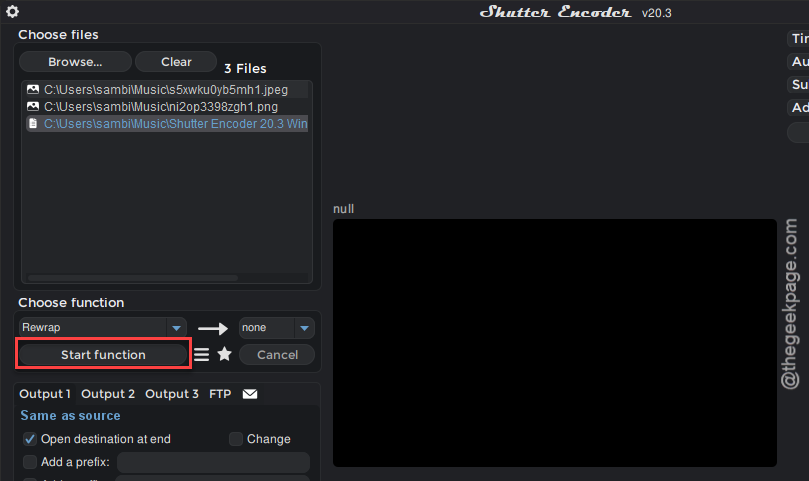
It should be done in a few seconds, since the video isn’t being re-rendered (that’s the beauty of a rewrap). Import the new .mov into your media pool and the waveform shows up right away.
Some people pick AC3 in that audio dropdown instead of WAV. That works too. But WAV is the safer choice, and it’s what most editors use anyway.
Fix 2 – Convert the Whole Clip With ffmpeg
If you’d rather stay in the terminal, ffmpeg does the same job. This one converts the video as well, into DNxHR (a production codec Resolve loves). The files get bigger. But they scrub much smoother on the timeline, which is a nice side effect.
1 – Install ffmpeg from your distro’s package manager if it isn’t already on your system.
2 – Open a terminal in the folder that holds your video.
3 – Run this command, swapping in your own file names:
ffmpeg -i input.mp4 -c:v dnxhd -profile:v dnxhr_hq -c:a pcm_s16le output.mov
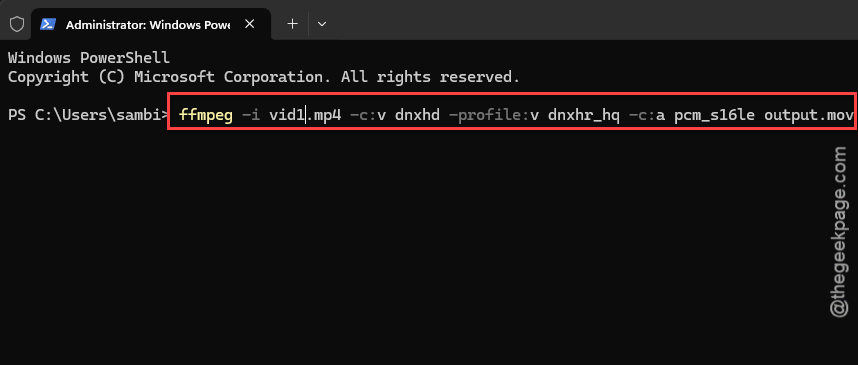
4 – Wait for it to finish. A long clip can take several minutes, and the terminal scrolls a wall of numbers the whole time. That’s normal.
5 – Import output.mov into your DaVinci media pool.
Expect the new file to be several times larger than the original. That’s just how DNxHR works.
Fix 3 – Pull the Audio Out With Audacity
Already have Audacity installed? Then you don’t need a new tool at all.
1 – Open Audacity, click File, then Open, and pick your video file.
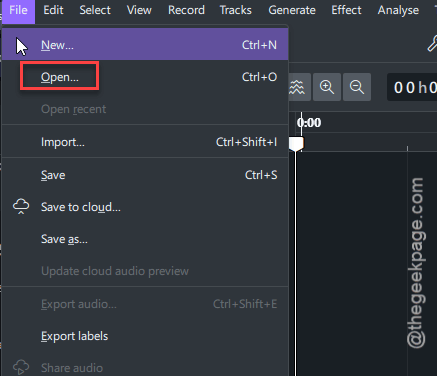
Audacity grabs only the audio track.
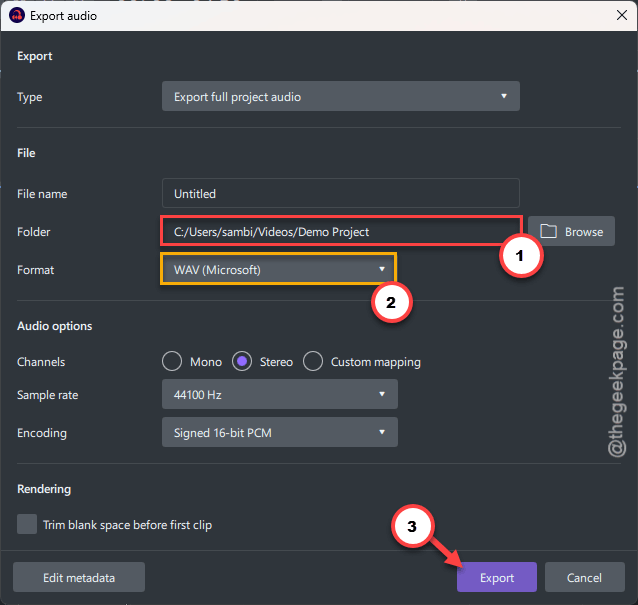
2 – Click File at the top, then Export. Set the Format to WAV(Microsoft) format.
3 – Save the WAV file into your project folder.
4 – In Resolve, drag the original video onto the timeline.
5 – Mute the video’s own audio track. Click the M button on the track header on the left side.
6 – Drag the new WAV file onto the track right underneath it.
Both files start at zero, so they should line up. Check the end of a long clip anyway. If lips are drifting, nudge the WAV a frame or two until they match.
Fix 4 – Delete the Cached Peak Files
Here’s a sneaky one. If you imported the clip before fixing the audio, Resolve saved a silent waveform in its cache. And it keeps playing that silent cache even after you swap in a working file. Annoying, right?
Try the quick route first. Click Playback in the top menu, then Delete Render Cache, then All. Next, click Fairlight in the top menu and pick Delete Peak Audio Files. Restart Resolve and check the track.
Still flat? Then delete the files by hand.
1 – Open your project in Resolve.
2 – Click the small gear icon in the bottom right corner to open Project Settings.
3 – Click Master Settings in the list on the left.
4 – Scroll down to the Working Folders section.
5 – Write down the path shown under Cache files location. It usually ends in a folder called CacheClip.
6 – Close Resolve.
7 – Open that CacheClip folder in your file manager, then open the Audio folder inside it.
8 – Delete every file that ends in .pfl. Those are the peak files (the little waveform previews).
9 – Open Resolve again and wait a moment. It rebuilds the waveforms from scratch, and this time it reads the real audio.
Fix 5 – Check Resolve’s Output Device
Quick one. Waveform shows up but you still hear nothing? Then the audio is decoding fine, and Resolve is just sending it to the wrong place.
1 – Click the DaVinci Resolve menu.
2 – Then, Preferences, then Video and Audio I/O.
3 – Under Output Device, pick your actual speakers or headphones by name (turn off the automatic option if it’s on).
Save, restart Resolve, and play the clip again.
Keep It From Coming Back
- Rewrap every new clip before you import it, not after. That way the cache never learns the silent version in the first place.
- Keep Shutter Encoder installed. Trust me. On Linux you’ll need it every week.
- Some recorders and cameras let you pick the audio codec. If yours does, choose PCM or WAV and you skip this whole dance.
- The paid Studio version does not have this limit. Not cheap (it’s a one-time license, though). But if you live in Resolve all day, it’s worth knowing.
People Also Ask
Why does DaVinci Resolve have no audio on Linux?
Because the free Linux build can’t decode AAC, and AAC is what nearly every MP4 uses. The video loads, the audio doesn’t. It’s a licensing thing, not a bug.
Does DaVinci Resolve support AAC?
On Windows and Mac, yes. On Linux, only the paid Studio version reads AAC. The free Linux version skips the track entirely, so your clips come in silent. Convert the audio to WAV or PCM before importing and you’ll never notice the difference. Takes seconds with a rewrap.