Editing the RAW footage stored in the external drive is quite easy in DaVinci Resolve. But, if this popular video editor starts to show up “Media Offline” message in the middle of the editing process, it will disrupt your productivity, and all your efforts may go in vain. So, in this post, we have listed the best possible solutions to sort out this media offline mess.
Fix 1 – Relink those missing video files
The video files have lost the links to the source file and the error message is the result of this error.
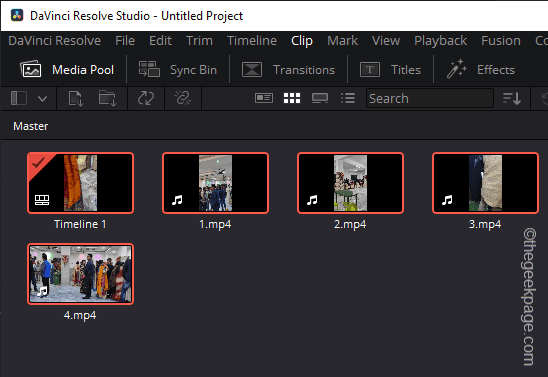
Step 1 – In the DaVinci Resolve page, only select the missing video files from the Master section.
Step 2 – If all the clips is showing the same symptoms, you can use the Ctrl+A to select them all at once.
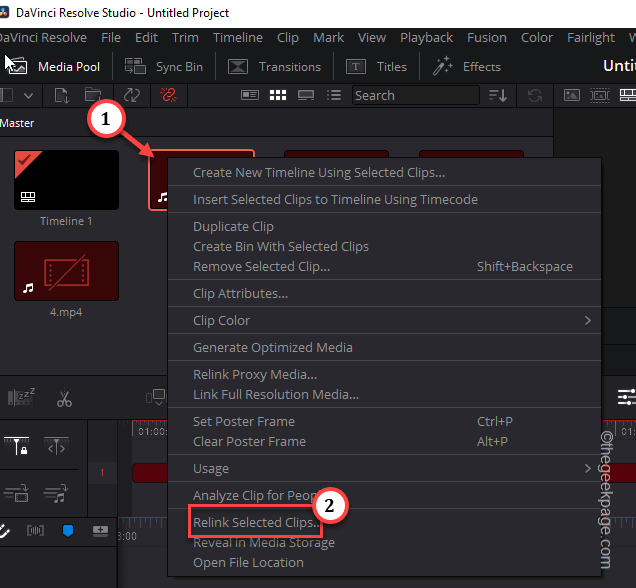
Step 3 – Next, just right-click that file and click “Relink selected clips“.
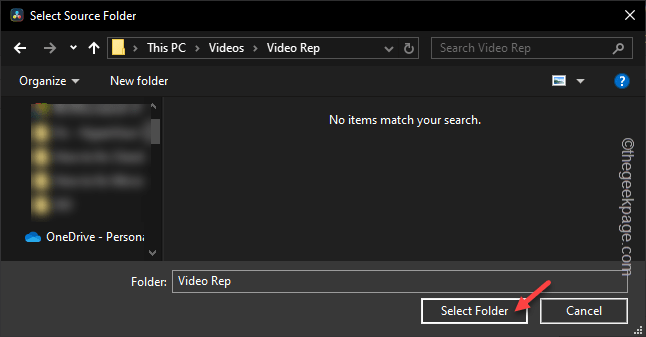
Step 4 – Now, you have to redirect to the location of the original video files.
Step 5 – Open the folder that contains those master clips. Don’t worry if the clips are not visible there. Finally, click “OK“.
Give DaVinci Resolve a few seconds. All the media files will be resynced and there won’t be any further Media Offline message.
NOTE – It is possible that the clips that you are using have been transferred to another folder on your device. If you can’t find the RAW clips in their actual location.
Step 1 – Peform a search using the clip ID (name) and locate them.
Step 2 – Select the clip and transfer it to a new folder.
Step 3 – Use the steps discussed in the solution to relink the media in the Master section.
This way, you can fix the Media Offline issue in the app.
Fix 2 – View the attached sources automatically
Make sure DaVinci Resolve detects the source automatically from the settings.
Step 1 – In the main DaVinci Resolve page, click the “DaVinci Resolve” in the menu and click “Preferences“.
Step 2 – Switch to the “Media Storage” tab.
Step 3 – Check the “Automatically display attached storage location” box.
Step 4 – Finally, tap the “Save changes” option.
Once you have saved the changes, DaVinci Resolve will recognize the attached SSDs, HDDs, USB drives automatically.
Fix 3 – Do not store rendered frames
Storing the rendered frames in the DaVinci Resolve app can create this conflict.
Step 1 – Open up the “Playback” settings in DaVinci Resolve.
Step 2 – Later, tap the “Render Cache>” and choose the “None” option.
This way, DaVinci Resolve won’t store the render frames. This does eliminate possible infringement of cached media file and actual one.
Fix 4 – Check the connected drive
You should always make sure the drive is connected to your system.
Step 1 – Check the connection of the drive to your system. If it is an external SSD/HDD, disconnect and reconnet it. It is better if you use another USB port on your system.
Step 2 – If you are working with a NAS drive, make sure the NAS is accessible.
The ‘Media Offline’ message won’t appear after this.
Fix 5 – Remove all the older render cache
As you work in the DaVinci Resolve, it continues to build up render cache. Clearing that up may help you resolve the problem.
Step 1 – To do this, go to the “Playback” settings at the top of the editor and there you will find an option “Delete Render Cache“.
Step 2 – Now, select that and choose “All” to clear all the saved up render cache for the project.
This will clear all the stored up rendered cache data from the local files. Try working with the media files once more and test it out.
Fix 6 – Toggle the Timeline Resolution
The variability of the resolutions in the video timeline can cause this issue as well.
Step 1 – To tackle this issue, tap the “Playback” button.
Step 2 – Later, tap the “Timeline Proxy Resolution” option and choose the “Half” option from the context menu.
After tweaking the resolution of clips in the timeline, the problem with offline media should disappear.
Fix 7 – Update DaVinci Resolve
It is important that you use the latest version of the DaVinci Resolve app.
Step 1 – It is very easy to update the DaVinci Resolve app. To do this, go to the “DaVinci Resolve” menu and click “Check for updates“.
Then it will perform a check for the latest version of the DaVinci Resolve editor.
Step 2 – If it detects an update, it will show up this message –
Update Available!
Step 3 – Tap “Download” to download the update package.
Go through on-screen wizard and complete the whole update process.
Then, import your project in the new version of the app and test.
There won’t be any “Media offline” message anymore.
Additonal Tips –
1. One of the key reasons behind this issue is the usage of a slow storage device, like HDDs or lower class USB storage devices. You should transfer the clips from the older device to a SSD and then use them in the media pool/ master.
2. Check the encoding of the media files you are using in DaVinci Resolve.


