Windows 10 is one of the most popular operating systems in the world due to its wide range of features and functionalities. Best of all, it’s highly customizable. It allows you to customize it’s background, arrangement of icons, how they look, themes, colors and so on. One such interesting feature offered by Windows 10 is the colored window borders, colored title bars, Start menu, taskbar, and even the action centre.
While the windows border features was also available in the previous versions, with Windows 10 the window borders are more slimmer. However, the color of the windows border and the title bar is automatically turned off in Windows 10. So, unless you enable the feature, you won’t see the windows borders or the title bars colored on your Windows 10 system.
As understood, yes, you have the option to enable and customize the window border and the title bar colors on your Windows 10 PC. Let’s see how.
Method 1: Through Personalization Settings
Step 1: Press the Win + I shortcut key on your keyboard to launch the Settings app.
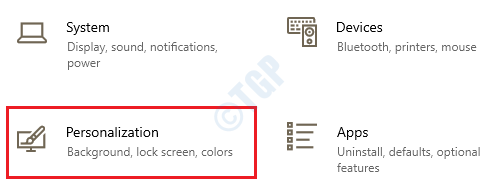
Step 2: In the Settings window, click on Personalisation.

Step 3: In the next window, go to the left side of the pane and click on Colours.

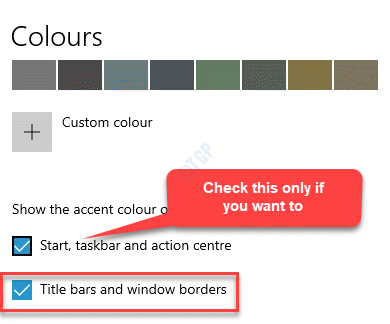
Step 4: Now, go to the right side of the window, scroll down and check the box next to Title bars and window borders.
This will make sure that the windows of different apps and the title bars are now colored.
*Note – If you want the Start menu, taskbar and the action centre to be also colored, check the box next to Start, taskbar and action centre option.

Step 5: Now, scroll to the top and and if you want Windows 10 to automatically select an accent color for your desktop background, check the box next to Automatically pick an accent color from my background.

Step 6: But, if you want to select your own accent color for the window borders and the title bar, select an accent color from the Recent colours section or from the Windows colors section.

Step 7: You can also choose your custom color by clicking on the + sign next to Custom colour option.

Step 8: It will open up the Choose a custom accent colour menu with a colour palette.
Slide the bar left or right to select your color.
Once selected, press the Done button to save the changes.
Now, exit the Settings app, and the window borders and the title bars should display your chosen accent colour.
Method 2: Through Colour and Appearance
This method will work only after you have enabled the window border color through the Settings app as shown in Method 1. However, if you are still not happy with the color options offered in the Settings app, you can use the Colour and Appearance tool in the Control Panel to select a colour of your choice and change the colour of the window borders accordingly. Let’s see how:
Step 1: Right-click on Start menu and select Run to launch the Run command window.

Step 2: In the Run command search box, type the below path and hit Enter:
shell:::{ED834ED6-4B5A-4bfe-8F11-A626DCB6A921} -Microsoft.Personalization\pageColorization

Step 3: This will open the Colour and Appearance window in the Control Panel.
You can select a colour from the colour palette.

Step 4: Or, you can expand the Show color mixture option below to change the window border colour based on your preference.
Here, you can customize the Hue, Saturation, and Brightness by moving the sliders next to them.

*Note – You can also change the intensity of the colour by moving the Colour intensity slider.
Also, while selecting the colour from the colour mixer, the window borders keep changing colors in real-time.
Press the Save changes button to save the changes you made and exit the Color and Appearance window.

The selected colour is now applied to the window borders.
Method 3: Using the Desktop Background Color
This method will help you to set the Windows 10 to automatically select the perfect window border color matching your desktop background by enabling it to automatically select a colour from the current desktop background. Here’s how:
Step 1: Go to the desktop, right-click on it and select Personalise.

Step 2: This will open the Personalise page in the Settings app.
Click on the Colours option on the left side of the pane.

Step 3: Now, on the right side of the pane, make sure that the Title bars and window borders option enabled.

Step 4: Now, scroll up and check the box next to Automatically pick an accent color from my background.

Now, exit the Settings app and the title bars and the window borders will now automatically pick the accent colour from the desktop background.
Method 4: By Editing the Registry Editor
Before you proceed with the method, you would first need to know RGB value (Red, Green, Blue) for the color you want. Let’s see how:
Step 1: Press the Win + X keys together on your keyboard and select Run.

Step 2: It opens the Run command window.
In the search box, write mspaint and press OK to open the Paint app.

Step 3: In the Paint app, go to the upper right side of the window and click on Edit colours.

Step 4: It will open up a colour palette.
Select your preferred colour from this palette and move the pointer on the extreme right to adjust the color as per your choice.

Step 5: Once you have found the right colour and the correct adjustment, note down the Red, Green, and Blue (RGB) values in the boxes below.
For instance, here we have selected the blue colour and after adjusting the colour, the Red, Green and Blue values are 106, 106, and 255 respectively.

Now, close the Paint app and proceed to follow the Registry Editor method below:
Step 1: Press the Win + R hotkeys on your keyboard to open the Run command box.
Step 2: In the search field, write regedit and hit Enter to open the Registry Editor window.

Step 3: In the Registry Editor window, navigate to the below path:
HKEY_CURRENT_USER\Control Panel\Colors
Now, go to the right side of the pane and double-click on the WindowFrame string value.

Step 4: This will open the Edit String Value dialogue box.
Now, change the Value data field from 100 100 100 (default RGB value) to 106 106 255 (the RGB value you noted down from the Paint app) for your preferred colour.
Press OK to save the changes and exit.

Close the Registry Editor window.
Now, sign out from and sign in back to your Windows 10 for the changes to be applied.
You should now see the window border color changed to the one you selected.