Snipping Tool, after Microsoft’s latest update, has become the main native screenshot capture tool for all Windows devices. You may notice the Snipping Tool is automatically minimizing the window just after taking a screenshot. This is just after the latest update for the Snipping Tool that minimizes the tool after taking a screenshot. Luckily, there are some solutions that you can try to enact to solve the issue with the Snipping Tool.
Fix 1 – Disallow the Snipping Tool
Disallow the Snipping Tool to run in the background on your computer.
Step 1 – Open Settings.
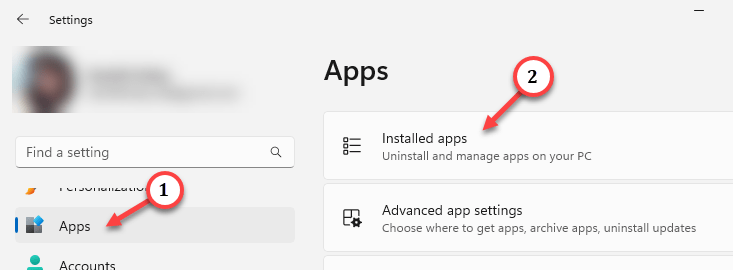
Step 2 – Then, go to the “Apps” on the left-hand side.
Step 3 – Next, open the “Installed apps“.
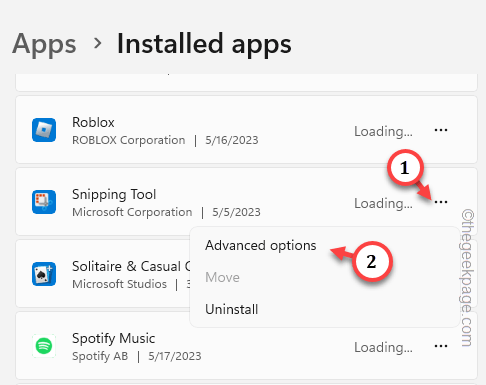
Step 4 – You can either search for the “Snipping tool” or you can just manually identify it by scrolling down the page.
Step 5 – Then, click the dots beside the app and click “Advanced options“.
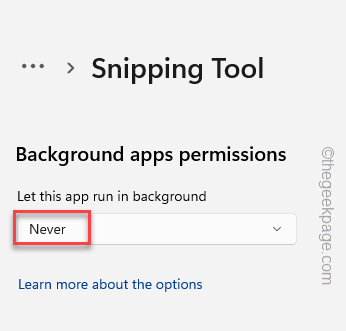
Step 6 – Now, just set the “Background apps permissions” to “Never“.
Now, reboot your system once.
Then, you try out the Snipping tool once more. It won’t get minimized again.
Fix 2 – Turn off Focus Assist
The Focus Assist feature can cause this problem.
Windows 10 users –
Step 1 – Directly tap the date and time panel on your taskbar to open the Notification panel.
Step 2 – You will see the “Focus Assist” option there. Tap it a few times until it shows “Off“.
Windows 11 users –
Step 1 – Click on the date and time pane in the bottom left corner of the taskbar.
Step 2 – You will see the ongoing Focus session there. Just, tap “End session” to stop it.
After turning off the Focus session, try using the Snipping Tool once more.
Fix 3 – Automate the Windows Push Notification System Service
Sometimes some services are necessary for the Snipping Tool to work properly.
Step 1 – Directly write “services” after pressing the Windows key once.
Step 2 – Click “Services” to open it.
Step 3 – Once you get there, get down to the bottom until you see “Windows Push Notifications System Service“.
Step 4 – Right-click this service and tap “Properties“.
Step 5 – You can switch the ‘Startup type:’ to “Automatic“.
Step 6 – If the service hasn’t started yet, click “Start” to start the Push Notifications service.
Step 7 – You have to apply and save the settings. So, click “Apply” and “OK“.
Step 8 – Later, get to the “Windows Push Notifications User Service“. Double-click that to open it up.
Step 9 – Just like the previous service, switch the “Startup type” to “Automatic“.
Step 10 – Don’t forget to click “Start” to start the service.
Step 11 – Tap “Apply” to apply the changes. Then, click “OK” to save the change.
Close Services. Then, try to take a snip using the Snipping tool. It won’t be minimized again.


