When the Winsock Catalog of your system is corrupt or when the installation of Visual C++ in the system has issues, you see the error that says:
Could not Load File or Assembly ‘RSy3_AudioAppStreamsWrapper.dll’
When the system is booted after the Windows update, the error is seen. Mostly with the Razer Synapse application
In this article, let us discuss various ways of fixing the Could Not Load File or Assembly ‘RSy3_AudioAppStreamsWrapper.dll’ issue.
Fix 1: Reset Winsock from the command prompt
Step 1: Pressing the keys Windows+R at the same time, open the Run terminal
Step 2: Type cmd and hit enter

Step 3: In the Command prompt window that opens, type the below command and hit Enter
netsh winsock reset

Step 4: Restart your computer and see if the error vanishes.
In case this does not help, try the next fix.
Fix 2: Disable the .NET features
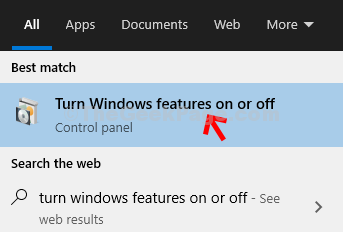
Step 1: In the search bar, next to the Start button(Windows logo at the bottom left corner), type Turn Windows features
Step 2: In the menu that pops up, select the option Turn Windows features on or off as shown below

Step 3: In the Windows Features window that opens, Untick all the .NET Framework options available.

Step 4: While unticking the options, if you see any warning prompt as shown below, just click on Yes

Step 5: Go to the Visual Studio Download link and then click on Download Community 2019 button

Step 6: Now, double-click on the executable file to install it in your system
Step 7: If you see a UAC prompt popping up, click on Yes
Step 8: You can see that Visual Studio starts Installing in the system

Step 9: Got to the Workloads tab
Step 10: Under the Desktop & Mobile section, tick on the .NET desktop development
Step 11: Click on the Install button

Step 12: You can see that the installation begins. Please be patient till the installation completes.
Step 13: Once the installation finishes, restart the system.
Step 14: If you do not see any errors, repeat Steps 1,2 and 3 to turn on the features corresponding to .NET Frameworks
Fix 3: Reinstall Application Causing Problem
Step 1: Open the Run Dialog
Step 2: Type appwiz.cpl and hit Enter

Step 3: From the list of applications, locate the application causing problem. Right-click on the application and choose Uninstall
NOTE: Good Sync application is used only for demonstration purposes.

Step 4: Restart the System
Step 5: Open the Run Dialog.
Step 6: Type below location and hit Enter
%PROGRAMFILES(x86)%

Step 7: Locate the folder corresponding to the problematic application, if any.
Step 8: Delete that folder from the system. To do so, just click on the required folder and press the delete button from the keyboard.
Step 9: Repeat Steps 5,6,7 and 8 and delete any folder related to the application from the below locations as well
%PROGRAMFILES%
%ProgramData%
%AppData%
Step 10: Restart the System and check if the error resolves.
Fix 5: Repair All the Microsoft Visual C++ Programs
Step 1: Open the Run Dialog
Step 2: Type appwiz.cpl and hit Enter

Step 3: Scroll down and locate the Microsoft Visual C++ application.
NOTE: There will be a lot of programs, choose the one that has a computer icon.
Step 4: Right-click on it and select Change.

Step 5: In the window that shows up, click on the Repair button

Step 6: Follow the onscreen instructions and repair the program.
Step 7: Now, repeat steps 3,4,5 and 6 to repair all the Microsoft Visual C++ programs
NOTE: Omit the programs that do not have the Change option.
Step 8: Restart the system
Check if the error disappears, if not try the next fix.
Fix 9: Re-install All the Microsoft Visual C++ Programs
Step 1: Open Run Dialog
Step 2: Type appwiz.cpl and hit Enter

Step 3: Scroll down and locate the Microsoft Visual C++ application.
NOTE: There will be a lot of programs
Step 4: Click on Microsoft Visual C++ X86 based installations(ignore X64 installations). Make the note of the name of that program.
Step 5: Right-click and Uninstall the program

Step 6: Follow the on-screen instructions to completely uninstall the program from the system.
Step 7: Repeat Steps 3,4,5 and 6 and Uninstall all the x86 based installations from the system.
Step 8: Restart the system and check if the error resolves.
Step 9: In case, the error is still seen, re-install all the programs that were uninstalled
Step 10: Restart the system and check for errors.
Step 11: In case the issue still exists, then try to install any Visual C++ Runtime Installer and check if the error disappears.
That’s All
We hope this article has been informative. Kindly comment and let us know if you were able to fix the error. Also, let us know the Fix that helped you resolve the error
Thank you for Reading.