Many users have noticed a prompt that asks to enter A1B2C3 as the pin whenever their Windows 11/10 system is restarted. This prompt continuously keeps popping up asking to enter A1B2C3 even if the Windows PIN is entered correctly or not entered at all. This can be a frustrating issue for the user where he/she is not able to use the system to perform their important tasks even when they have not made an attempt to enter the PIN. Basically, the error message says that there have been many incorrect PIN entry attempts by the user.
If you are facing this problem with your Windows 11/10 PC, then go ahead and read this article. Here, we have discussed a solution that can help you resolve this problem on your computer.
Fix – Remove NGC Folder and Set the Windows PIN
Step 1 – Remove NGC Folder From Your PC
Step 1. On the screen where you see this prompt, enter A1B2C3 to go to the next screen.
Step 2. You will now see Sign-options on the next screen.
Click on Sign-in options and then select the key option.
Step 3. Now, enter your password and log in to your computer.
Step 4. Press Windows + E to open File Explorer.
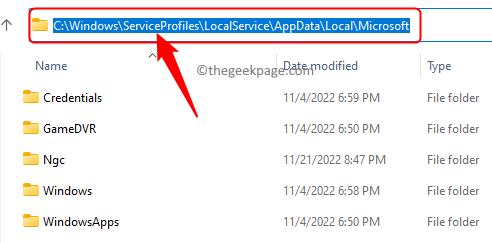
Step 5. Navigate to the location below or copy and paste it into the navigation bar.
C:\Windows\ServiceProfiles\LocalService\AppData\Local\Microsoft
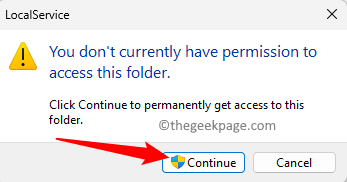
Note: If you notice that you don’t have permission to access some folders in the path, then click on Continue in the dialog that appears.
Also, if you are not able to find AppData folder, then click on View at the top of the File Explorer.
Then, choose Show –> Hidden items.
Step 6. In the Microsoft folder, right-click on the Ngc folder and choose Properties.
Step 7. Go to the Security tab in the Ngc Properties window.
Step 8. Then, click on the Advanced button at the bottom.
Step 9. Click on the Change link associated with the Owner in the Advanced Security Settings page for the Ngc folder.
Step 10. In the Select User or Group window, enter everyone in the text box below Enter the object name to select.
Then, click on Check Names.
Finally, click on OK.
Step 11. Back in the Advanced Security Settings window, click on Apply.
Then, click on OK in the Windows Security dialog and then on OK again.
Step 12. Close the Ngc Properties window by clicking on OK.
Step 13. Right-click on the Ngc folder and click on the Delete icon to remove the Ngc folder from your PC.
Note: If you are not able to delete the folder, then open the Properties window for Ngc folder and go to the Security tab.
Again, click on the Advanced button.
In the Advanced Security settings window, click on Add.
In the Permissions Entry window, click on the link “Select a principal”.
Type everyone below Enter the object name to select.
Click on Check Names and then on OK.
Then, check the box next to Full control and click on OK.
Finally, click on Apply and then Yes in the Windows Security dialog.
Then, click on Continue and then on OK.
Now, try to delete the Ngc folder on your PC.
If you are still not able to delete the Ngc folder, then follow the steps below.
1. Press Windows + R to open Run.
2. Type cmd and press Ctrl + Shift + Enter to open Command Prompt as administrator.
3. Click on Yes when prompted by UAC for permissions.
4. In the Command Prompt, copy and paste the commands below one after the other and hit Enter after each to execute them.
takeown /f C:\Windows\ServiceProfiles\LocalService\AppData\Local\Microsoft\NGC

icacls C:\Windows\ServiceProfiles\LocalService\AppData\Local\Microsoft\NGC /grant administrators:f
Step 2 – Setup Windows Hello PIN
Step 1. After you have removed the NGC folder and your system restarts, log in using your password.
Step 2. Open the Settings app using Windows + I key combination.
Step 3. Select the Accounts tab in the left pane.
Step 4. Click on the box labeled Sign-in options on the right side.
Step 5. Now, click on PIN (Windows Hello) to expand it.
Then, click on the Set up button next to Use a PIN to sign in to Windows, apps, and services.
Step 6. Enter your account password in the dialog that appears.
Then, click on OK.
Step 7. You will now be prompted to create a new PIN.
Enter a new PIN and click on OK.
Step 8. Restart your PC.
After the system starts up, log in using your Windows Hello PIN and you will not see the prompt to enter A1B2C3.
That’s it.
Thanks for reading.
We hope the method elaborated on in this post has helped you resolve the issue “Continuous Prompt Asking to Enter A1B2C3 to Login” on your Windows 11/10 PC. If you found this article informative and useful, then comment and let us know your thoughts on the same.


