Changing the display language on the Windows system to their regional ones is beneficial for all Windows users in a nation where the regional language has greater prominence than the English language.
With the introduction of Windows 11, Microsoft took this into consideration and integrated all conceivable languages from across the world. This makes it simple to utilise the Windows system for people who find it difficult to read and understand English.
If a user wants to change the display language on their Windows 11 system, this post will show them how to do it in a few simple steps described below.
NOTE: Before proceeding with this post, keep in mind that any system logged in with any Microsoft account will automatically synchronize the settings that have been changed on the system, with all the devices which use the same Microsoft account for login.
How to Change the Display Language on Windows 11
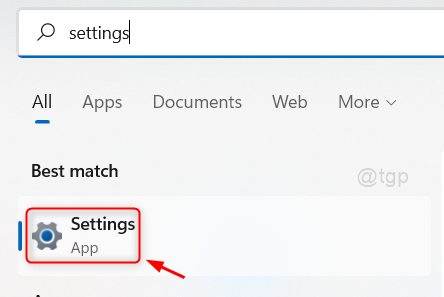
Step 1: Press the Windows key on your keyboard and type settings.
Step 2: Select the Settings app from the search results to open the Settings app on your system as shown below.

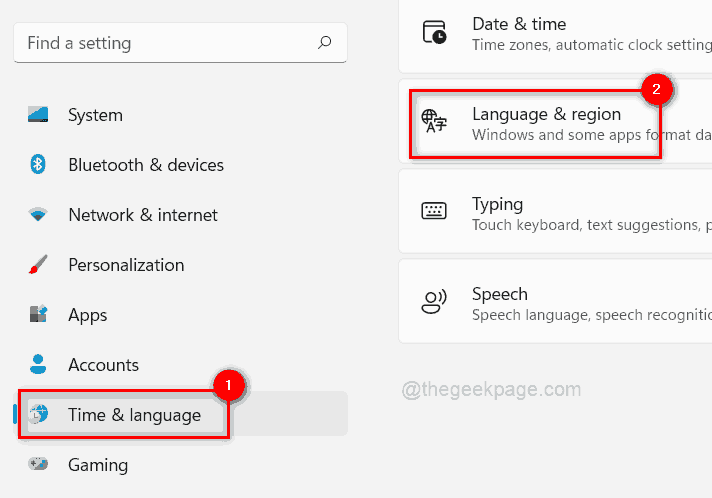
Step 3: Once the Settings app opens up, click Time & language on the left side of the Settings window.
Step 4: Then, select Language & region on the Time & language page as shown below.

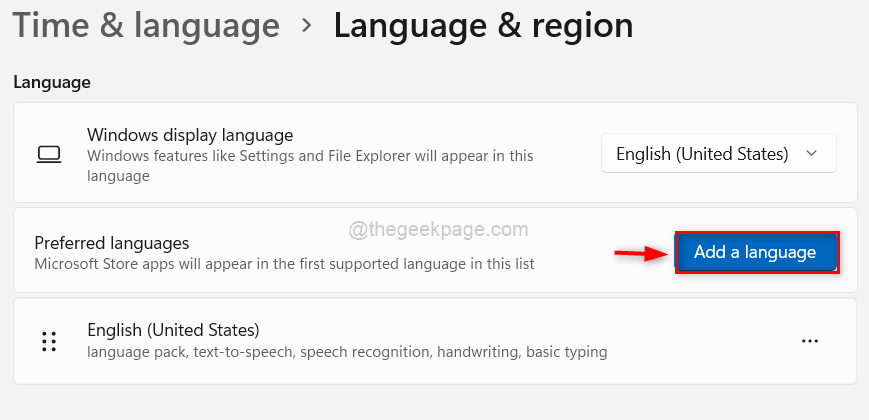
Step 5: Under Language, click Add a language button in front of the Preferred languages option.

Step 6: In the pop up window, type the language name you want to add ( for eg. Chinese) and select all the languages that you want.
Step 7: Then click Next button to proceed.

Step 8: In the Install language features window, check all the optional language features you wish to download and install.
Step 9: If you do not want to immediately set the language as display language, uncheck the Set as my Windows display language.
Step 10: Click the Install button to start downloading and installing the languages you chose.

Step 11: After it is done downloading and installing the languages, go and click on Windows display language dropdown at the top as shown below.
Step 12: Select the language which you had installed from the list.

Step 13: As soon as you select it, Windows warns the user that they need to sign out and sign in again to reflect the changes in display language. So click the Sign out button to take effect.

How to Stop Synchronizing the Languages set on Windows 11 system
If you only want to change the display language only on a Windows system and not all devices, then kindly follow the below steps.
Step 1: Press Windows + I keys together to open the Settings app on the system.
Step 2: Then, click the Accounts option on the left side menu as shown below.
Step 3: Select Windows backup on the right side of the Settings app window.

Step 4: Click on Remember my preferences option to expand it as shown in the below image.

Step 5: Finally, uncheck the Language preferences checkbox to stop synchronizing the languages setting on all other devices.

Step 6: Once done, close the settings window.
That’s all. Hereafter, any language preference will not be synced to your Microsoft Account.
That’s all guys.
Hope this article was informative. Please let us know in the comments section below.
Thank you!