Remember Windows Movie Maker on Windows 7? Microsoft hasn’t launched any genuine movie maker since discontinuing the Windows Movie Maker. On the other hand, they have tried their luck revamping the Photos app with a small, lightweight in-built video editor. After a long time, Microsoft is offering Clipchamp, a better video processor for all the Windows 11 devices out there. In this article, we are going to take a deep dive into how to get everything out of the Clipchamp app on your Windows 11 device.
How to use Clipchamp – A detailed guide
We have presented a detailed guide on how to use Clipchamp to curate your videos using different tools, stock audio-video footage, text-to-speech generator, etc.
Step 1 – Sign in to Clipchamp
You have to sign in to Clipchamp before you do anything else.
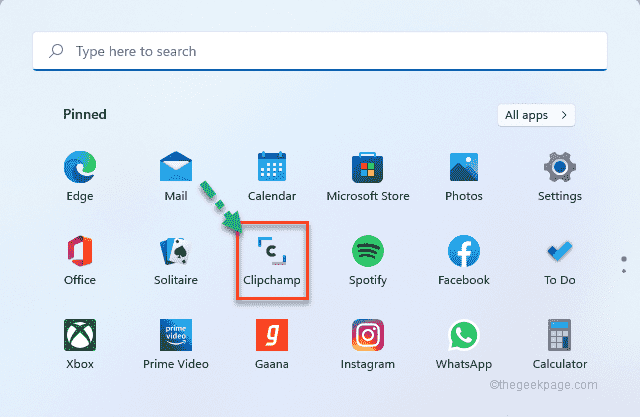
1. Press the Windows key and tap the “Clipchamp” app.
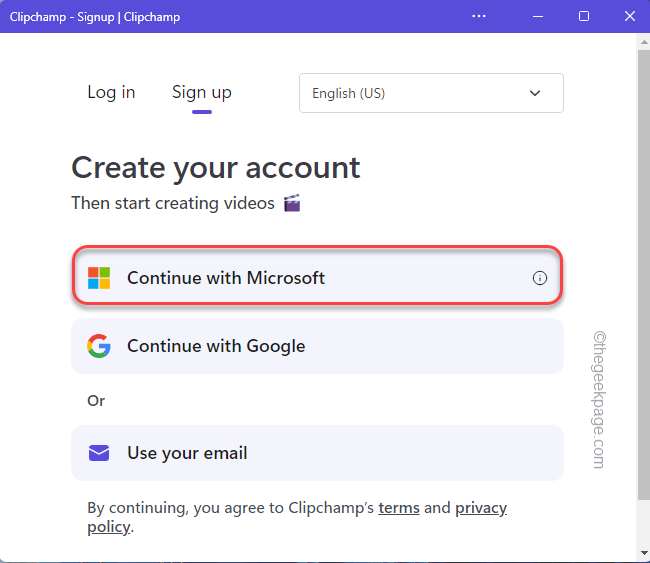
2. In the Clipchamp app, tap “Continue with Microsoft“.
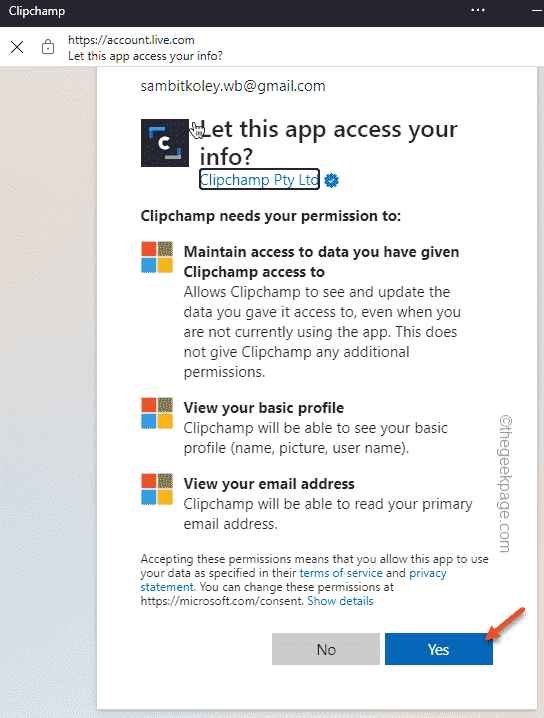
3. This will automatically detect your Microsoft ID and log in.
4. Just tap “Yes” to allow Clipchamp.
5. Now, you will be asked ‘What sort of videos bring you to Clipchamp?‘.
6. Tap “Personal“. Otherwise, you can select anything else from the options.
Step 2 – Create a new video
Now, you can edit your videos using Clipchamp.
1. In Clipchamp, click on “Create a video” on the top of the screen.
This will open up a blank screen offering all the useful accessories on the left-hand side and the main video player, timeline on the right-hand side of the screen.
2. Additionally, you can toggle the aspect ratio of your video. To do that, tap on the small rectangular box that is set to “16:9“.
3. You can choose any of the options you prefer.
Step 3 – Importing raw video file
You can import your video file to Clipchamp. Clipchamp allows an extensive range of import options.
1. Just tap on the “⊕” sign on the left-hand side.
2. Now, you will see several places where you can import files from. Even you can use the “From phone” option to import files from your phone.
Additionally, you can drag & drop your files also.
3. Tap on “Browse files” and navigate to videos files.
4. Just select the files you want and tap “Open“.
This will import your files into the Clipchamp editor.
Step 4 – Add the video files to Timeline
Once you have imported your audio, video, and image files, you can add the files to the Timeline directly.
1. Just select the video file you want to start with.
2. Then, drag and drop the file to the timeline on the bottom left portion of Clipchamp.
Timeline, as the name suggests shows the order of the clips that will be played in the video.
You can take a detailed look at the clips by zooming more into them. It allows you to edit the clips to the finer details you prefer.
3. Just tap on the “+” button to zoom in more in the timeline. And, the “–” button does just the opposite, i.e. zoom out in the timeline.
4. Additionally, there is another key that you can use to zoom in to fit the clip in the timeline.
Step 5 – Use the Viewer efficiently
The Video viewer section on the top right-hand side shows the actual video you are making.
You can resize the video viewer screen according to your preference.
1. Just select the video clip in the viewer.
You will notice four dots are visible in the four corners of the video. You can toggle the size of the video as you like.
2. Additionally, there are three distinct options to set the video file in your viewer feed.
Fit to center
Crop to fill
Picture-in-picture
You can use these three options to size the video.
This way, you can dynamically adjust the screen size.
Step 6 – Basic Editing tools
Clipchamp also includes a set of basic editing tools which you can use to trim, move and split the raw files.
Trimming –
1. Just select the video from the Timeline which you want to trim.
2. Then, you can resize the video with your mouse from both ends.
This way, you can trim a video clip.
Moving clips –
You can move and adjust your clips as you prefer.
1. Just select and drag the clip to the specific location of the timeline.
2. Even you can select multiple clips and move those. Just press & hold the “Ctrl” button while selecting the clips and then you can easily drag&drop those through the timeline.
Splitting clips –
You can split the video clips into multiple clips according to your need.
1. Select the clip from the timeline.
2. Adjust the slider in the clip from where you want to split.
2. Once you have done that, just tap on the scissor icon on the tray to split the clip into two halves.
Step 7 – Additional tools
Apart from these basic tools, you can use some additional tools to edit your videos in further detail.
1. Select the video in the Viewer area.
2. Here, you will notice several options in the top portion of the screen.
These are the various tools and their functionalities –
Layout – Control the size of the clip on the screen.
Transform – You can crop the feed or rotate it in any direction from this menu.
Additionally, you can control the opacity of the video clip.
Filters – There are multiple filters that you can apply to the video clip. Just tap on “Filters” and select any filter you prefer.
Adjust colors – Sometimes you need the color correcting tool to balance the exposure, saturation, temperature, and contrast of a clip. You can do it from here.
Fade – Fading tool can be used in the transition between the video clips.
1. Just select the clip you want to fade from the timeline.
2. Then, tap “Fade” and adjust the ‘Fade in‘ and ‘Fade out‘ time.
That’s it! You can play the clip and notice this transitional effect in between clips.
Speed –
You can adjust the speed of the clip using this option.
1. Select the clip you want to vary the speed of.
2. Then, tap “Speed” from the menu bar. After that, set it to “Fast“, “Slow“.
3. Adjust the speed.
Step 8 – Text to speech generator
This app comes with a Text to speech generator which you can use to the fullest extent.
1. Select the clip from the timeline.
2. Then, tap on the “Record & create” on the left-hand pane.
3. After that, click on “Text to speech“.
4. Now, you can select your preferred language from the ‘Language’ section.
5. After that, set the ‘Voice’.
6. Next, set the ‘Speech Speed’ to “Regular“, “Slow” or “Fast” as you prefer.
7. Just, write your ‘Text’ in the box that you want in speech format.
8. You can take a ‘Preview’.
9. After that, tap “Save to media” to save the audio file.
10. On the left-hand side, you will notice the text to speech audio file has appeared.
11. Move the file to the timeline to insert it into the Timeline.
This way, you can easily create video clips with the help of text to speech tool.
Step 9 – Use the in-built screen recorder
The most used feature of the Clipchamp app is the in-built screen recorder.
1. In the Clipchamp app, tap “Record & create” on the left-hand pane.
2. After that, tap “Screen recording“.
3. You have to allow this app to access the microphone and camera.
4. Just click on “Allow” to proceed.
5. Now, tap on the red button on the corner to start recording the screen.
6. There are multiple options that you can use to record the screen.
7. Choose your window and tap “Share” to start recording.
8. Once you are done recording the screen, click on the square symbol to end the recording.
9. After recording the video, tap on “Save & edit” to start editing the video.
After that, close Clipchamp and test.
Step 10 – Add stock music, video & images
You can add stock music, video, and images directly to your video clips.
1. Just tap on “Stock video” on the left-hand pane.
2. You will notice the stock video clips. Just, select the clip and drag it directly to the timeline.
3. Same way, tap “Music & VFX” on the left-hand pane.
4. Just, select the music or video effect you like and drag it to the clip you want.
5. Now, select the audio file from the timeline.
6. Then, tap on “Fade” and toggle the ‘Fade in’ and ‘Fade out’ according to your preference.
This way you can add video, images, and audio tracks to the video clips.
Step 11 – Add text
You can add text to the video as you prefer.
Adding Text file –
1. On the left-hand pane, tap “Text“.
2. After that, choose the particular text style and drag it to the Timeline as you like.
Editing the text –
1. Select the text file in the timeline.
2. Then, tap on “Text” on the menu bar. Now, write the thing you want to appear in the ‘TEXT’ box.
3. Additionally, you can set the ‘FONT’ and ‘ALIGNMENT’ respectively.
Changing Colors and Filters –
1. Select “Colors” from the menu.
2. Now, you can click on ‘Primary Color’ and set the color you want.
3. Additionally, click on “Filters” and you can choose any filter from the extensive list of filters available there.
Besides this, you can use the Adjust colors, Fade effect to add more details to the text.
Step 12 – Adding Graphics & Overlays
Clipchamp offers an extensive range of graphics and overlay tools that you can use.
1. Just tap on “Graphics” in the left-hand pane.
2. Here are four distinct options that you may use –
Backgrounds – You can use these backgrounds in your clips.
Overlays – Overlays can be used extensively.
GIPHY – This offers short animated GIFs directly from GIPHY.
Stickers – Various types of stickers.
3. Tap on the arrow button in ‘Stickers’ and tap on the “See more>“.
4. Now, you can search for a sticker using the search box.
5. Then, drag the file to add it to the timeline.
6. You can adjust the size of the sticker easily. Just tap on it and you can resize it from the four corners.
7. Apart from that, you can also control the span directly from the timeline.
Step 13 – Add Transitions
Transitions play a very crucial role in the video-making process.
1. Go to the “Transitions” tab on the left pane.
2. All the list of transitions should be visible here. Just select a transition from the list and drag it to the intersection point (+) of two slides.
This will create the transition.
3. You can further control the duration of the transition.
4. Select the transition from the timeline. Then, tap on “Duration” and toggle the time to anything you prefer.
This way, you can add more transitions to the video clips as you want.
Step 14 – Export the video
Finally, it is time to export the final video.
1. Once you have finished editing the video, tap “Export“.
2. Tap “480p” from the drop-down.
You may choose other qualities but for that, you have to opt for the premium plans. Only 480p export quality is available for free.
Let Clipchamp render the video.
3. Click on the pen sign to rename the file.
4. Once it is done rendering, tap “Save to computer“.
5. Now, you should get the final result.
Additional features –
Apart from these features, there are some additional features that can come in quite handy.
1. Creating Brand kits
There is a very useful tool that you can use to create your brand font, logo, colors.
But this is a premium feature that is available only in plans above the Business level.
2. Ready-made templates
There are several ready-made templates that you can easily use to create quick videos for several themes.
This way, you can use Clipchamp and quickly edit your videos on your new Windows 11 device.


