Before you learn how to clear a system restore point in your Windows 11 PC system, you must know what it is. A restore point is what you create to help your PC revert back to a previous working state. This is especially helpful when you troubleshoot an error on your system and none of the solutions can fix the issue. Therefore, when you have no option left, you can roll back your OS to a certain time and date when your system was working fine, using the system restore point you created earlier.
This process helps you save a lot of time and money. However, the downside is, a system restore point can occupy a considerable amount of disk space and hence, slow down your PC performance, if it runs low on memory. In such a case, it’s wise to clear the system restore point to increase the memory. However, this process is not recommended in usual circumstances, since a restore point is the only option to help your PC get back to working state in case it runs into any issues. It is rather advised to expand your system memory with additional RAM and not delete the restore point.
However, if you are not in a situation to expand the system memory, you may consider deleting the system restore point on your Windows 11 PC. In this post, we will show you how to:
How to Delete All Restore Points and Previous Version Files in Windows 11
This method will guide you on how to remove a system restore point to free up space in your Windows 11 PC. However, before you proceed, make sure that you try to expand the memory instead of deleting the restore pint, since, in situations where your PC cannot be repaired with any other method, the restore point comes to your rescue. Or else, you end up reset Windows or re-install the Windows OS.
In case, you do not have an option to expand the memory, you can proceed with the below instructions:
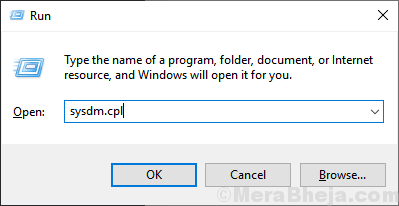
Step 1 – Press Windows key + R together to open run.
Step 2 – Write sysdm.cpl in it and click OK.

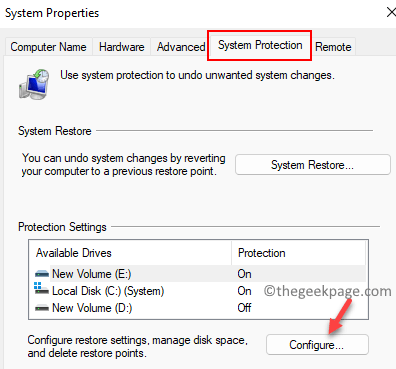
Step 3: In the System Properties dialogue box that opens, Click on System Protection tab
Step 4: Now, press the Configure button towards the bottom.

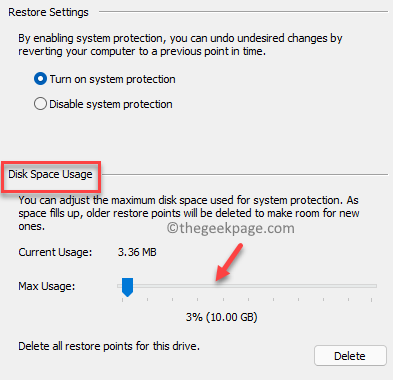
Step 5: Now, in the next dialogue box that opens, go to the Disk Space Usage section and move the slider accordingly to assign the storage space for your restore points.
If your system is running low on memory, simply move the slider to the extreme left to decrease the space being used.
Step 6: However, if you want to simply delete the restore points, press the Delete button below and all your system restore points will be removed.
Step 7: Press Continue in the pop up to confirm the action.
Once the restore points are deleted, you will see a confirmation prompt – The restore points were deleted successfully.
This will clear all the old system restore points from your Windows 11 PC and also any related system settings or the older versions of files
How to Delete Most Recent Restore Points
However, if you simply want to delete the most recent restore point, you can do so by using the Disk Cleanup tool. Let’s see how:
Step 1: Go to Start, right-click on it and select Run.
Step 2: This will open the Run command window.
In the search bar, type cleanmgr and press OK to open the Disk Clean-up : Drive Selection dialogue box.
Step 3: Select your system drive (usually C:) from the drop-down and press OK to open the Disk Clean-up dialogue box.
Step 4: In the Disk Clean-up window, go to the bottom and press the Clean up system files button.
Step 5: This will again open the Disk Clean-up : Drive Selection prompt.
Again select the system drive (usually C:) from the drop-down and press OK.
Step 6: In the Disk Clean-up for (C:) window, go to the More Options tab.
Next, go to the System Restore and Shadow Copies section.
Click on the Clean up button below.
Once done, press Apply and then OK.
Now, the most recent system restore points on your Windows 11 PC are deleted successfully.

