Every WiFi access point has a maximum limit to the devices you can connect. When enough devices have connected to it, it will show up “Access point temporarily full” message when you try to connect to it. Whether it is a mobile hotspot or a router, you can’t connect to it unless you have disconnected a few of those already connected devices. We have discussed these solutions in detail so that you can get a swift resolution.
Fix 1 – Disconnect other devices
The number of connected devices is limited in all the access points. So, the quickest way to resolve the issue is to disconnect any unnecessary devices connected to the access point.
Step 1 – Switch off the WiFi on other devices.
Step 2 – If you don’t know which devices are connected, you may follow these steps –
For mobile hotspots –
Step 1 – On your phone, slide down the notification shade.
Step 2 – Hold down the hotspot on your phone to open the hotspot settings.
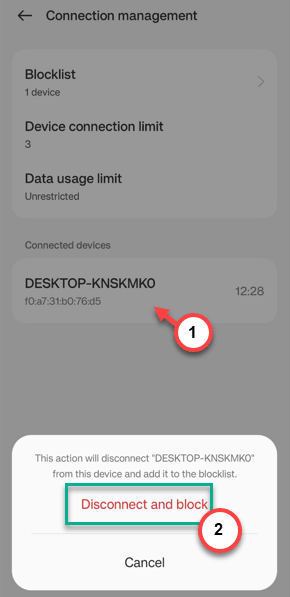
Step 3 – Go to the “Connection management” menu to open the list of devices connected to the hotspot.
Step 4 – From there, you can also block the unnecessary connections.
For normal router –
If you are having trouble connecting to a normal router, you can block any unwanted device by following these instructions –
Step 1 – In a browser, open the WiFi setup page (It is mentioned in the back of the router).
Step 2 – Use the user ID, and password to log in properly.
Step 3 – After this, open the “Clients” settings.
Step 4 – You will see the list of devices connected to the access point.
Step 5 – You can either manually disconnect all those unnecessary devices or, you can just block the client device in there.
After disconnecting the devices, try reconnecting to that access point and test.
Fix 2 – Increase the limit of the connected devices
You can increase the limit of the connected devices on your device. Normally, this setting is different on different router devices (like on some routers, it is ‘IP & MAC Binding’, while the same thing is called ‘MAC Address filtering’), you can change the settings.
Steps for phone hotspot users –
Step 1 – Start by sliding down the notification shade.
Step 2 – After this, hold down the hotspot in there.
The hotspot settings will load up in no time.
Step 3 – Open the “Connection management” menu.
Step 4 – As the Connection management page loads up, tap the “Device connection limit“.
Step 5 – Adjust it to the highest number from there and click “Confirm“.
After this, retry connecting to the same access point once more.
Check if this helps!
Fix 3 – Use a different network bandwidth
Too many devices on the same bandwidth of connection may cause this problem. Opting for a different network bandwidth may resolve the issue.
[NOTE – This solution may work if your WiFi router or mobile hotspot supports dual-band. It means that it must support both the 2.4 GHz and 5 GHz bandwidth.]
Step 1 – Log into your router settings on a browser page.
Step 2 – Use the password to sign in to the router administrator page.
Step 3 – When you do sign in to the router page, open the “Wireless” settings.
Step 4 – Now, if you scroll down, you will find the settings for both the “2.4 GHz” and “5GHz” bands.
Step 5 – Enable both the bands.
After enabling both the bands, go back to the system.
Step 6 – Click the WiFi icon once. Now, connect to the 5 GHz band and retry to reconnect to the network.
You will get connected to the network successfully. You won’t get the “Access point temporarily full” message.
Fix 4 – Check the WiFi adapter
The problem can be associated with the WiFi adapter itself. Disable the WiFi adapter and re-enable the WiFi adapter.
Step 1 – Quickly, tap the Win+X buttons.
Step 2 – Later, open the “Device Manager” from the same context menu.
Step 3 – When the Device Manager opens up, expand the “Network adapters“.
Step 4 – Later, right-click the network adapter you are using and click “Disable device“.
Step 5 – After disabling the device, right-click the same device and tap “Enable device“.
After this, retry connecting to the same network connection once more.
Fix 5 – Run a network reset
Run a network reset to reset the complete network configuration on your system.
NOTE – Resetting the network means all the network-related information will be removed from your computer. Everything will be cleared off, starting from the network settings, configuration, and SSID to network adapters.
Step 1 – If you hold the Win+I buttons together, the Settings panel opens up.
Step 2 – Open the “Network & Internet” settings.
Step 3 – On the right-hand pane, open the “Advanced network settings” option.
Step 4 – Scroll down enough to find the ‘More settings’ tab, and open the “Network reset” setting to open that.
Step 5 – In the following Network Reset page, click the “Reset” now” button.
Step 6 – A warning message will show up. Tap “Yes” to reset it.
As everything is reset, you have to connect to the access point using the WiFi password.
Check if this offers any help.

