Though you use the Microsoft Outlook as your daily mail driver, you may not know how much temporary storage those emails takes up. You should definitely clear it up as it does take up quite a lot of free space on your device. This stored up data may induce bugs or glitches in the MS Outlook. So, you should clear the Outlook cache every once in a while.
NOTE – This won’t delete any of your emails. So, go ahead without any worries.
Way 1 – Do it from the Outlook app
You can clear the Auto-complete sets from the MS Outlook.
Step 1 – Open Outlook and visit the “File” tab.
Step 2 – Go to “Options“.
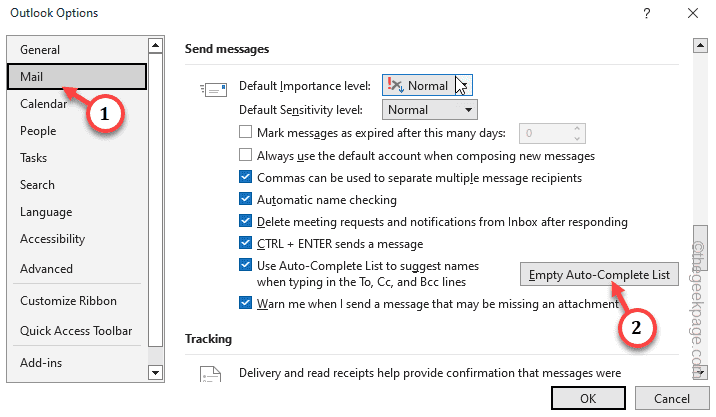
Step 3 – Go to the “Mail” tab.
Step 4 – On the other part of the panel, go to the ‘Send Messages’ section. Tap the “Empty Auto-Complete list” option.
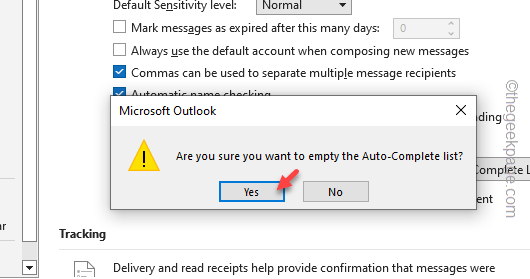
Step 5 – Confirm it with a click on “Yes“.
This process clears the Outlook cache on your device.
Way 2 – Remove the Roamcache directory
You should remove the Roamccache folder completely from your File Explorer.
STEP 1
You do have to unhide the hidden folders on your system.
Step 1 – You have to unhide the system folders. So, hold the Win+R keys briefly.
Step 2 – Paste this code in the Run tab and hit Enter.
control folders
Step 3 – Go straight to the “View” tab in Folder Options window.
Step 4 – Tick mark the “Show hidden files, folders and drives” tab.
Step 5 – Save the changes.
STEP 2
Now, go ahead and clear the Outlook cache on your system.
Step 1 – To do this, first, load the File Explorer. Hold the Win+E keys quickly.
Step 2 – Travel through the files following this path –
%localappdata%\Microsoft\Outlook\RoamCache
Step 3 – There should be one or multiple files there. Select all the files at once and press the Delete key to remove them all.
This way, you can easily clear the Outlook cache.
Way 3 – Remove the cache using powershell
If you don’t want to get into the File Explorer, use the PowerShell for the cleanup of the MS Outlook cache.
Step 1 – Just type “powershell” after hitting the Start button once.
Step 2 – Next, right-tap the “PowerShell” and click “Run as administrator“.
Step 3 – Copy-paste this line there and hit Enter.
Remove-Item "C:\Users$env:UserName\AppData\Local\Microsoft\Windows\INetCache\Content.Outlook\*" -Recurse -Force
Next, terminate the PowerShell window and restart the computer.
This way, you can clear the Outlook cache without any difficulties.


