Many windows users using TeamViewer for video conferencing, calls, and chats have reported that they are unable to connect to TeamViewer and encountered an error message which reads as,
Not Ready.Please Check your Connection.
This error message is seen at the bottom of the TeamViewer window with a red light against it. This issue occurs due to various reasons like bad internet connectivity, old outdated Teamviewer software, Firewall or Antivirus issues, broken winsock settings. If you’re also facing the same issue with TeamViewer, do not worry. Try these easy fixes stated below to resolve the issue.
Fix 1: Change the DNS address
If the above fix does not resolve your problem, try to change the DNS address that you are using currently. To change the DNS address follow the steps given below,
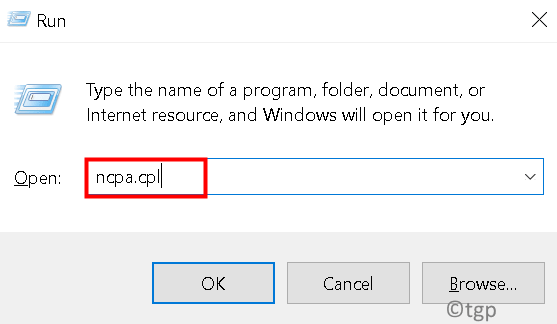
Step 1: Simultaneously, press the Win + R keys to open the Run Window.
Step 2: Type ncpa.cpl and hit Enter.
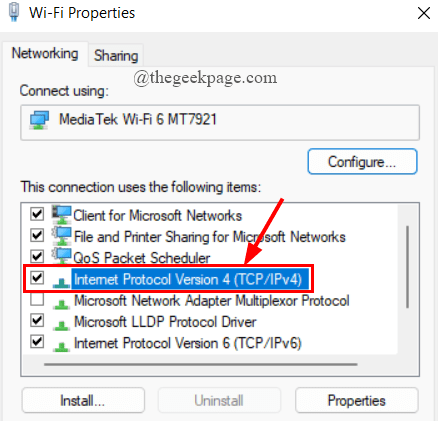
Step 3: Right-click on your current network ( Wifi or Ethernet), and click on Properties.
Step 4: Now, double-click on Internet Protocol Version 4 (TCP/IPv4).
Step 5: Under the General tab, tick the radio button against Use the following DNS server addresses.
Step 6: Now, change the Preferred DNS to 8.8.8.8 and Alternate DNS to 8.8.4.4. Next, tick the box against Validate settings upon exit and click on OK.
Step 7: Open the TeamViewer to see if the error is resolved.
Step 8: If not, right-click on the network connection and click on Disable.
Step 9: After a few seconds, again right-click on the network connection and click on Enable. This should resolve your error.
Fix 2: Reset Winsock
TeamViewer Not Ready Check your connection error can occur because of corrupted settings of winsock. Winsock contains your system’s internet connectivity configuration. You simply need to reset winsock to solve the TeamViewer error. This is done as below,
Step 1: Simultaneously, press the Win + R keys to open the Run Window.
Step 2: Type cmd and press Cltr+Shift +Enter to open the command prompt as admin.
Step 3: User Account Control will ask for permission, click Yes.
Step 4: Now, copy-paste the given commands one after the other in the terminal and hit Enter.
netsh winsock reset
netsh int ip reset
Step 5: Now, Restart your system to complete the reset. Open Team Viewer and check.
Fix 3: Configure no Proxy
1: In TeamViewer , Click on Gear shaped Setting Icon located at top right.

2: Now, Click General from left menu
3: Now, Click on Configure located at the right of Proxy settings

4: Now, Choose No proxy and Click Ok. Restart TeamViewer.

Fix 4: Disable New User Interface in TeamViewer
Step 1: Open TeamViewer by double-clicking on the Desktop icon.
Step 2: Click on Gear shaped Setting Icon located at top right.

Step 3: Next, click on Advanced > Show Advanced options.
Step 4: Now, uncheck the box against Use New User Interface and click on OK.
Step 5: Reopen TeamViewer and check.
Fix 5: Delete TeamViewer entries from Host File
Step 1: Navigate to the address given below to open the Etc folder.
C:\Windows\System32\drivers\etc
Step 2: In the Etc Folder, right-click on the hosts file to open with Notepad.
Step 3: Now, Check for ” #TeamViewer ” entries, and delete everything under this.
Step 4: Once you delete all the TeamViewer entries, save the changes that you made in the hosts file by clicking on File > Save.
Step 5: Restart your system and see if the error is resolved.
Fix 6: Allow TeamViewer in Windows Defender Firewall
Sometimes, Windows Firewall may not allow TeamViewer to connect to the internet, as the private networks will not allow this. You need to change the options so that private networks will also allow Teamviewer to connect.
Step 1: In the taskbar Search box, type Windows Defender Firewall and hit Enter.
Step 2: On the left side, click on Allow an app or feature through Windows Defender Firewall.
Step 3: Click on Change Settings.
Step 4: Scroll down to select Teamviewer and tick the box under Private and click on OK.
Step 5: Restart your system and open TeamViewer to check.
Fix 7: Allow TeamViewer as an Exception in Third-party antivirus
If you are using a third-party antivirus tool in your system, then you must add an exception to the TeamViewer service file while scanning, as some of the antivirus tools fail to acknowledge TeamViewer to connect to the internet. ( Here, I am using Norton Security )
Step 1: Open the antivirus tool. Here, Norton Security is opened by double-clicking on the icon as shown.
Step 2: In the search tab, type Exclusions and click on Process Exclusions.
Step 3: Now, click on Add.
Step 4: Browse to select TeamViewer.exe file, click on Add.
Step 5: Click on Apply and close the Antivirus Window.
Step 6: Restart your system and open Team Viewer to check.
Fix 8: Disable IPv6
If the IPv6 network connection in your system is broken, this may also cause the TeamViewer error. You must disable IPv6 connectivity on your system to resolve the issue. To do this,
Step 1: Simultaneously, press the Win + R keys to open the Run Window.
Step 2: Type ncpa.cpl and hit Enter.
Step 3: Right-click on your current network ( Wifi or Ethernet), and click on Properties.
Step 4: Now, uncheck the box against Internet Protocol Version 46(TCP/IPv6) and click on OK.
Step 5: Restart your system and open TeamViewer to check.
Fix 9: Check the proxy settings
At times, even though when we do not use a proxy server or Firewall, you will still encounter the error. This can be solved by disabling the proxy server. To do this,
Step 1: In the taskbar Search box, type Control Panel and hit Enter.
Step 2: Click on Network and Internet.
Step 3: Next, click on Internet Options.
Step 4: Under the Connections tab, click on LAN Settings.
Step 5: Now, uncheck the box against Use Proxy Server for your LAN and click OK.
Fix 10: Delete TeamViewer Processes
Sometimes, simply deleting all the TeamViewer processes in the Task Manager can help resolve your issue. You can try this workaround and check. To do this,
Step 1: Press Win +X keys and click on Task Manager.
Step 2: In the Processes tab, scroll down to select TeamViewer.
Step 3: Right-click on it and select End Task.
Fix 11: Restart TeamViewer
Step 1: Simultaneously, press the Win + R keys to open the Run Window.
Step 2: Type services.msc and hit Enter.
Step 3: Scroll down to select TeamViewer, right-click on it to select Properties.
Step 4: Under the General tab, if TeamViewer is running, click on Stop.
Step 5: Now, select Automatic in the Startup type, click on Start and click on Apply.
Fix 12: Reinstall TeamViewer
If all the above fixes and workarounds do not help you in fixing the TeamViewer Could not Connect error, you should reinstall your TeamViewer tool. To do this,
Step 1: In the taskbar Search box, type Apps & Features and hit Enter.
Step 2: Select TeamViewer, click on 3-dots and click Uninstall.
Step 3: Download the latest version of TeamViewer and install it by following the on-screen instructions. You can download the latest version of TeamViewer here.
That’s all.
Hope this article is useful. Comment and let us know which fix helped you.
Thanks for Reading.

